---
title: Your first widget with AI
slug: bar/dev/widget-with-ai
description: Create dynamic widgets for BUSY Bar with AI, even if you have no prior programming experience
image: https://cdn.images.archbee.com/3StCFqarJkJQZV-7N79yY/_yXkFNx6i7dFAHb1A7ul4_busy-docs-prev.jpg
createdAt: 2026-06-10T10:35:43.207Z
---
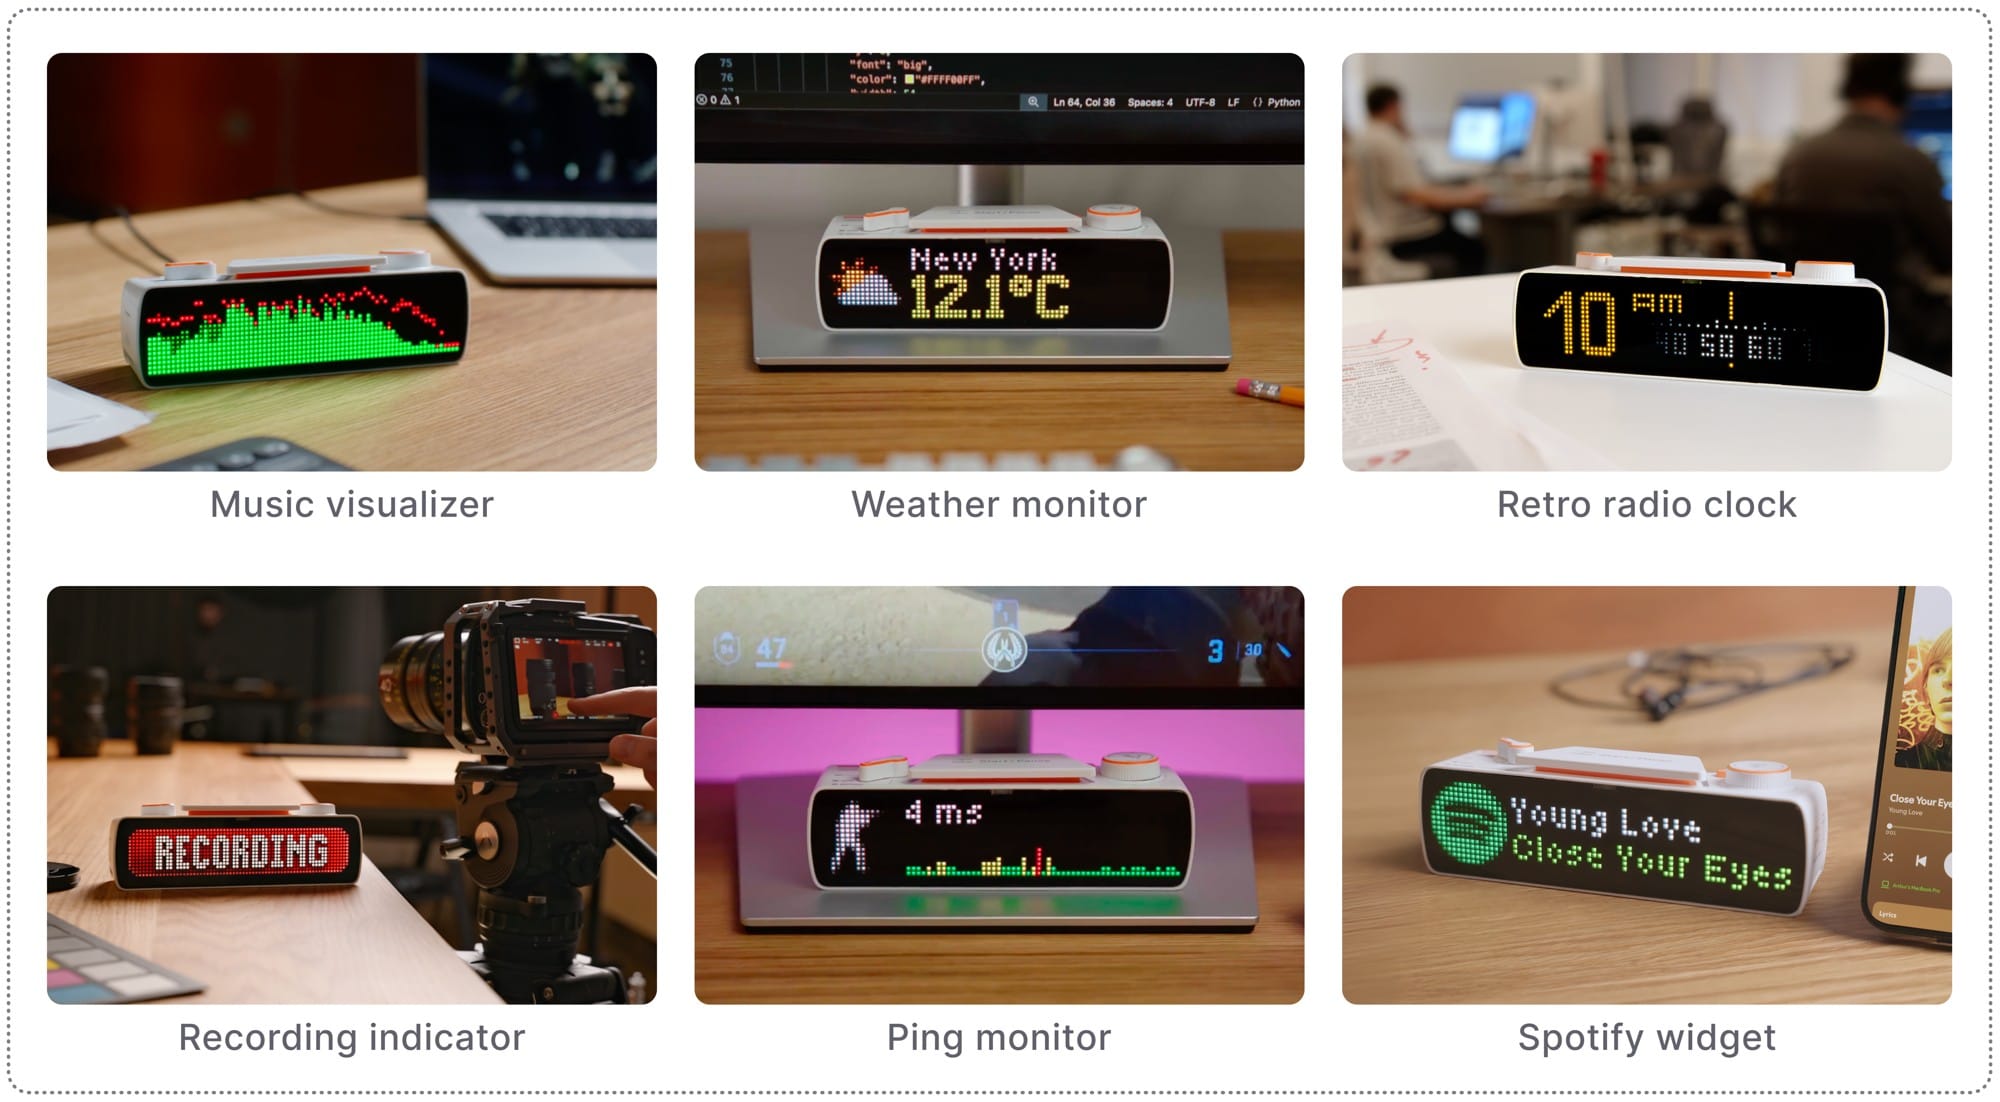
The [HTTP API](docId\:H4whpEXTNlYjSR9PlxsAr) page describes the BUSY Bar HTTP API for developers. It’s for people who already work with HTTP APIs or want to learn how to use them.
This page shows how you can create dynamic widgets for BUSY Bar with AI, even if you have no prior programming experience. You might be surprised how easy it is to build a widget with just a few prompts — and BUSY Bar users are already creating their own this way.
***
# What is a widget
A widget is a program that runs on a separate computer, Raspberry Pi, or router, rather than on the BUSY Bar itself. Unlike on-device apps, widgets send information to BUSY Bar screens through USB, Wi-Fi, or the internet using the BUSY Bar HTTP API.
In terms of the HTTP protocol, the BUSY Bar acts as an **HTTP Server**, listening for incoming requests from an **HTTP Client** — your widget.

***
# What you need to create a widget
You‘ll need:
- **A PC or laptop** where the widget code will run. Later, you can run the same code on a single-board computer, server, or even some routers.
- **A BUSY Bar** connected to your PC via USB or Wi-Fi. USB is more convenient for testing because it doesn‘t require authentication.
- **An AI assistant** powered by a modern LLM, such as ChatGPT, Claude, Gemini, or others. A free plan is usually enough. Agent mode is preferred, but Chat mode works too.
***
# How to create a widget with AI
In this section, we‘ll create three simple widgets: a clock widget, a weather widget, and a ping monitor. You can use the same approach to build your own widget ideas.
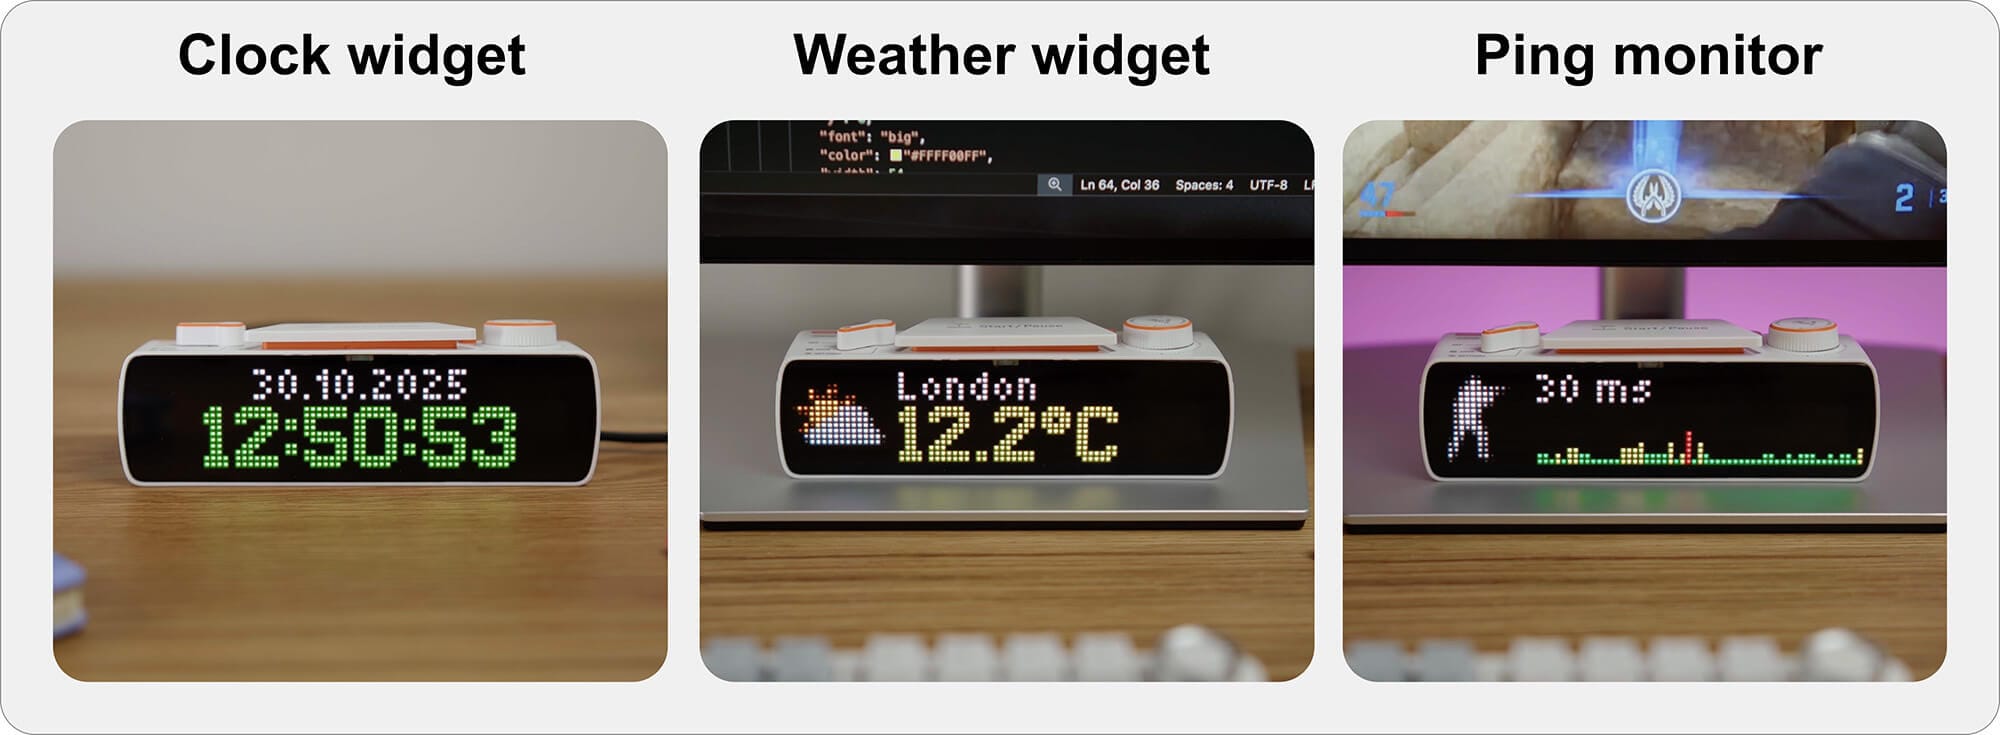
The whole process takes just a few steps. No special knowledge is required, so you can get started as soon as you have an idea for a widget.
***
## Step 0\: Teach the AI to work with BUSY Bar
First, let‘s teach the AI how to use the HTTP API or the busylib library to interact with BUSY Bar. This includes displaying images and text, playing sounds, and responding to button presses on the device.
:::hint{type="info"}
AI assistants are getting better at working with the BUSY Bar HTTP API all the time. By the time you read this, your AI assistant may already know the API well enough to skip this step. Still, it’s worth doing.
:::
The easiest way is to provide the API description in the standard OpenAPI format.
Follow these steps:
:::::WorkflowBlock
:::WorkflowBlockItem
Connect BUSY Bar to your PC via USB.
:::
:::WorkflowBlockItem
Download the `openapi.yaml` file from [http://10.0.4.20/openapi.yaml](http://10.0.4.20/openapi.yaml).
:::
::::WorkflowBlockItem
Send the file to your AI agent with this message:
:::BlockQuote
I have a device with an LED display that supports an HTTP API. The device is available at 10.0.4.20.
:::
::::
:::::
That‘s it. The AI agent now knows how to work with BUSY Bar, and you can start describing your widget idea.
***
## Creating a clock widget
To start, let’s create a simple clock with the date — a good way to get familiar with the process. The time and date will come from your PC and update on the BUSY Bar every second. We’ll display the time in a large font so it’s easy to read at a glance.
### Step 1\: Displaying time and date
****:inlineImage[]{src="https://api.archbee.com/api/optimize/3StCFqarJkJQZV-7N79yY/yPYou_IvFTPCs14UbA_W0_prompt-bubble.png" alt caption width="96" height="96"} **AI prompt: **
:::BlockQuote
Make a Python script, displaying the date (in small font) and the time (in large font), horizontally centered on the screen. Date format: dd.mm.yyyy.
:::
The AI wrote a Python script. Save it as a `.py` file, then run it in the terminal with `python file.py` (Windows) or `python3 file.py` (Linux/macOS).
:inlineImage[]{src="https://api.archbee.com/api/optimize/3StCFqarJkJQZV-7N79yY/PomrFi0zymINgYw7Mzng0_script-icon.png" alt caption width="96" height="96"}** Script:**
:::ExpandableHeading
*Click here to expand the block with the script code *:inlineImage[]{src="https://api.archbee.com/api/optimize/3StCFqarJkJQZV-7N79yY/BnDmvlxd6fDnLVlZlpBnN-20260615-181604.png" alt caption width="96" height="96"}
```python
import requests
from datetime import datetime
DEVICE_IP = "10.0.4.20"
APP_ID = "my_app"
# Get current date and time
now = datetime.now()
date_str = now.strftime("%d.%m.%Y")
time_str = now.strftime("%H:%M:%S")
# Screen width in pixels
SCREEN_WIDTH = 72
# Font widths in pixels per character
FONT_WIDTHS = {
"small": 4,
"medium": 5,
"big": 7
}
def center_x(text, font):
text_width = len(text) * FONT_WIDTHS[font]
x = max((SCREEN_WIDTH - text_width) // 2, 0)
return x
# Prepare JSON payload
payload = {
"application_name": APP_ID,
"elements": [
{
"id": "date",
"type": "text",
"text": date_str,
"x": center_x(date_str, "small"),
"y": 0, # top row
"font": "small",
"color": "#FFFFFFFF", # white
"width": SCREEN_WIDTH,
"scroll_rate": 60,
"timeout": 6
},
{
"id": "time",
"type": "text",
"text": time_str,
"x": center_x(time_str, "big"),
"y": 6, # leaving 1px margin from date
"font": "big",
"color": "#FFFFFFFF", # white
"width": SCREEN_WIDTH,
"scroll_rate": 60,
"timeout": 6
}
]
}
# Send the request
response = requests.post(f"http://{DEVICE_IP}/api/display/draw", json=payload)
if response.ok:
print("Date and time displayed successfully!")
else:
print("Failed to display:", response.text)
```
:::
****:inlineImage[]{src="https://api.archbee.com/api/optimize/3StCFqarJkJQZV-7N79yY/6hddwgN3zvscmejXaKUZA_ai-result-icon.png" alt caption width="96" height="96"} **Result: **

Not bad, but this is actually... just a static image. Let’s ask the AI to make the clock run, fix the horizontal alignment, and add some colors.
### Step 2\: Running clock, alignment, and colors
:inlineImage[]{src="https://api.archbee.com/api/optimize/3StCFqarJkJQZV-7N79yY/yPYou_IvFTPCs14UbA_W0_prompt-bubble.png" alt caption width="96" height="96"}**AI prompt: **
:::BlockQuote
Make the clock run continuously without turning off. The text is not centered, shift it 3 pixels to the right. Display the time in light green.
:::
:inlineImage[]{src="https://api.archbee.com/api/optimize/3StCFqarJkJQZV-7N79yY/PomrFi0zymINgYw7Mzng0_script-icon.png" alt caption width="96" height="96"}** Script:**
:::ExpandableHeading
*Click here to expand the block with the script code *:inlineImage[]{src="https://api.archbee.com/api/optimize/3StCFqarJkJQZV-7N79yY/BnDmvlxd6fDnLVlZlpBnN-20260615-181604.png" alt caption width="96" height="96"}
```python
import requests
from datetime import datetime
import time
DEVICE_IP = "10.0.4.20"
APP_ID = "my_app"
# Screen width in pixels
SCREEN_WIDTH = 72
# Font widths in pixels per character
FONT_WIDTHS = {
"small": 4,
"medium": 5,
"big": 7
}
def center_x(text, font, shift=0):
text_width = len(text) * FONT_WIDTHS[font]
x = max((SCREEN_WIDTH - text_width) // 2 + shift, 0)
return x
while True:
now = datetime.now()
date_str = now.strftime("%d.%m.%Y")
time_str = now.strftime("%H:%M:%S")
payload = {
"application_name": APP_ID,
"elements": [
{
"id": "date",
"type": "text",
"text": date_str,
"x": center_x(date_str, "small", shift=3),
"y": 0,
"font": "small",
"color": "#FFFFFFFF", # white
"width": SCREEN_WIDTH,
"scroll_rate": 60,
"timeout": 0 # 0 = continuous display
},
{
"id": "time",
"type": "text",
"text": time_str,
"x": center_x(time_str, "big", shift=3),
"y": 6,
"font": "big",
"color": "#AAFF00FF", # light green
"width": SCREEN_WIDTH,
"scroll_rate": 60,
"timeout": 0
}
]
}
try:
response = requests.post(f"http://{DEVICE_IP}/api/display/draw", json=payload)
if not response.ok:
print("Failed to update display:", response.text)
except Exception as e:
print("Error:", e)
time.sleep(1)
```
:::
****:inlineImage[]{src="https://api.archbee.com/api/optimize/3StCFqarJkJQZV-7N79yY/6hddwgN3zvscmejXaKUZA_ai-result-icon.png" alt caption width="96" height="96"} **Result: **
:::Iframe{iframeHeight="0" code=""}
:::
****
That’s it — widget built in just three prompts.
The only note is that different characters, such as 1 and 5, have different widths, so the AI can’t center text perfectly. We’ll add horizontal and vertical text alignment in a future HTTP API update to solve this.
***
## Weather widget
Now, let’s build a weather widget. It’ll get weather data from public online sources and display the weather icon, city name, and temperature for multiple cities on BUSY Bar.
### Step 1\: Displaying the weather
****:inlineImage[]{src="https://api.archbee.com/api/optimize/3StCFqarJkJQZV-7N79yY/yPYou_IvFTPCs14UbA_W0_prompt-bubble.png" alt caption width="96" height="96"}**AI prompt: **
:::BlockQuote
Create a script that sequentially displays the weather for 3 cities: Dubai, London, New York, with a 3-second interval. Get the weather from public sources that don’t require registration.
:::
:inlineImage[]{src="https://api.archbee.com/api/optimize/3StCFqarJkJQZV-7N79yY/PomrFi0zymINgYw7Mzng0_script-icon.png" alt caption width="96" height="96"}** Script:**
:::ExpandableHeading
*Click here to expand the block with the script code *:inlineImage[]{src="https://api.archbee.com/api/optimize/3StCFqarJkJQZV-7N79yY/BnDmvlxd6fDnLVlZlpBnN-20260615-181604.png" alt caption width="96" height="96"}
```python
import time
import requests
# Device info
DEVICE_IP = "10.0.4.20"
APP_ID = "weather_app"
# City list with coordinates
cities = [
("Dubai", 25.2048, 55.2708),
("London", 51.5074, -0.1278),
("New York", 40.7128, -74.0060),
]
def get_weather(lat, lon):
# Using Open‑Meteo API to get current weather
url = (
f"https://api.open-meteo.com/v1/forecast?"
f"latitude={lat}&longitude={lon}¤t_weather=true"
)
resp = requests.get(url, timeout=10)
resp.raise_for_status()
j = resp.json()
cw = j.get("current_weather", {})
temp = cw.get("temperature")
wind = cw.get("windspeed")
# weathercode is numeric; you might map it to text, but for simplicity:
code = cw.get("weathercode")
return temp, wind, code
def display_text(text, timeout=6, font="medium", width=72, scroll_rate=60, color="#FFFFFFFF"):
payload = {
"application_name": APP_ID,
"elements": [
{
"id": "text0",
"timeout": timeout,
"type": "text",
"text": text,
"x": 0,
"y": 3,
"font": font,
"color": color,
"width": width,
"scroll_rate": scroll_rate,
}
]
}
url = f"http://{DEVICE_IP}/api/display/draw"
resp = requests.post(url, json=payload, timeout=10)
resp.raise_for_status()
return resp
def main_loop():
while True:
for city, lat, lon in cities:
try:
temp, wind, code = get_weather(lat, lon)
# Create a display string
text = f"{city}: {temp:.1f}°C, wind {wind:.1f} km/h"
except Exception as e:
text = f"{city}: weather error"
print("Error fetching weather for", city, ":", e)
print("Displaying:", text)
display_text(text)
time.sleep(3) # 3‑second pause before next city
if __name__ == "__main__":
main_loop()
```
:::
****:inlineImage[]{src="https://api.archbee.com/api/optimize/3StCFqarJkJQZV-7N79yY/6hddwgN3zvscmejXaKUZA_ai-result-icon.png" alt caption width="96" height="96"} **Result:**
:::Iframe{iframeHeight="0" code=""}
:::
The script is successfully retrieving data, yet everything moves too fast to read. Let’s fix that.
### Step 2\: Improving the interface
****:inlineImage[]{src="https://api.archbee.com/api/optimize/3StCFqarJkJQZV-7N79yY/yPYou_IvFTPCs14UbA_W0_prompt-bubble.png" alt caption width="96" height="96"}**AI prompt: **
:::BlockQuote
Create a script that sequentially displays the weather for 3 cities: Dubai, London, New York, with a 3-second interval. Get the weather from public sources that don’t require registration.
:::
:inlineImage[]{src="https://api.archbee.com/api/optimize/3StCFqarJkJQZV-7N79yY/PomrFi0zymINgYw7Mzng0_script-icon.png" alt caption width="96" height="96"}** Script:**
:::ExpandableHeading
*Click here to expand the block with the script code *:inlineImage[]{src="https://api.archbee.com/api/optimize/3StCFqarJkJQZV-7N79yY/BnDmvlxd6fDnLVlZlpBnN-20260615-181604.png" alt caption width="96" height="96"}
```python
import time
import requests
from PIL import Image, ImageDraw
DEVICE_IP = "10.0.4.20"
APP_ID = "weather_app"
# Cities and their coordinates
cities = [
("Dubai", 25.2048, 55.2708),
("London", 51.5074, -0.1278),
("New York", 40.7128, -74.0060),
]
# Light yellow color
TEXT_COLOR = "#FFFF00FF"
# Map basic weather codes to icons
def generate_icon(weather_code):
# Create a 16x16 RGBA image
img = Image.new("RGBA", (16, 16), (0, 0, 0, 0))
draw = ImageDraw.Draw(img)
if weather_code in ["clear", "sunny"]:
# Draw sun
draw.ellipse((2, 2, 13, 13), fill=(255, 255, 0, 255))
elif weather_code in ["cloudy", "partly cloudy"]:
draw.ellipse((1, 6, 15, 13), fill=(200, 200, 200, 255))
draw.ellipse((4, 2, 12, 10), fill=(180, 180, 180, 255))
elif weather_code in ["rain"]:
draw.rectangle((3, 5, 12, 12), fill=(100, 100, 255, 255))
else:
draw.rectangle((0, 0, 15, 15), fill=(150, 150, 150, 255)) # unknown
return img
# Convert PIL image to raw bytes
def pil_to_bytes(img):
from io import BytesIO
buf = BytesIO()
img.save(buf, format="PNG")
return buf.getvalue()
# Get current weather from Open-Meteo
def get_weather(lat, lon):
url = f"https://api.open-meteo.com/v1/forecast?latitude={lat}&longitude={lon}¤t_weather=true"
resp = requests.get(url)
resp.raise_for_status()
data = resp.json()
cw = data.get("current_weather", {})
temp = cw.get("temperature")
code = cw.get("weathercode", 0)
# Map code to string
if code == 0:
code_str = "clear"
elif code in [1, 2, 3]:
code_str = "cloudy"
elif code in [61, 63, 65]:
code_str = "rain"
else:
code_str = "unknown"
return temp, code_str
# Upload the icon to the device
def upload_icon(img_bytes, filename="icon.png"):
url = f"http://{DEVICE_IP}/api/assets/upload?application_name={APP_ID}&file={filename}"
resp = requests.post(url, data=img_bytes, headers={"Content-Type": "application/octet-stream"})
resp.raise_for_status()
return filename
# Display the weather on the screen
def display_weather(city, temp, icon_path):
payload = {
"application_name": APP_ID,
"elements": [
{
"id": "icon",
"timeout": 5,
"type": "image",
"path": icon_path,
"x": 0,
"y": 0
},
{
"id": "city",
"timeout": 5,
"type": "text",
"text": city,
"x": 18,
"y": 0,
"font": "small",
"color": "#FFFFFFFF",
"width": 54
},
{
"id": "temp",
"timeout": 5,
"type": "text",
"text": f"{temp}°C",
"x": 18,
"y": 6,
"font": "big",
"color": TEXT_COLOR,
"width": 54,
"scroll_rate": 60
}
]
}
url = f"http://{DEVICE_IP}/api/display/draw"
resp = requests.post(url, json=payload)
resp.raise_for_status()
def main():
while True:
for city, lat, lon in cities:
try:
temp, weather_code = get_weather(lat, lon)
icon_img = generate_icon(weather_code)
icon_bytes = pil_to_bytes(icon_img)
icon_path = upload_icon(icon_bytes)
display_weather(city, temp, icon_path)
except Exception as e:
print(f"Error displaying {city}: {e}")
time.sleep(3)
if __name__ == "__main__":
main()
```
:::
****:inlineImage[]{src="https://api.archbee.com/api/optimize/3StCFqarJkJQZV-7N79yY/6hddwgN3zvscmejXaKUZA_ai-result-icon.png" alt caption width="96" height="96"} **Result: **
:::Iframe{iframeHeight="0" code=""}
:::
****
Much better. There are still a couple of small issues, so let’s fix them with the next couple of prompts.
### Step 3\: Dealing with the degree symbol
:inlineImage[]{src="https://api.archbee.com/api/optimize/3StCFqarJkJQZV-7N79yY/yPYou_IvFTPCs14UbA_W0_prompt-bubble.png" alt caption width="96" height="96"}**AI prompt: **
:::BlockQuote
The ° symbol is missing on the screen. The device definitely can display this symbol in the big font.
:::
:inlineImage[]{src="https://api.archbee.com/api/optimize/3StCFqarJkJQZV-7N79yY/PomrFi0zymINgYw7Mzng0_script-icon.png" alt caption width="96" height="96"}** Script:**
:::ExpandableHeading
*Click here to expand the block with the script code *:inlineImage[]{src="https://api.archbee.com/api/optimize/3StCFqarJkJQZV-7N79yY/BnDmvlxd6fDnLVlZlpBnN-20260615-181604.png" alt caption width="96" height="96"}
```python
import time
import requests
from PIL import Image, ImageDraw
import json
DEVICE_IP = "10.0.4.20"
APP_ID = "weather_app"
# Cities and their coordinates
cities = [
("Dubai", 25.2048, 55.2708),
("London", 51.5074, -0.1278),
("New York", 40.7128, -74.0060),
]
# Light yellow color for temperature
TEXT_COLOR = "#FFFF00FF"
# Map basic weather codes to icons
def generate_icon(weather_code):
img = Image.new("RGBA", (16, 16), (0, 0, 0, 0))
draw = ImageDraw.Draw(img)
if weather_code in ["clear", "sunny"]:
draw.ellipse((2, 2, 13, 13), fill=(255, 255, 0, 255))
elif weather_code in ["cloudy", "partly cloudy"]:
draw.ellipse((1, 6, 15, 13), fill=(200, 200, 200, 255))
draw.ellipse((4, 2, 12, 10), fill=(180, 180, 180, 255))
elif weather_code in ["rain"]:
draw.rectangle((3, 5, 12, 12), fill=(100, 100, 255, 255))
else:
draw.rectangle((0, 0, 15, 15), fill=(150, 150, 150, 255))
return img
def pil_to_bytes(img):
from io import BytesIO
buf = BytesIO()
img.save(buf, format="PNG")
return buf.getvalue()
# Fetch weather from Open-Meteo
def get_weather(lat, lon):
url = f"https://api.open-meteo.com/v1/forecast?latitude={lat}&longitude={lon}¤t_weather=true"
resp = requests.get(url)
resp.raise_for_status()
data = resp.json()
cw = data.get("current_weather", {})
temp = cw.get("temperature")
code = cw.get("weathercode", 0)
# Map code to string
if code == 0:
code_str = "clear"
elif code in [1, 2, 3]:
code_str = "cloudy"
elif code in [61, 63, 65]:
code_str = "rain"
else:
code_str = "unknown"
return temp, code_str
def upload_icon(img_bytes, filename="icon.png"):
url = f"http://{DEVICE_IP}/api/assets/upload?application_name={APP_ID}&file={filename}"
resp = requests.post(url, data=img_bytes, headers={"Content-Type": "application/octet-stream"})
resp.raise_for_status()
return filename
def display_weather(city, temp, icon_path):
payload = {
"application_name": APP_ID,
"elements": [
{
"id": "icon",
"timeout": 5,
"type": "image",
"path": icon_path,
"x": 0,
"y": 0
},
{
"id": "city",
"timeout": 5,
"type": "text",
"text": city,
"x": 18,
"y": 0,
"font": "small",
"color": "#FFFFFFFF",
"width": 54
},
{
"id": "temp",
"timeout": 5,
"type": "text",
"text": f"{temp}°C",
"x": 18,
"y": 6,
"font": "big",
"color": TEXT_COLOR,
"width": 54,
"scroll_rate": 60
}
]
}
url = f"http://{DEVICE_IP}/api/display/draw"
# Send JSON with ensure_ascii=False so ° displays correctly
headers = {"Content-Type": "application/json"}
resp = requests.post(url, headers=headers, data=json.dumps(payload, ensure_ascii=False))
resp.raise_for_status()
def main():
while True:
for city, lat, lon in cities:
try:
temp, weather_code = get_weather(lat, lon)
icon_img = generate_icon(weather_code)
icon_bytes = pil_to_bytes(icon_img)
icon_path = upload_icon(icon_bytes)
display_weather(city, temp, icon_path)
except Exception as e:
print(f"Error displaying {city}: {e}")
time.sleep(3)
if __name__ == "__main__":
main()
```
:::
****:inlineImage[]{src="https://api.archbee.com/api/optimize/3StCFqarJkJQZV-7N79yY/6hddwgN3zvscmejXaKUZA_ai-result-icon.png" alt caption width="96" height="96"} **Result: **
:::Iframe{iframeHeight="0" code=""}
:::
****
Almost there. Everything looks good except those strange weather icons. ChatGPT seems to struggle with those, so why not use weather emojis instead?
### Step 4\: Adding weather icons
We need 16×16 px icons for the main weather conditions, such as sunny, cloudy, and rainy weather. We’ll need these icons:
- ☀️ **sun.png** — symbol U+2600
- ☁️ **cloud.png** — symbol U+2601
- 🌫️ **fog.png** — symbol U+1F32B
- ⛅ **partly.png** — symbol U+1324
- 🌧️ **rain.png** — symbol U+1327
- 🌨️ **snow\.png** — symbol U+1328
We can get these icons by downloading the archive below:
::File{src="https://api.archbee.com/api/presign/3StCFqarJkJQZV-7N79yY/dEWSgVxtV9NDyIC89Xkop_icons.zip" label="icons.zip"}
Extract the `zip` archive into the same folder as the script. After that, the only thing left is to ask the AI to update the script.
:inlineImage[]{src="https://api.archbee.com/api/optimize/3StCFqarJkJQZV-7N79yY/yPYou_IvFTPCs14UbA_W0_prompt-bubble.png" alt caption width="96" height="96"}**AI prompt: **
:::BlockQuote
Use the icons I placed in the icons folder: `cloud.png`, `fog.png`, `partly.png`, `rain.png`, `snow.png`, `sun.png`.
:::
:inlineImage[]{src="https://api.archbee.com/api/optimize/3StCFqarJkJQZV-7N79yY/PomrFi0zymINgYw7Mzng0_script-icon.png" alt caption width="96" height="96"}** Script:**
:::ExpandableHeading
*Click here to expand the block with the script code *:inlineImage[]{src="https://api.archbee.com/api/optimize/3StCFqarJkJQZV-7N79yY/BnDmvlxd6fDnLVlZlpBnN-20260615-181604.png" alt caption width="96" height="96"}
```python
import time
import requests
import json
import os
DEVICE_IP = "10.0.4.20"
APP_ID = "weather_app"
ICON_FOLDER = "icons" # local folder containing your icons
TEXT_COLOR = "#FFFF00FF"
cities = [
("Dubai", 25.2048, 55.2708),
("London", 51.5074, -0.1278),
("New York", 40.7128, -74.0060),
]
# Map Open-Meteo weather codes to icon filenames
weather_icon_map = {
0: "sun.png", # Clear sky
1: "partly.png", # Mainly clear
2: "partly.png", # Partly cloudy
3: "cloud.png", # Overcast
45: "fog.png", # Fog
48: "fog.png", # Depositing rime fog
51: "rain.png", # Drizzle
53: "rain.png",
55: "rain.png",
61: "rain.png", # Rain
63: "rain.png",
65: "rain.png",
71: "snow.png", # Snow
73: "snow.png",
75: "snow.png",
80: "rain.png", # Rain showers
81: "rain.png",
82: "rain.png",
95: "rain.png", # Thunderstorm
96: "rain.png",
99: "rain.png",
}
def get_weather(lat, lon):
url = f"https://api.open-meteo.com/v1/forecast?latitude={lat}&longitude={lon}¤t_weather=true"
resp = requests.get(url)
resp.raise_for_status()
data = resp.json()
cw = data.get("current_weather", {})
temp = cw.get("temperature")
code = cw.get("weathercode", 0)
return temp, code
def upload_icon(local_path, filename="icon.png"):
with open(local_path, "rb") as f:
data = f.read()
url = f"http://{DEVICE_IP}/api/assets/upload?application_name={APP_ID}&file={filename}"
resp = requests.post(url, data=data, headers={"Content-Type": "application/octet-stream"})
resp.raise_for_status()
return filename
def display_weather(city, temp, icon_path):
payload = {
"application_name": APP_ID,
"elements": [
{
"id": "icon",
"timeout": 5,
"type": "image",
"path": icon_path,
"x": 0,
"y": 0
},
{
"id": "city",
"timeout": 5,
"type": "text",
"text": city,
"x": 18,
"y": 0,
"font": "small",
"color": "#FFFFFFFF",
"width": 54
},
{
"id": "temp",
"timeout": 5,
"type": "text",
"text": f"{temp}°C",
"x": 18,
"y": 6,
"font": "big",
"color": TEXT_COLOR,
"width": 54,
"scroll_rate": 60
}
]
}
url = f"http://{DEVICE_IP}/api/display/draw"
headers = {"Content-Type": "application/json"}
resp = requests.post(url, headers=headers, data=json.dumps(payload, ensure_ascii=False))
resp.raise_for_status()
def main():
while True:
for city, lat, lon in cities:
try:
temp, code = get_weather(lat, lon)
icon_filename = weather_icon_map.get(code, "sun.png") # fallback to sun.png
local_icon_path = os.path.join(ICON_FOLDER, icon_filename)
device_icon_path = upload_icon(local_icon_path)
display_weather(city, temp, device_icon_path)
except Exception as e:
print(f"Error displaying {city}: {e}")
time.sleep(3)
if __name__ == "__main__":
main()
```
:::
****:inlineImage[]{src="https://api.archbee.com/api/optimize/3StCFqarJkJQZV-7N79yY/6hddwgN3zvscmejXaKUZA_ai-result-icon.png" alt caption width="96" height="96"} **Result: **
:::Iframe{iframeHeight="0" code=""}
:::
Done! You can modify the list of cities in the script starting on line 11. If you keep only one city, the widget will just display its weather, updating every 3 seconds.
***
## A ping monitor
**Ping** is a built-in system tool for checking the availability of devices on a network. It works by sending a special request to the IP address of the target device and measuring the time it takes to get a response.
This is especially important in some online games, where the game’s outcome can depend on the server’s response time and connection quality. That’s why having a real-time ping indicator is useful. Let’s create one for Counter-Strike 2.
### Step 1\: Displaying the ping chart
:inlineImage[]{src="https://api.archbee.com/api/optimize/3StCFqarJkJQZV-7N79yY/yPYou_IvFTPCs14UbA_W0_prompt-bubble.png" alt caption width="96" height="96"}**AI prompt: **
:::BlockQuote
Create a script that displays a line chart for ping to a game server by IP address. Update it every second. In the top-left corner of the chart, show the current ping value as a number in a small font.
:::
:inlineImage[]{src="https://api.archbee.com/api/optimize/3StCFqarJkJQZV-7N79yY/PomrFi0zymINgYw7Mzng0_script-icon.png" alt caption width="96" height="96"}** Script:**
:::ExpandableHeading
*Click here to expand the block with the script code *:inlineImage[]{src="https://api.archbee.com/api/optimize/3StCFqarJkJQZV-7N79yY/BnDmvlxd6fDnLVlZlpBnN-20260615-181604.png" alt caption width="96" height="96"}
```python
#!/usr/bin/env python3
"""
Ping chart display for 72x16 LED device.
Features:
- Pings a target IP once per second
- Draws a simple scrolling line chart (72 px wide) in a 72x16 image
- Reserves the top 5 pixels for the current ping value shown as a small-font text element
- Uploads the image to the device and issues a draw command that overlays the small-font ping
Usage:
python ping_chart_display.py --server 10.0.4.20 --target 1.2.3.4 --app_id my_app
Dependencies:
pip install pillow requests
Notes:
- This script shells out to the system "ping" command; behaviour/options differ slightly between OSes.
- The script updates the device every second. Stop with Ctrl-C.
"""
import argparse
import collections
import io
import json
import os
import platform
import re
import signal
import subprocess
import sys
import time
from typing import Optional
import requests
from PIL import Image, ImageDraw
WIDTH = 72
HEIGHT = 16
TOP_TEXT_HEIGHT = 5 # small font height on device
CHART_Y = TOP_TEXT_HEIGHT
CHART_HEIGHT = HEIGHT - TOP_TEXT_HEIGHT # 11
HISTORY_LENGTH = WIDTH
STOP = False
def signal_handler(sig, frame):
global STOP
STOP = True
signal.signal(signal.SIGINT, signal_handler)
signal.signal(signal.SIGTERM, signal_handler)
def ping_once(host: str, timeout_s: float = 1.0) -> Optional[float]:
"""Ping host once and return round-trip time in ms, or None on failure."""
system = platform.system()
if system == "Windows":
# Windows: use -n 1 and -w timeout_in_ms
cmd = ["ping", "-n", "1", "-w", str(int(timeout_s * 1000)), host]
elif system == "Darwin":
# macOS: ping -c 1 -W is different (in ms) — use -c 1 and rely on default timeout
cmd = ["ping", "-c", "1", host]
else:
# Linux: ping -c 1 -W timeout_in_seconds (integer)
# Use -w fallback if available
cmd = ["ping", "-c", "1", "-W", str(int(timeout_s)), host]
try:
completed = subprocess.run(cmd, stdout=subprocess.PIPE, stderr=subprocess.PIPE, text=True, timeout=timeout_s + 1)
out = completed.stdout + completed.stderr
except Exception:
return None
# Parse for time=XX ms
m = re.search(r"time[=<]([0-9]+\.?[0-9]*)\s*ms", out)
if m:
try:
return float(m.group(1))
except Exception:
return None
# Windows localized output might include "Average = Xms" or different formatting; try another regex
m2 = re.search(r"Average =\s*([0-9]+)ms", out)
if m2:
try:
return float(m2.group(1))
except Exception:
return None
# No parse
return None
def draw_chart_image(history, width=WIDTH, height=HEIGHT):
"""Return a bytes object containing PNG image (72x16) of the chart with black background."""
img = Image.new("RGBA", (width, height), (0, 0, 0, 255))
draw = ImageDraw.Draw(img)
# Draw grid baseline (optional): horizontal line at bottom
# draw.line([(0, height - 1), (width - 1, height - 1)], fill=(40, 40, 40, 255))
# Determine scale: use max of recent history (ignore None). Minimum scale at 50ms to make small pings visible
valid_vals = [v for v in history if v is not None]
if valid_vals:
max_ping = max(max(valid_vals), 50.0)
else:
max_ping = 100.0
# Cap to sane maximum to keep chart readable
max_ping = min(max_ping, 2000.0)
# map values to y coordinates in chart area (0..CHART_HEIGHT-1) where 0 is top of chart area
points = []
for i, v in enumerate(history):
x = i
if v is None:
# put missing as bottom (i.e., high latency)
y = CHART_HEIGHT - 1
else:
ratio = min(v / max_ping, 1.0)
y = int((1.0 - ratio) * (CHART_HEIGHT - 1))
points.append((x, CHART_Y + y))
# Draw polyline connecting consecutive valid points
for i in range(len(points) - 1):
x1, y1 = points[i]
x2, y2 = points[i + 1]
draw.line([(x1, y1), (x2, y2)], fill=(0, 255, 0, 255))
# Optionally draw dots
for x, y in points:
draw.point((x, y), fill=(0, 200, 0, 255))
# Return PNG bytes
buf = io.BytesIO()
img.save(buf, format="PNG")
return buf.getvalue()
def upload_image(server: str, app_id: str, filename: str, image_bytes: bytes):
url = f"http://{server}/api/assets/upload?application_name={app_id}&file={filename}"
headers = {"Content-Type": "application/octet-stream"}
try:
resp = requests.post(url, headers=headers, data=image_bytes, timeout=5)
resp.raise_for_status()
except Exception as e:
print(f"Upload failed: {e}")
return False
return True
def send_draw_command(server: str, app_id: str, image_path: str, ping_text: str, timeout=2):
url = f"http://{server}/api/display/draw"
payload = {
"application_name": app_id,
"elements": [
{
"id": "img",
"timeout": timeout,
"type": "image",
"path": image_path,
"x": 0,
"y": 0,
},
{
"id": "txt",
"timeout": timeout,
"type": "text",
"text": ping_text,
"x": 0,
"y": 0,
"font": "small",
"color": "#FFFFFFFF",
"width": 20,
"scroll_rate": 0,
},
],
}
try:
resp = requests.post(url, json=payload, timeout=5)
resp.raise_for_status()
except Exception as e:
print(f"Draw command failed: {e}")
return False
return True
def main():
parser = argparse.ArgumentParser()
parser.add_argument("--server", required=True, help="Device IP or host (e.g. 10.0.4.20)")
parser.add_argument("--target", required=True, help="Target game server IP or hostname to ping")
parser.add_argument("--app_id", default="my_app", help="app_id to use when uploading/displaying")
parser.add_argument("--interval", type=float, default=1.0, help="Seconds between updates (default 1.0)")
parser.add_argument("--fname", default="ping_chart.png", help="Filename to upload to device")
args = parser.parse_args()
history = collections.deque([None] * HISTORY_LENGTH, maxlen=HISTORY_LENGTH)
print(f"Starting ping chart: target={args.target} -> device={args.server} (app_id={args.app_id})")
while not STOP:
start = time.time()
ping_ms = ping_once(args.target, timeout_s=0.9)
if ping_ms is None:
ping_text = "-- ms"
else:
ping_text = f"{int(round(ping_ms))}ms"
history.append(ping_ms)
png_bytes = draw_chart_image(list(history))
ok = upload_image(args.server, args.app_id, args.fname, png_bytes)
if not ok:
print("Upload failed; retrying on next loop")
else:
ok2 = send_draw_command(args.server, args.app_id, args.fname, ping_text, timeout=int(max(args.interval * 1.5, 2)))
if not ok2:
print("Draw command failed")
# Sleep the remainder of the interval
elapsed = time.time() - start
to_sleep = args.interval - elapsed
if to_sleep > 0:
time.sleep(to_sleep)
print("Exiting")
if __name__ == "__main__":
main()
```
:::
The AI generated a script that takes the server and BUSY Bar IP addresses as parameters. This means you need to provide these addresses when running the script. For example, if the server address is *8.8.8.8*, the command would look like this:
*`python3 ping-monitor-1.py --server 10.0.4.20 --target 8.8.8.8`*
****:inlineImage[]{src="https://api.archbee.com/api/optimize/3StCFqarJkJQZV-7N79yY/6hddwgN3zvscmejXaKUZA_ai-result-icon.png" alt caption width="96" height="96"} **Result: **
:::Iframe{iframeHeight="0" code=""}
:::
****
Great, it’s almost ready. But it’s not immediately clear what the values mean. And in this case, you don’t really need the exact numbers — what matters is being able to spot changes from the normal ping level.
Let’s use different colors to show good, average, and poor ping.
### Step 2\: Coloring the chart
:inlineImage[]{src="https://api.archbee.com/api/optimize/3StCFqarJkJQZV-7N79yY/yPYou_IvFTPCs14UbA_W0_prompt-bubble.png" alt caption width="96" height="96"}**AI prompt: **
:::BlockQuote
On the chart, bars for 0–20 ms should be green, 21–50 ms yellow, and above 50 ms red. Scale height: 100 ms.
:::
:inlineImage[]{src="https://api.archbee.com/api/optimize/3StCFqarJkJQZV-7N79yY/PomrFi0zymINgYw7Mzng0_script-icon.png" alt caption width="96" height="96"}** Script:**
:::ExpandableHeading
*Click here to expand the block with the script code *:inlineImage[]{src="https://api.archbee.com/api/optimize/3StCFqarJkJQZV-7N79yY/BnDmvlxd6fDnLVlZlpBnN-20260615-181604.png" alt caption width="96" height="96"}
```python
#!/usr/bin/env python3
"""
Ping chart display for 72x16 LED device with colored bars.
Features:
- Pings a target IP once per second
- Draws a colored line chart (72 px wide) in a 72x16 image
- Bars colored based on ping: 0–20ms green, 21–50ms yellow, >50ms red
- Scale height fixed at 100ms
- Reserves the top 5 pixels for the current ping value shown as a small-font text element
- Uploads the image to the device and issues a draw command that overlays the small-font ping
Usage:
python ping_chart_display.py --server 10.0.4.20 --target 1.2.3.4 --app_id my_app
Dependencies:
pip install pillow requests
"""
import argparse
import collections
import io
import json
import platform
import re
import signal
import subprocess
import sys
import time
from typing import Optional
import requests
from PIL import Image, ImageDraw
WIDTH = 72
HEIGHT = 16
TOP_TEXT_HEIGHT = 5 # small font height on device
CHART_Y = TOP_TEXT_HEIGHT
CHART_HEIGHT = HEIGHT - TOP_TEXT_HEIGHT # 11
HISTORY_LENGTH = WIDTH
MAX_PING = 100.0 # Scale height fixed at 100ms
STOP = False
def signal_handler(sig, frame):
global STOP
STOP = True
signal.signal(signal.SIGINT, signal_handler)
signal.signal(signal.SIGTERM, signal_handler)
def ping_once(host: str, timeout_s: float = 1.0) -> Optional[float]:
system = platform.system()
if system == "Windows":
cmd = ["ping", "-n", "1", "-w", str(int(timeout_s * 1000)), host]
elif system == "Darwin":
cmd = ["ping", "-c", "1", host]
else:
cmd = ["ping", "-c", "1", "-W", str(int(timeout_s)), host]
try:
completed = subprocess.run(cmd, stdout=subprocess.PIPE, stderr=subprocess.PIPE, text=True, timeout=timeout_s + 1)
out = completed.stdout + completed.stderr
except Exception:
return None
m = re.search(r"time[=<]([0-9]+\.?[0-9]*)\s*ms", out)
if m:
try:
return float(m.group(1))
except Exception:
return None
m2 = re.search(r"Average =\s*([0-9]+)ms", out)
if m2:
try:
return float(m2.group(1))
except Exception:
return None
return None
def get_color_for_ping(ping: Optional[float]) -> tuple[int,int,int,int]:
if ping is None:
return (128, 128, 128, 255) # gray for missing
if ping <= 20:
return (0, 255, 0, 255) # green
elif ping <= 50:
return (255, 255, 0, 255) # yellow
else:
return (255, 0, 0, 255) # red
def draw_chart_image(history, width=WIDTH, height=HEIGHT):
img = Image.new("RGBA", (width, height), (0, 0, 0, 255))
draw = ImageDraw.Draw(img)
for i, ping in enumerate(history):
if ping is None:
ping_val = MAX_PING
else:
ping_val = min(ping, MAX_PING)
ratio = ping_val / MAX_PING
y = int((1.0 - ratio) * (CHART_HEIGHT - 1))
color = get_color_for_ping(ping)
# Draw vertical line (1px wide) for the ping value
draw.line([(i, CHART_Y + CHART_HEIGHT - 1), (i, CHART_Y + y)], fill=color)
buf = io.BytesIO()
img.save(buf, format="PNG")
return buf.getvalue()
def upload_image(server: str, app_id: str, filename: str, image_bytes: bytes):
url = f"http://{server}/api/assets/upload?application_name={app_id}&file={filename}"
headers = {"Content-Type": "application/octet-stream"}
try:
resp = requests.post(url, headers=headers, data=image_bytes, timeout=5)
resp.raise_for_status()
except Exception as e:
print(f"Upload failed: {e}")
return False
return True
def send_draw_command(server: str, app_id: str, image_path: str, ping_text: str, timeout=2):
url = f"http://{server}/api/display/draw"
payload = {
"application_name": app_id,
"elements": [
{
"id": "img",
"timeout": timeout,
"type": "image",
"path": image_path,
"x": 0,
"y": 0,
},
{
"id": "txt",
"timeout": timeout,
"type": "text",
"text": ping_text,
"x": 0,
"y": 0,
"font": "small",
"color": "#FFFFFFFF",
"width": 20,
"scroll_rate": 0,
},
],
}
try:
resp = requests.post(url, json=payload, timeout=5)
resp.raise_for_status()
except Exception as e:
print(f"Draw command failed: {e}")
return False
return True
def main():
parser = argparse.ArgumentParser()
parser.add_argument("--server", required=True, help="Device IP or host (e.g. 10.0.4.20)")
parser.add_argument("--target", required=True, help="Target game server IP or hostname to ping")
parser.add_argument("--app_id", default="my_app", help="app_id to use when uploading/displaying")
parser.add_argument("--interval", type=float, default=1.0, help="Seconds between updates (default 1.0)")
parser.add_argument("--fname", default="ping_chart.png", help="Filename to upload to device")
args = parser.parse_args()
history = collections.deque([None] * HISTORY_LENGTH, maxlen=HISTORY_LENGTH)
print(f"Starting ping chart: target={args.target} -> device={args.server} (app_id={args.app_id})")
while not STOP:
start = time.time()
ping_ms = ping_once(args.target, timeout_s=0.9)
if ping_ms is None:
ping_text = "-- ms"
else:
ping_text = f"{int(round(ping_ms))}ms"
history.append(ping_ms)
png_bytes = draw_chart_image(list(history))
ok = upload_image(args.server, args.app_id, args.fname, png_bytes)
if not ok:
print("Upload failed; retrying on next loop")
else:
ok2 = send_draw_command(args.server, args.app_id, args.fname, ping_text, timeout=int(max(args.interval * 1.5, 2)))
if not ok2:
print("Draw command failed")
elapsed = time.time() - start
to_sleep = args.interval - elapsed
if to_sleep > 0:
time.sleep(to_sleep)
print("Exiting")
if __name__ == "__main__":
main()
```
:::
****:inlineImage[]{src="https://api.archbee.com/api/optimize/3StCFqarJkJQZV-7N79yY/6hddwgN3zvscmejXaKUZA_ai-result-icon.png" alt caption width="96" height="96"} **Result: **
:::Iframe{iframeHeight="0" code=""}
:::
****
Great! There’s just one small, cosmetic detail left: let’s add the game logo to the left side of the screen.
### Step 3\: Adding the game logo
:inlineImage[]{src="https://api.archbee.com/api/optimize/3StCFqarJkJQZV-7N79yY/yPYou_IvFTPCs14UbA_W0_prompt-bubble.png" alt caption width="96" height="96"}**AI prompt: **
:::BlockQuote
Let’s also display the Counter-Strike 2 game logo (cs2.png, 16×16) to the left of the chart. Move the chart and the ping value so that they don’t overlap the logo.
:::
:inlineImage[]{src="https://api.archbee.com/api/optimize/3StCFqarJkJQZV-7N79yY/PomrFi0zymINgYw7Mzng0_script-icon.png" alt caption width="96" height="96"}** Script:**
:::ExpandableHeading
*Click here to expand the block with the script code *:inlineImage[]{src="https://api.archbee.com/api/optimize/3StCFqarJkJQZV-7N79yY/BnDmvlxd6fDnLVlZlpBnN-20260615-181604.png" alt caption width="96" height="96"}
```python
#!/usr/bin/env python3
"""
Ping chart display for 72x16 LED device with colored bars and CS2 logo.
Features:
- Pings a target IP once per second
- Draws a colored line chart in a 72x16 image
- Bars colored based on ping: 0–20ms green, 21–50ms yellow, >50ms red
- Scale height fixed at 100ms
- Displays a 16x16 CS2 logo to the left of the chart
- Moves chart and ping text to the right of the logo to avoid overlap
- Uploads the image to the device and overlays the ping value
Usage:
python ping_chart_display.py --server 10.0.4.20 --target 1.2.3.4 --app_id my_app --logo cs2.png
Dependencies:
pip install pillow requests
"""
import argparse
import collections
import io
import json
import platform
import re
import signal
import subprocess
import sys
import time
from typing import Optional
import requests
from PIL import Image, ImageDraw
WIDTH = 72
HEIGHT = 16
TOP_TEXT_HEIGHT = 5 # small font height on device
CHART_HEIGHT = HEIGHT - TOP_TEXT_HEIGHT # 11
HISTORY_LENGTH = WIDTH
MAX_PING = 100.0 # Scale height fixed at 100ms
LOGO_WIDTH = 16 # pixels reserved for 16x16 logo
STOP = False
def signal_handler(sig, frame):
global STOP
STOP = True
signal.signal(signal.SIGINT, signal_handler)
signal.signal(signal.SIGTERM, signal_handler)
def ping_once(host: str, timeout_s: float = 1.0) -> Optional[float]:
system = platform.system()
if system == "Windows":
cmd = ["ping", "-n", "1", "-w", str(int(timeout_s * 1000)), host]
elif system == "Darwin":
cmd = ["ping", "-c", "1", host]
else:
cmd = ["ping", "-c", "1", "-W", str(int(timeout_s)), host]
try:
completed = subprocess.run(cmd, stdout=subprocess.PIPE, stderr=subprocess.PIPE, text=True, timeout=timeout_s + 1)
out = completed.stdout + completed.stderr
except Exception:
return None
m = re.search(r"time[=<]([0-9]+\.?[0-9]*)\s*ms", out)
if m:
try:
return float(m.group(1))
except Exception:
return None
m2 = re.search(r"Average =\s*([0-9]+)ms", out)
if m2:
try:
return float(m2.group(1))
except Exception:
return None
return None
def get_color_for_ping(ping: Optional[float]) -> tuple[int,int,int,int]:
if ping is None:
return (128, 128, 128, 255) # gray for missing
if ping <= 20:
return (0, 255, 0, 255) # green
elif ping <= 50:
return (255, 255, 0, 255) # yellow
else:
return (255, 0, 0, 255) # red
def draw_chart_image(history, logo_image: Optional[Image.Image] = None, width=WIDTH, height=HEIGHT):
img = Image.new("RGBA", (width, height), (0, 0, 0, 255))
draw = ImageDraw.Draw(img)
# Paste logo if provided
if logo_image is not None:
logo_resized = logo_image.resize((LOGO_WIDTH, HEIGHT))
img.paste(logo_resized, (0, 0), logo_resized)
# Draw chart and ping value starting after logo
chart_x_offset = LOGO_WIDTH
chart_width = width - chart_x_offset
for i, ping in enumerate(history[-chart_width:]):
x = chart_x_offset + i
if ping is None:
ping_val = MAX_PING
else:
ping_val = min(ping, MAX_PING)
ratio = ping_val / MAX_PING
y = int((1.0 - ratio) * (CHART_HEIGHT - 1)) + TOP_TEXT_HEIGHT
color = get_color_for_ping(ping)
draw.line([(x, HEIGHT - 1), (x, y)], fill=color)
buf = io.BytesIO()
img.save(buf, format="PNG")
return buf.getvalue()
def upload_image(server: str, app_id: str, filename: str, image_bytes: bytes):
url = f"http://{server}/api/assets/upload?application_name={app_id}&file={filename}"
headers = {"Content-Type": "application/octet-stream"}
try:
resp = requests.post(url, headers=headers, data=image_bytes, timeout=5)
resp.raise_for_status()
except Exception as e:
print(f"Upload failed: {e}")
return False
return True
def send_draw_command(server: str, app_id: str, image_path: str, ping_text: str, timeout=2):
url = f"http://{server}/api/display/draw"
payload = {
"application_name": app_id,
"elements": [
{
"id": "img",
"timeout": timeout,
"type": "image",
"path": image_path,
"x": 0,
"y": 0,
},
{
"id": "txt",
"timeout": timeout,
"type": "text",
"text": ping_text,
"x": LOGO_WIDTH,
"y": 0,
"font": "small",
"color": "#FFFFFFFF",
"width": WIDTH - LOGO_WIDTH,
"scroll_rate": 0,
},
],
}
try:
resp = requests.post(url, json=payload, timeout=5)
resp.raise_for_status()
except Exception as e:
print(f"Draw command failed: {e}")
return False
return True
def main():
parser = argparse.ArgumentParser()
parser.add_argument("--server", required=True, help="Device IP or host (e.g. 10.0.4.20)")
parser.add_argument("--target", required=True, help="Target game server IP or hostname to ping")
parser.add_argument("--app_id", default="my_app", help="app_id to use when uploading/displaying")
parser.add_argument("--interval", type=float, default=1.0, help="Seconds between updates (default 1.0)")
parser.add_argument("--fname", default="ping_chart.png", help="Filename to upload to device")
parser.add_argument("--logo", help="Path to 16x16 CS2 logo image (PNG) to display left of chart")
args = parser.parse_args()
history = collections.deque([None] * HISTORY_LENGTH, maxlen=HISTORY_LENGTH)
logo_img = None
if args.logo:
try:
logo_img = Image.open(args.logo).convert("RGBA")
except Exception as e:
print(f"Failed to load logo: {e}")
print(f"Starting ping chart: target={args.target} -> device={args.server} (app_id={args.app_id})")
while True:
start = time.time()
ping_ms = ping_once(args.target, timeout_s=0.9)
if ping_ms is None:
ping_text = "-- ms"
else:
ping_text = f"{int(round(ping_ms))}ms"
history.append(ping_ms)
png_bytes = draw_chart_image(list(history), logo_image=logo_img)
ok = upload_image(args.server, args.app_id, args.fname, png_bytes)
if not ok:
print("Upload failed; retrying on next loop")
else:
ok2 = send_draw_command(args.server, args.app_id, args.fname, ping_text, timeout=int(max(args.interval * 1.5, 2)))
if not ok2:
print("Draw command failed")
elapsed = time.time() - start
to_sleep = args.interval - elapsed
if to_sleep > 0:
time.sleep(to_sleep)
if __name__ == "__main__":
main()
```
:::
****:inlineImage[]{src="https://api.archbee.com/api/optimize/3StCFqarJkJQZV-7N79yY/6hddwgN3zvscmejXaKUZA_ai-result-icon.png" alt caption width="96" height="96"} **Result: **
:::Iframe{iframeHeight="0" code=""}
:::
****
Done! In just a few steps, and without writing any code, we created a useful widget. You can use it to monitor a game server or keep track of any other server on your LAN or the internet.
***
# Share your widget with the community
Made something cool or useful? Share it with the community on the [r/busyapp](https://www.reddit.com/r/busyapp/) subreddit — and check out what other community members have built, too. You might find your next widget there.