FAQ
Explore frequently asked questions about the BUSY Ecosystem by category. If you’re experiencing issues with your device, app, or connection, visit the%troubleshooting%Troubleshooting page for step-by-step solutions.
BUSY Bar
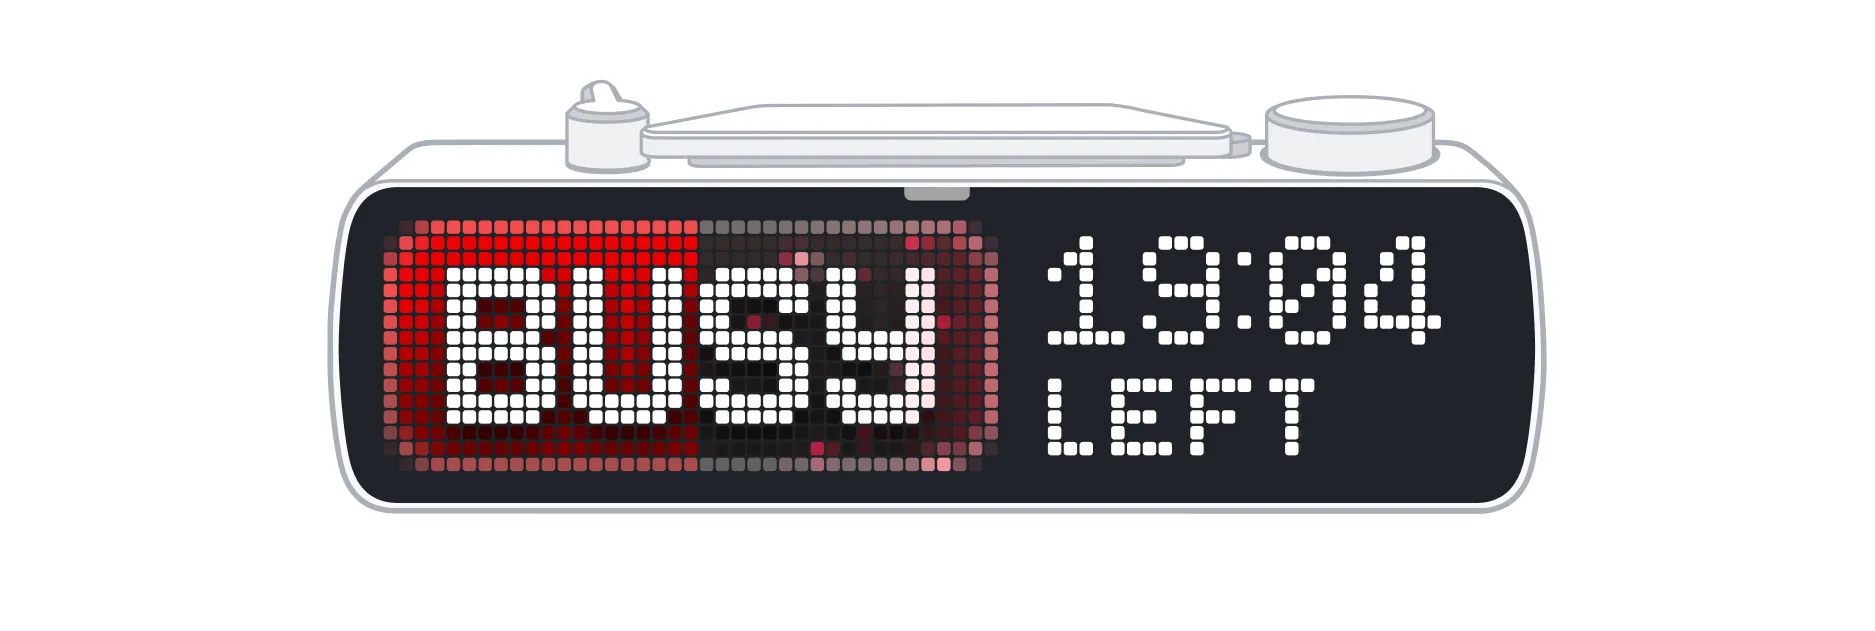
BUSY Bar is a productivity multi-tool with an LED pixel display for custom statuses. It includes a built-in Pomodoro timer, apps, and an open HTTP API for customization and integrations. You can also connect BUSY Bar to Matter-enabled smart home systems to use it in your automations.
- 2.5 hours — with an 18W (or higher) Power Delivery charger.
- 7–8 hours — with other USB chargers or a USB port.
The status bar on the right side of the back screen shows the current state of your BUSY Bar.
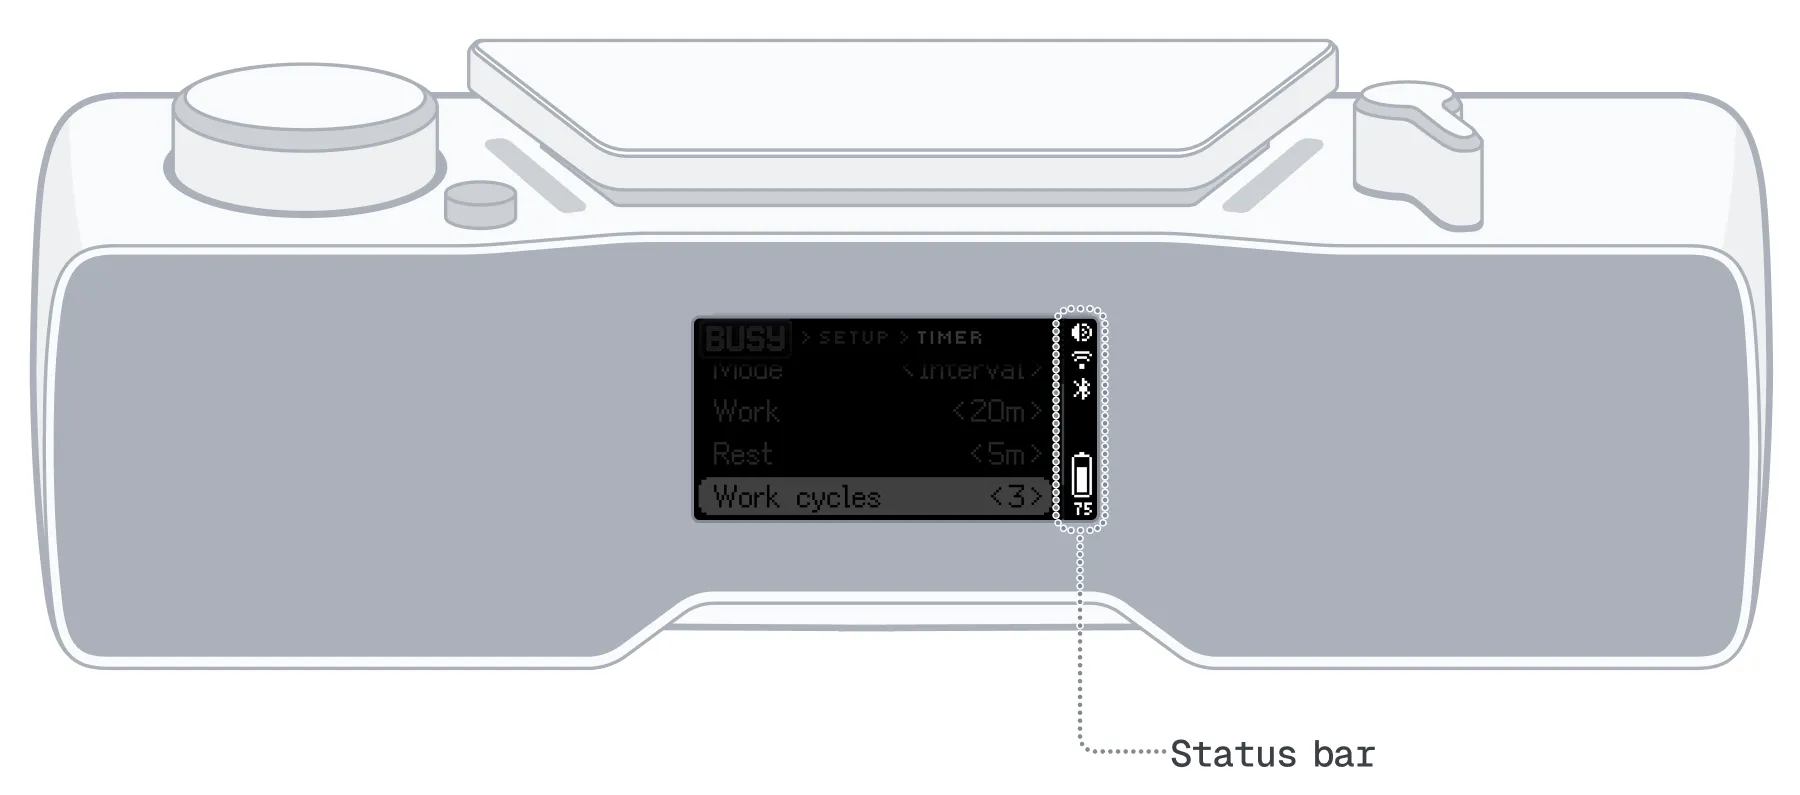
The indicators show:
Sound
-
 — Sound on
-
 — Muted
Wi-Fi connection
-
 — Connected
-
 — Connecting
-
 — No connection
Bluetooth connection
-
 — Connected
-
 — Connecting
-
 — No connection
USB connection
-
 — Connected via USB
Battery charge
-
 — Battery level: 75%
-
 — Charging
-
 — Battery issue. Contact support%page%
Clean only with a well-wrung electronic/screen wipe or a dry microfiber cloth.
Never spray liquid directly onto the device or let moisture enter any openings, including the USB charging port, speaker holes, or button gaps.
Do not clean either screen with alcohol or alcohol-based cleaners, tissues, wipes, or sanitizers. Doing so can permanently damage the screens and void your warranty.
Yes. It is recommended to carry the BUSY Bar in your hand luggage, as most airlines require battery-powered devices to be transported in the cabin.
Some airlines may allow the device in checked baggage, but you should confirm their policy in advance.
You can completely power off the device and preserve battery charge:
- On the BUSY Bar, go to Settings → System → Power → Shut Down.
To turn the BUSY Bar back on, press and hold the  Back button for 3 seconds.
Yes. You can use BUSY App or the local web interface, available via USB or Wi-Fi.
Learn more: Set up via PC%page%
That’s expected. OFF puts the BUSY Bar to sleep — it doesn’t shut it down completely. Notifications, focus sessions started in the app, and the ON CALL status still appear.
To shut down your BUSY Bar completely:
- Go to Settings → System → Power → Shut down.
To turn it back on:
- Press and hold the
 Back button for 3 seconds.
BUSY Bar shows only one activity at a time. When multiple activities are active, the one with the highest priority is shown. Lower-priority activities are hidden until the higher-priority activity ends.
Priority, from highest to lowest:
- Focus sessions started on BUSY Bar, in BUSY App, by a smart home automation, or through the API.
- Google Calendar notifications shown before and during events.
- Automatic ON CALL status triggered when your Mac's microphone is in use.
- Smart home graphics sent by automations that call /api/draw.
- Draw tool graphics and streams from API clients.
BUSY Bar firmware
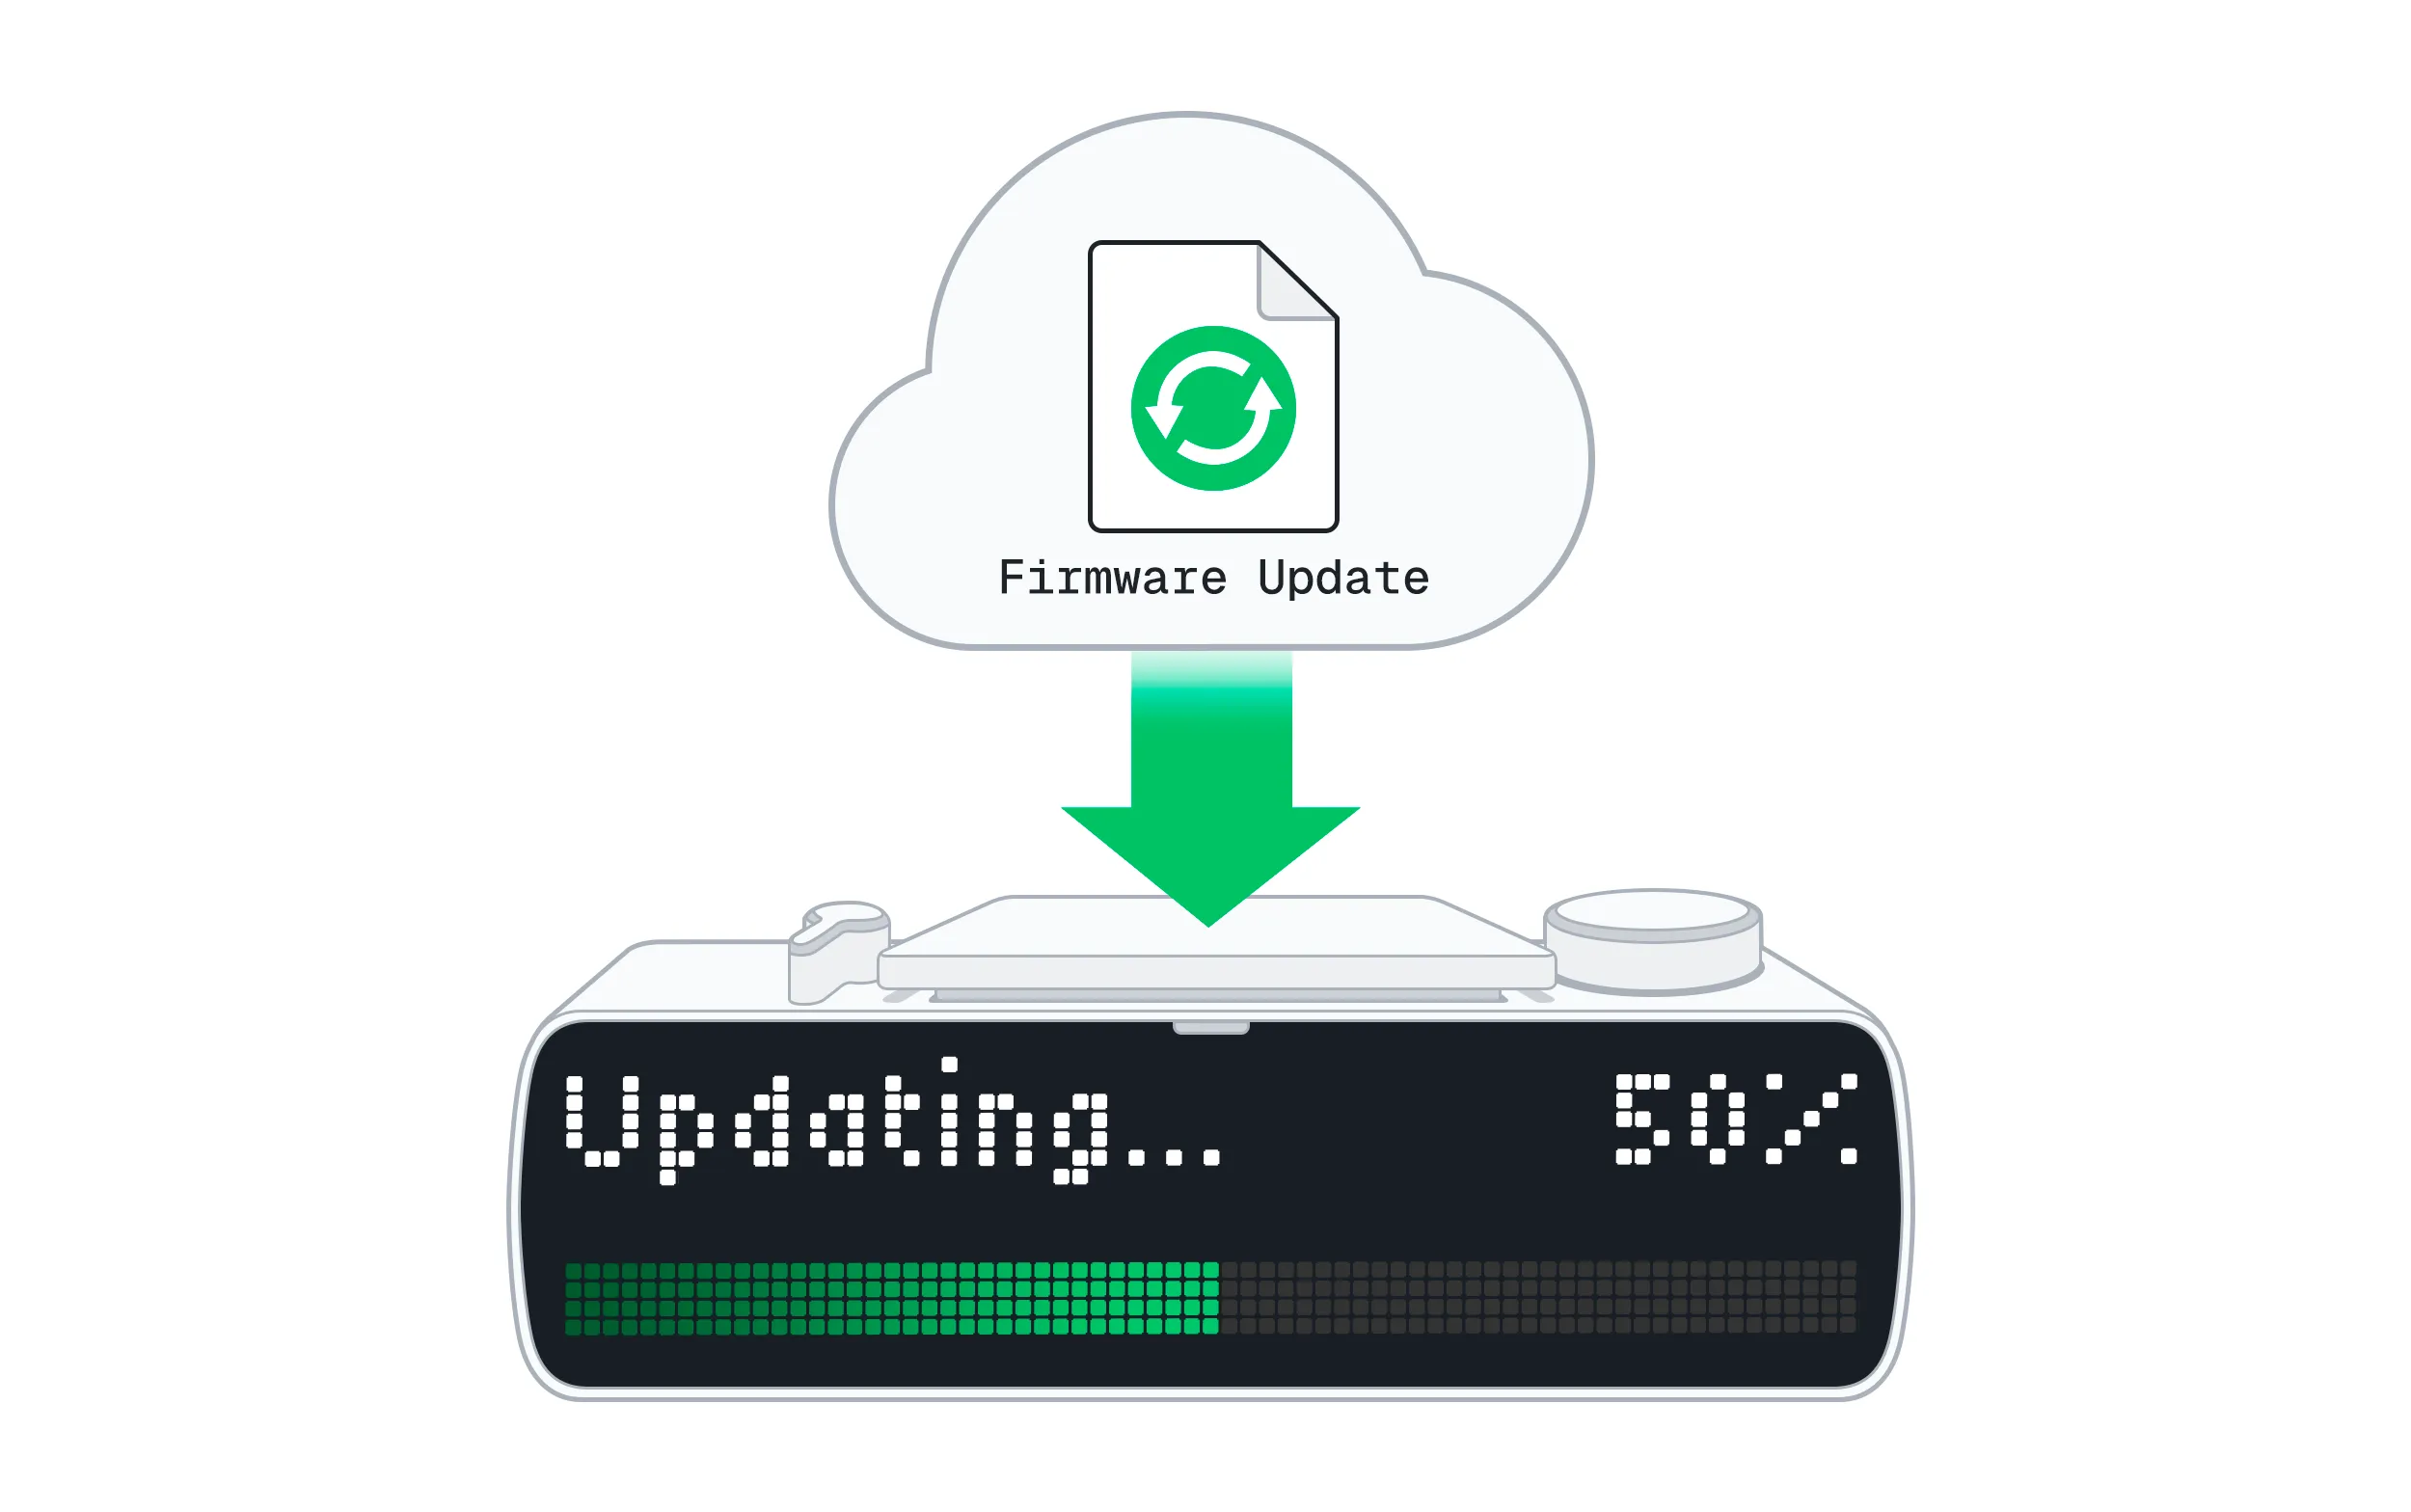
You can check your firmware version directly on the BUSY Bar:
- Go to Settings → About → Firmware.
You can also view it in BUSY App under your device settings or in the Firmware tab of the local web interface.
Option 1. Update via BUSY App on Mac
If your Mac is connected to the internet, you can update your BUSY Bar through BUSY App over USB. BUSY App uploads the firmware update file to your BUSY Bar and installs it.
Learn more: Use desktop BUSY App to update the BUSY Bar firmware%page%Use desktop BUSY App to update the BUSY Bar firmware%page%
Option 2. Update via the BUSY Bar local web interface
You can download the latest firmware version from the official BUSY Bar firmware repository and install it through the local web interface.
Step 1. Download the firmware file
On your PC, go to the firmware releases page on GitHub.
Find the latest firmware version.
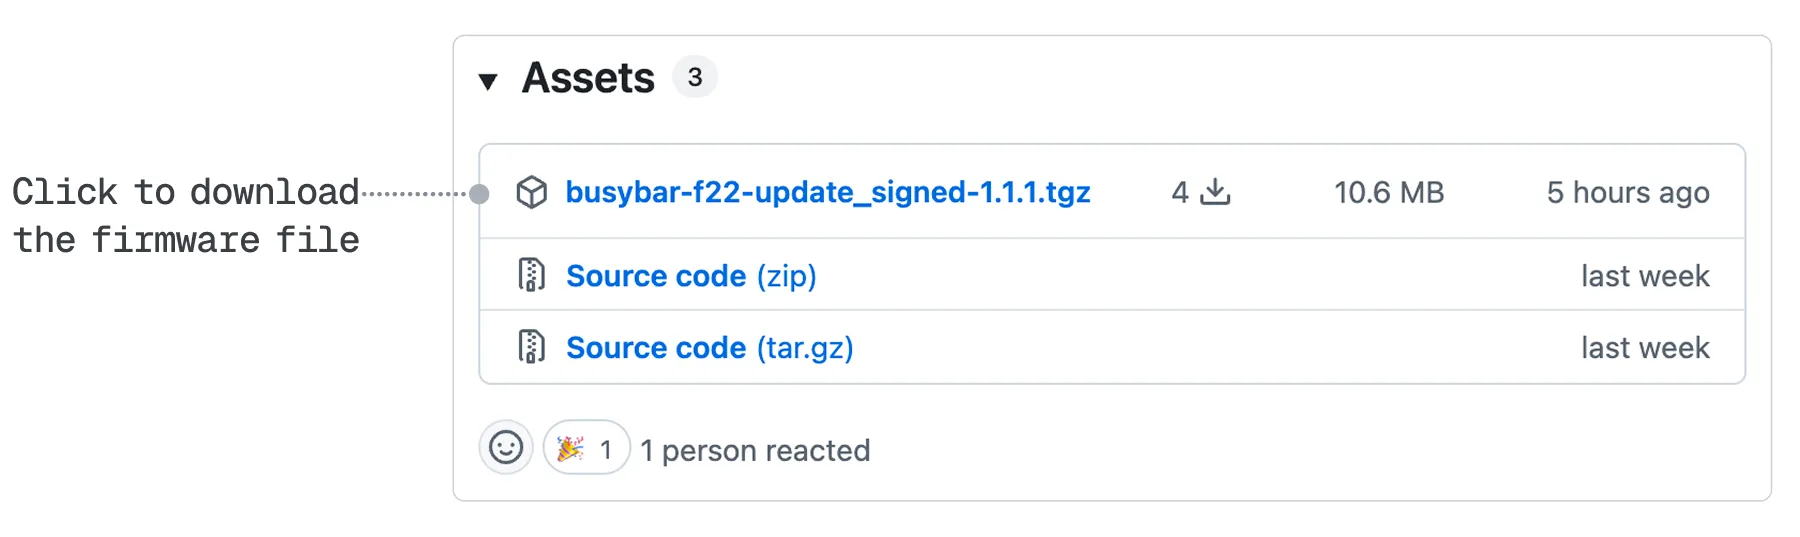
In the Assets section, click the .tgz file to download it:
Step 2. Upload the file and install the firmware
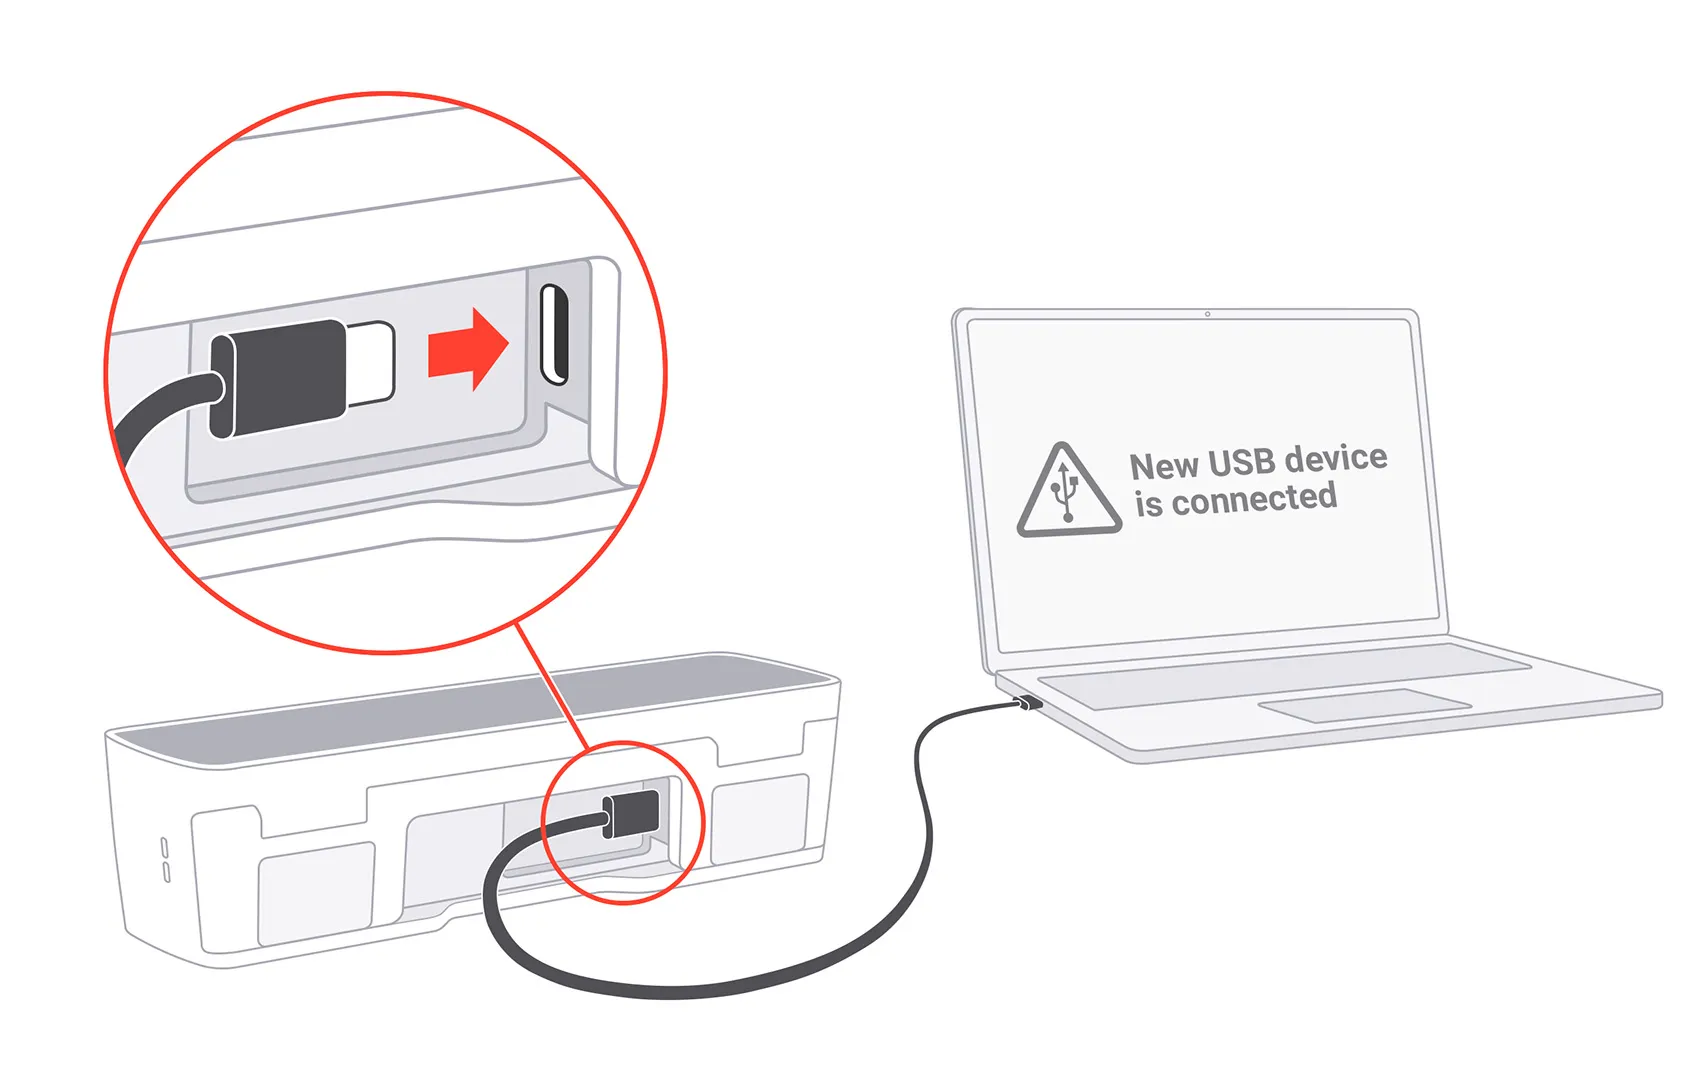
Connect your BUSY Bar to your PC using a USB cable.
In the browser, go to http://10.0.4.20. If the page doesn’t load:
- Make sure your browser is enabled to find devices on local networks. → How to enable this on macOS and Windows 11.
- Try a hard restart of your BUSY Bar. → Press and hold the Back button for 20 seconds.
Go to Firmware and click Update from file.
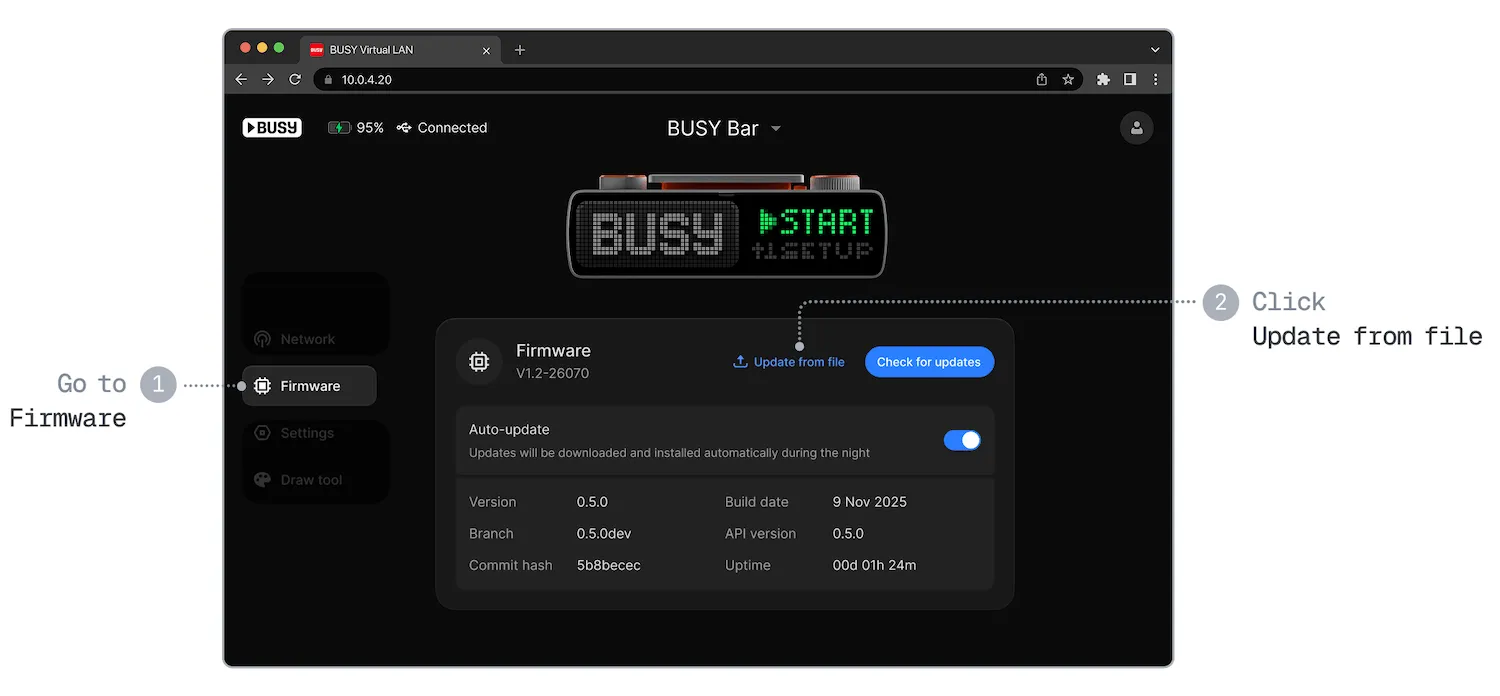
Select the .tgz file you downloaded, then click Start update.
The update takes about 3 minutes.
You can check for updates directly on the BUSY Bar:
- Go to Settings → Firmware → Check for updates.
You can also check for updates and update your BUSY Bar using BUSY App, the local web interface, or BUSY account (available at cloud.busy.app). If an update is available, you will see a green notification.
BUSY Bar has no dedicated downgrade option, but you can install any previously released firmware version manually: download the firmware file, then upload it to your device via the web interface.
Step 1. Download the firmware file
On your PC, go to the firmware releases page on GitHub.
Find the version you want to install.
In the Assets section, click the .tgz file to download it:
Step 2. Upload the file to install the firmware on your BUSY Bar
Connect your BUSY Bar to your PC using a USB cable.
In the browser, go to http://10.0.4.20. If the page doesn’t load:
- Make sure your browser is enabled to find devices on local networks. → How to enable this on macOS and Windows 11.
- Try a hard restart of your BUSY Bar. → Press and hold the Back button for 20 seconds.
Go to Firmware and click Update from file.
Select the .tgz file you downloaded, then click Start update.
The firmware update takes about 3 minutes.
Step 3. Disable automatic firmware updates
On your BUSY Bar, go to Settings → Firmware → Settings.
Set Auto-update to Off.
Use recovery mode (DFU) only for firmware recovery.
Press and hold 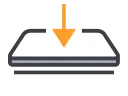 Start / Pause, Back, and
  OK / Skip buttons for 3 seconds.
Release Start / Pause and Back buttons, but keep holding the OK / Skip button for an additional 2 seconds.
Release the OK / Skip button.
Once in DFU mode, the BUSY Bar flashes its LEDs yellow three times, then turns them red.
To exit recovery mode:
- Press and hold the Start / Pause and Back buttons for 3 seconds.
To exit recovery mode:
- Press and hold the Start / Pause and Back buttons for 3 seconds.
Yes. You can install custom firmware on BUSY Bar via the local web interfaceFirmware update.
The firmware sources are available in the official firmware repository. You can modify the code, build your own firmware, and flash it to your BUSY Bar.
BUSY App
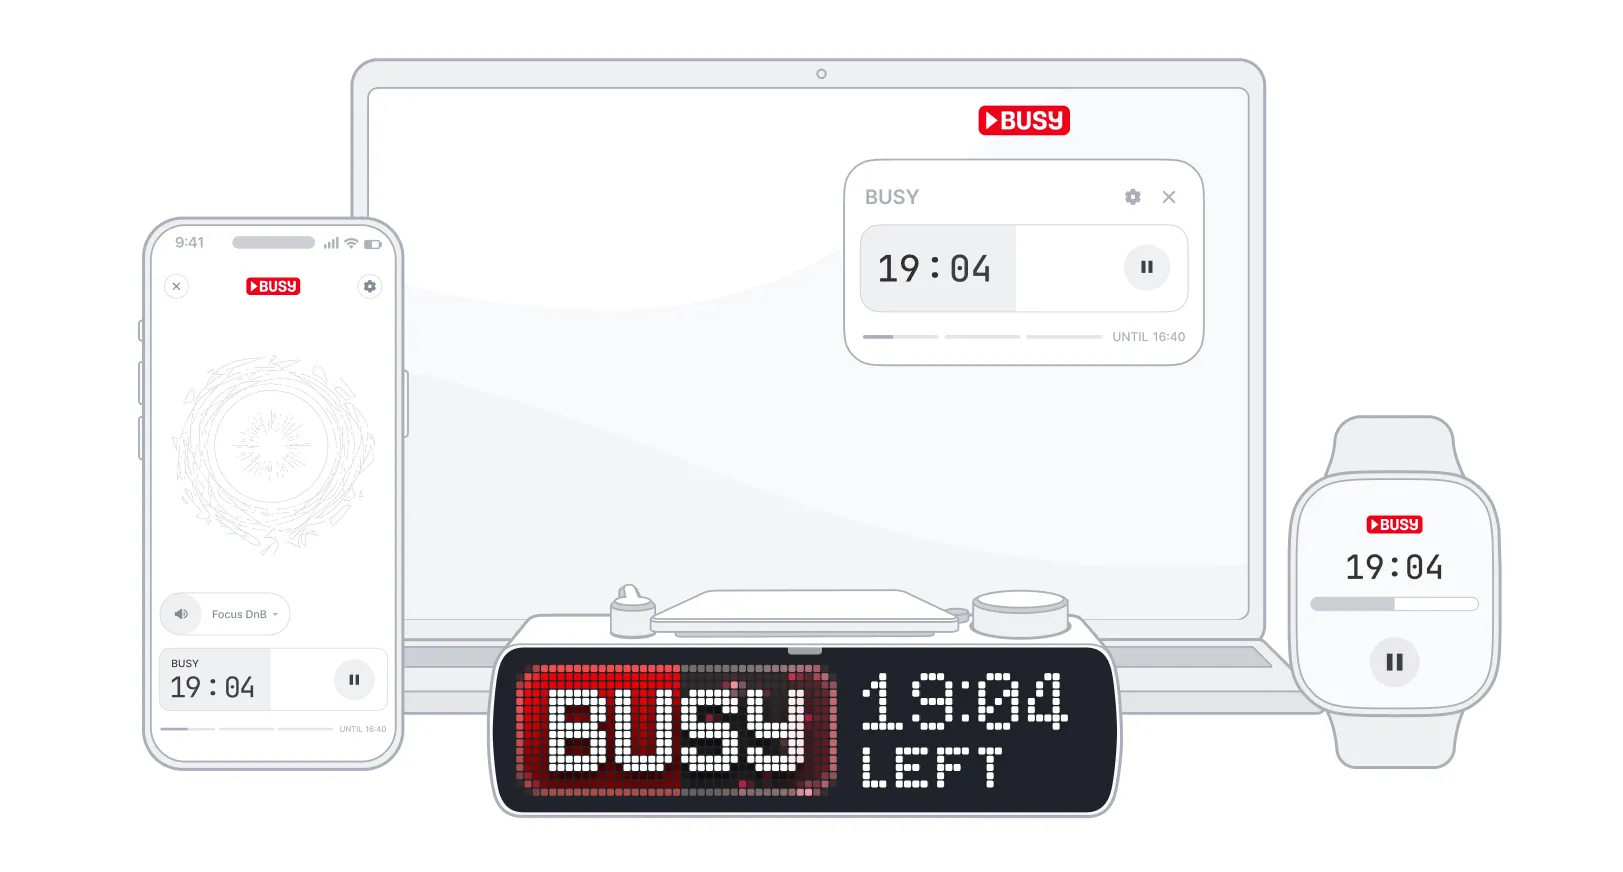
BUSY App is a free focus timer for your phone, watch, and Mac. Set up a Pomodoro-style workflow or run a session with no time limit, block distracting apps and notifications, choose what BUSY Bar shows during a session, and play music in work and rest phases.
Learn more: BUSY App%page%BUSY App
No. BUSY App works on its own as a focus timer on your phone, watch, and Mac. Log in to your BUSY accountBUSY account on each device to sync timers and sessions between them. If you have a BUSY Bar, it joins the same sync — start a session on your BUSY Bar and control it from any app.
BUSY App is available on iOS and Android, including support for Apple Watch and Wear OS smartwatches.
On computers, BUSY App is available for macOS. A Windows app is coming soon.
Not yet. The Windows version is coming soon.
You can connect any number of BUSY Bars by linking them to your BUSY accountBUSY account.
Follow the steps on the Pair with your phonePair with your phone page.
Connect your first BUSY Bar with the desktop BUSY App.Connect your first BUSY Bar.
Disconnect the USB cable from your first BUSY Bar.
Click the  BUSY App icon in the Dock.
Go to the BUSY Bar tab.
Click your BUSY Bar’s name, then click Add device.
Connect the second BUSY Bar to your Mac via USB.
Connect the second BUSY Bar to Wi-Fi.
Update the second BUSY Bar’s firmware.
 Your BUSY Bars are ready to use!
Repeat steps 2–8 for each additional BUSY Bar.
Connect your first BUSY Bar.Connect your first BUSY Bar.
In your BUSY account, click your BUSY Bar’s name in the lower-left corner, then click Connect another device.
On your second BUSY Bar, go to Settings → Account → Get pairing code. BUSY Bar displays a pairing code.
In your BUSY account, enter the code, then click Connect.
Your BUSY Bars are ready to use!
Repeat steps 2–4 for each additional BUSY Bar.
This feature is coming soon.
Yes. You can remove it by going to Preferences → Show in Dock and turning it off.
BUSY account
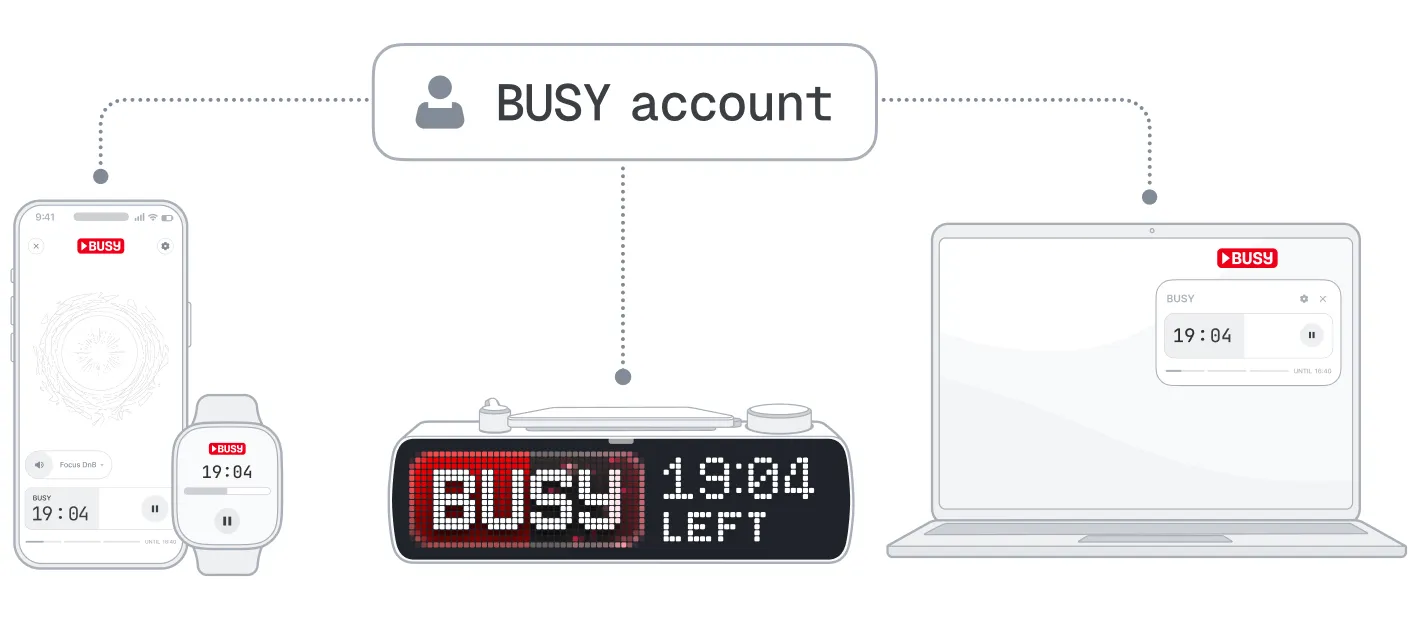
BUSY account is the cloud service that keeps the entire BUSY ecosystem in sync, including BUSY App on mobile and desktop, and the BUSY Bar device.
It keeps your focus sessions, timers, and integrations synced across all your devices, enables secure remote access to your BUSY Bar over the internet, and manages API access for connected services and automations.
To use these cloud features, create an account and sign in to BUSY App on your mobile and desktop devices, as well as your BUSY Bar.
Learn more: BUSY account%page%BUSY account%page%
You can create an account in BUSY App on mobile and desktop, or in your web browser.
 Mobile BUSY App
Open BUSY App on your phone.
Tap  Log in in the top-left corner. The browser will open the sign-in page.
Continue with your Google, Apple, or Microsoft account.
or
Create your account using your email.
 Web browser (any platform)
Open cloud.busy.app in your browser.
Continue with your Google, Apple, or Microsoft account.
or
Create your account using your email.
 Desktop BUSY App (Mac only)
Open BUSY App on your computer.
Click Log in in the top-left corner. The browser will open the sign-in page.
Continue with your Google, Apple, or Microsoft account.
or
Create your account using your email.
Having trouble logging in or creating an account? Please see BUSY account issues%page%
You can connect any number of BUSY Bars to your BUSY account. All connected devices will stay in sync.
Follow the steps on the Pair with your phonePair with your phone page.
Connect your first BUSY Bar with the desktop BUSY App.Connect your first BUSY Bar.
Disconnect the USB cable from your first BUSY Bar.
Click the BUSY App icon in the Dock.
Go to the BUSY Bar tab.
Click your BUSY Bar’s name, then click Add device.
Connect the second BUSY Bar to your Mac via USB.
Connect the second BUSY Bar to Wi-Fi.
Update the second BUSY Bar’s firmware.
Your BUSY Bars are ready to use!
Repeat steps 2–8 for each additional BUSY Bar.
Connect your first BUSY Bar.Connect your first BUSY Bar.
In your BUSY account, click your BUSY Bar’s name in the lower-left corner, then click Connect another device.
On your second BUSY Bar, go to Settings → Account → Get pairing code. BUSY Bar displays a pairing code.
In your BUSY account, enter the code, then click Connect.
Your BUSY Bars are ready to use!
Repeat steps 2–4 for all other BUSY Bars.
 API tokens will be deleted and integrations removed
Your account and all your user data will be permanently deleted from our servers.
You can delete your account in BUSY App (mobile or desktop) or at cloud.busy.app
Mobile BUSY App
Open BUSY App on your phone.
Go to Account in the top-left corner.
Tap Delete account.
In the pop-up, tap Delete to confirm.
Web browser (any platform)
In your browser, go to cloud.busy.app
Log in to your BUSY account.
Click Account in the top-right corner.
Go to Account.
Click Delete account.
In the pop-up, click Delete to confirm.
Desktop BUSY App (Mac only)
Open BUSY App on your computer.
Click Account in the top-left corner.
Click Delete account.
In the pop-up, click Delete to confirm.
Local web interface
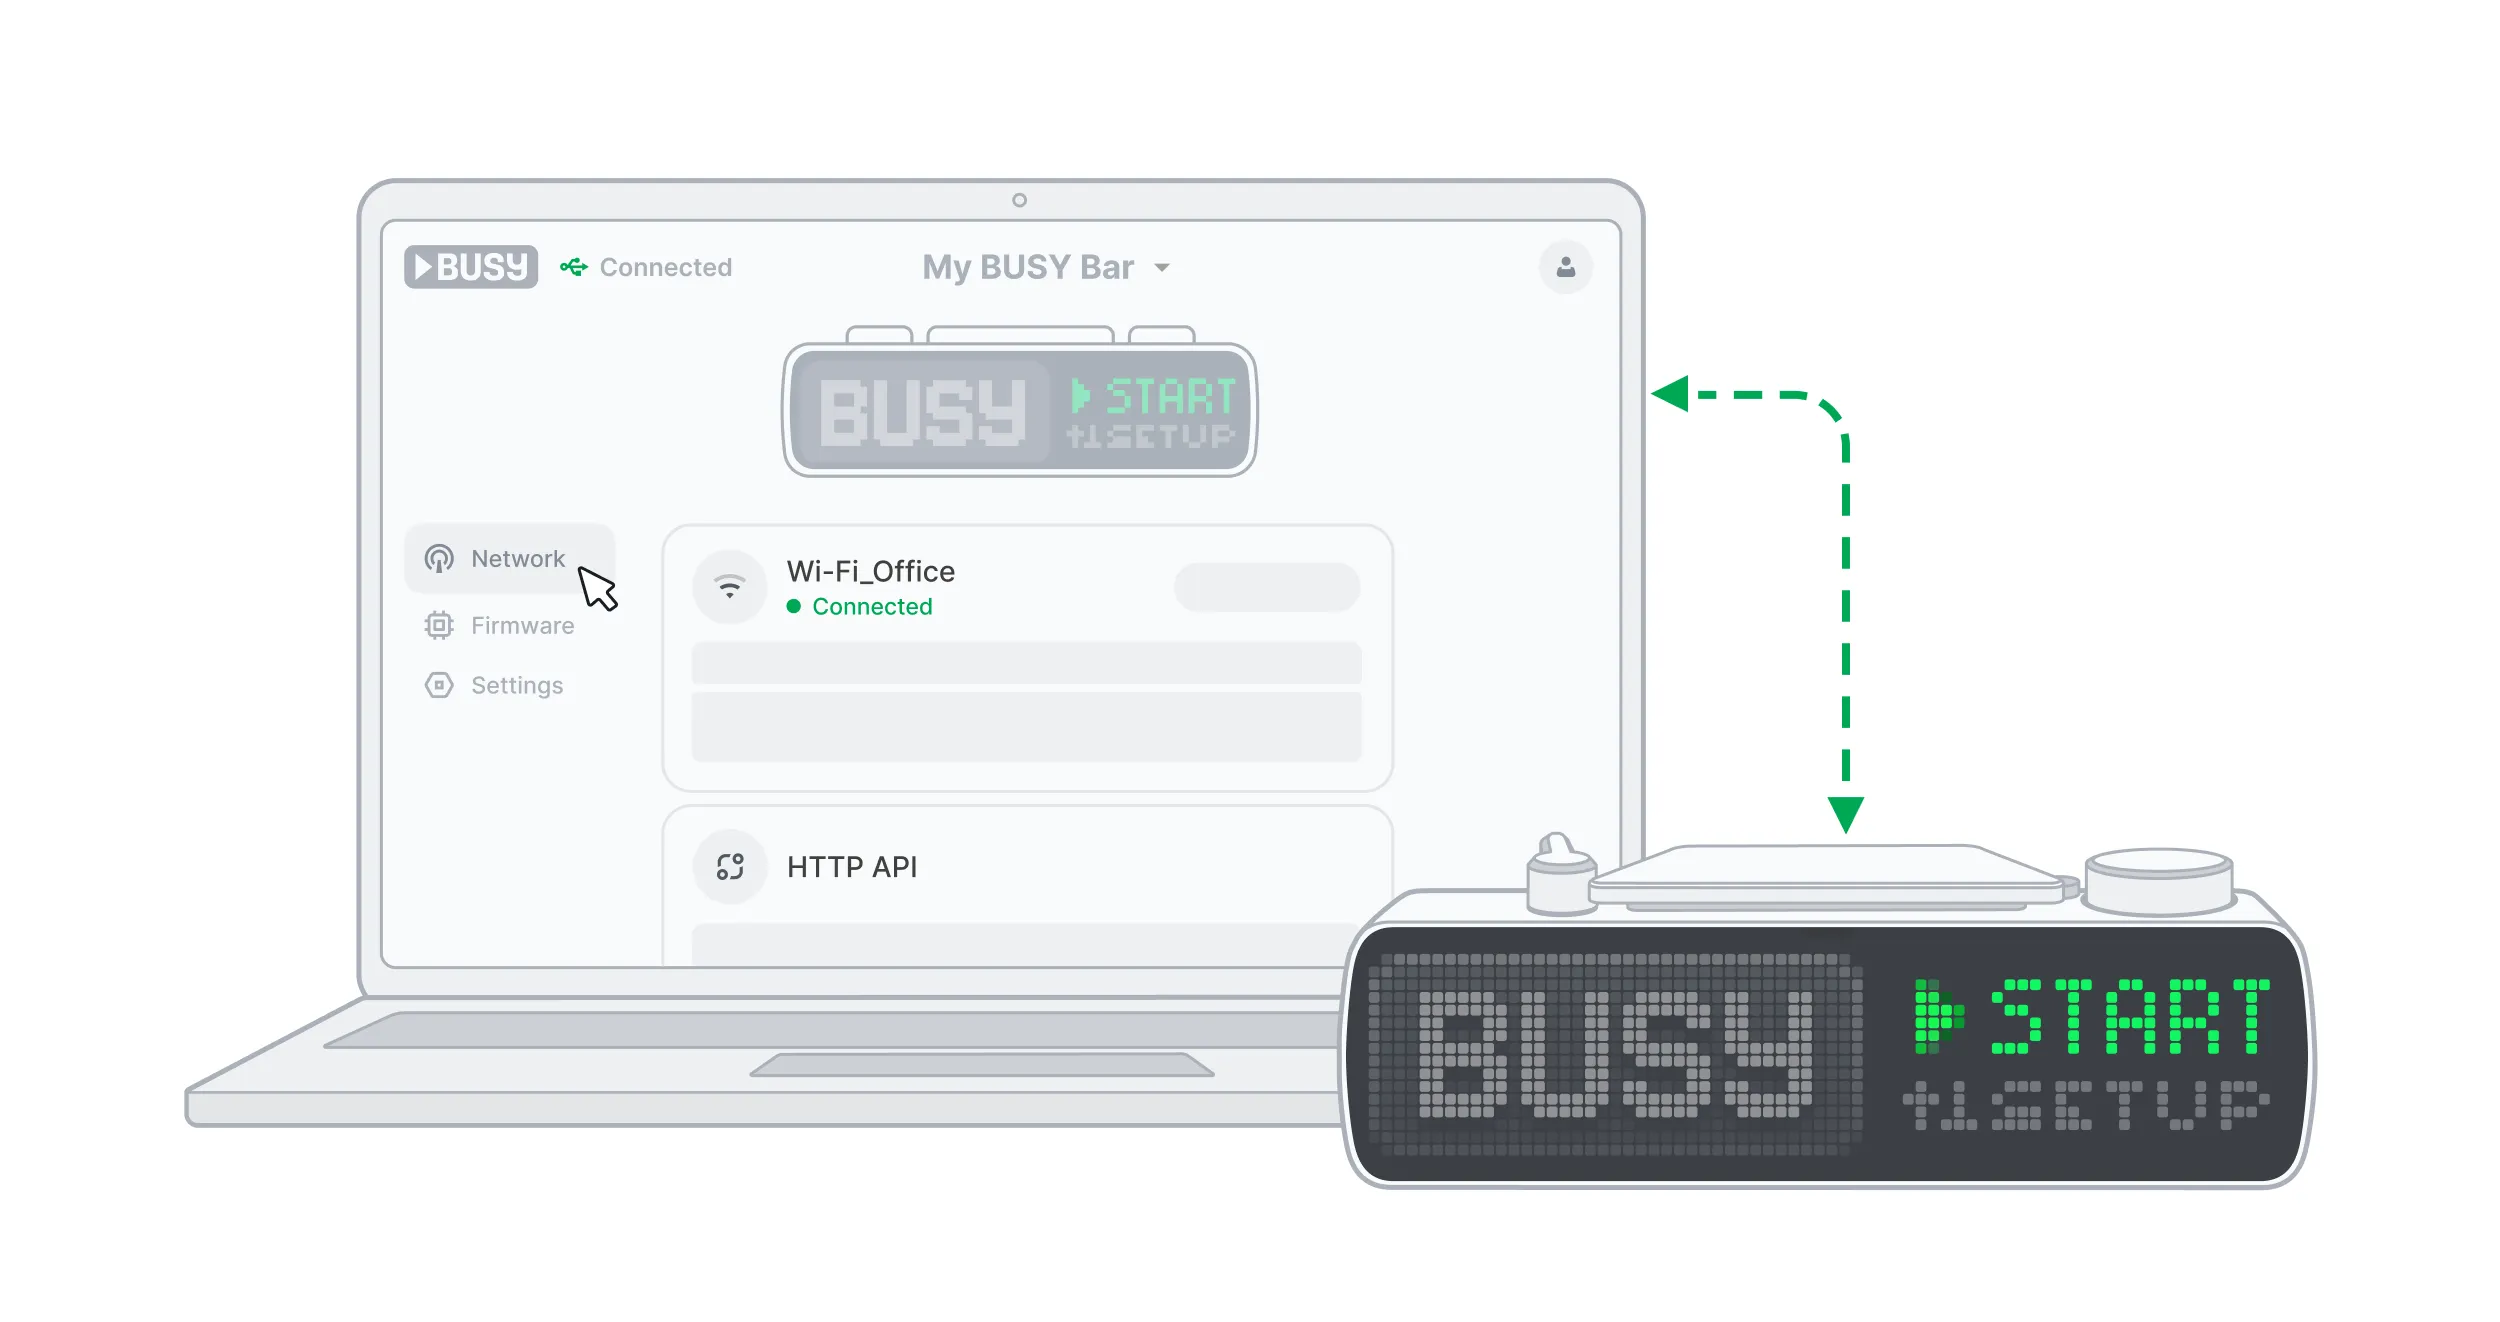
The local web interface is a control panel for your BUSY Bar that‘s built right into the device. It allows you to remotely control and update your BUSY Bar, create custom statuses, enable HTTP API access, and view the HTTP API reference.
Open it in any web browser using Wi-Fi (LAN) or USB Ethernet (virtual LAN).
Learn more: Local web interface%page%
Yes. Follow the steps described on the Local web interface page.
To change the web interface theme:
Сlick the  Account icon in the top-right corner.
Click Switch to light theme (or Switch to dark theme).
Yes, you can protect it with a password, and we recommend doing so. The password will be required when connecting over Wi-Fi, but not when connecting via USB.
To set a password for web interface access:
Сlick the Account icon in the top-right corner.
Click Set password.
Enter the password and click Set password.
Remember your web interface password carefully — it cannot be recovered, but only reset via a wired connection.
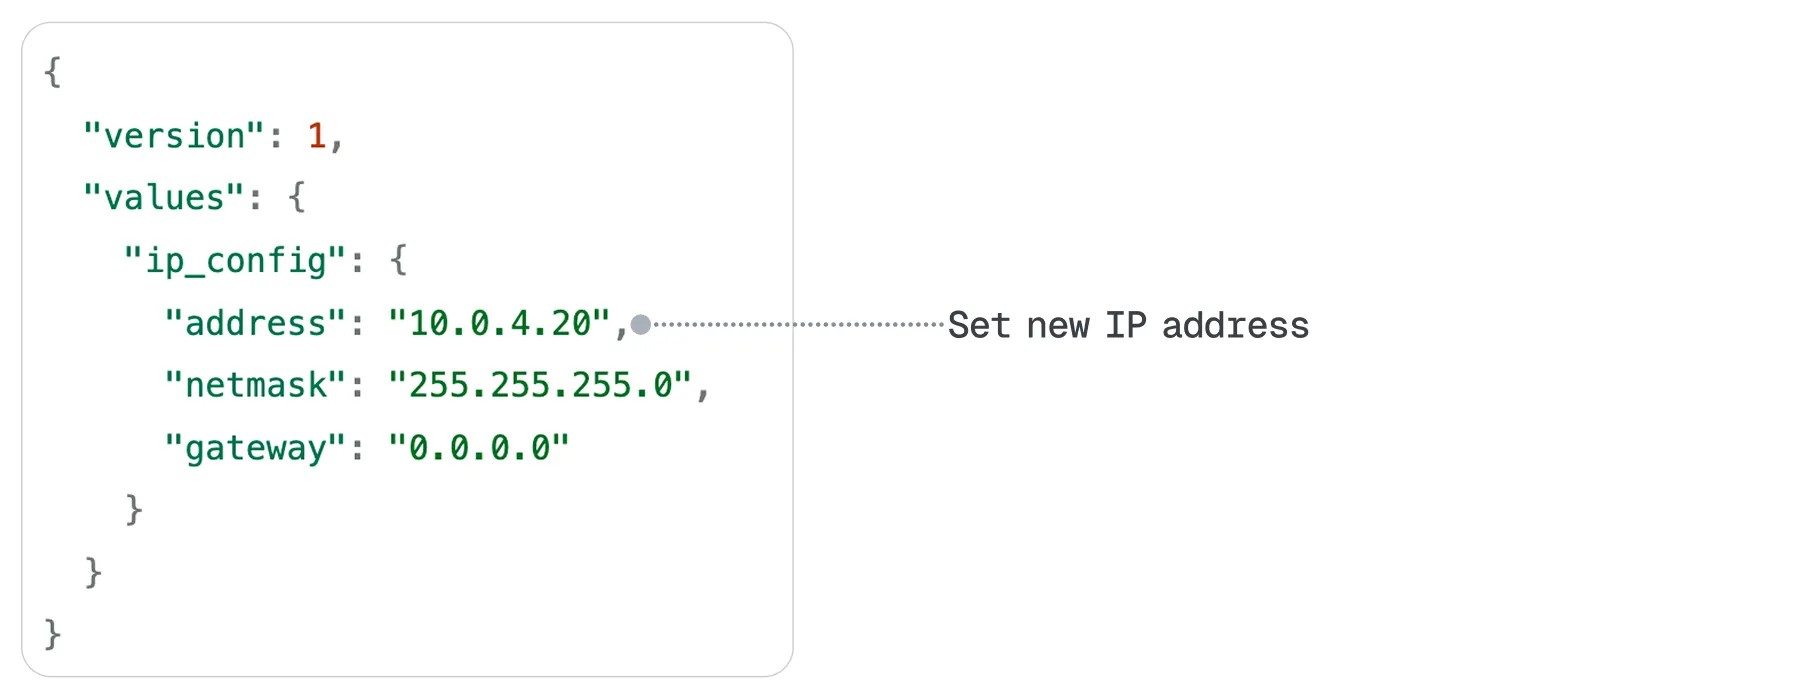
Yes. BUSY Bar's local web interface is available at 10.0.4.20 when the device is connected over USB. If that address conflicts with your network, change it by editing the settings.json file on your BUSY Bar.
Connect your BUSY Bar to a PC using a USB cable.
In your browser, go to 10.0.4.20/?path=/ext/apps_data/usb_srv
Right-click settings.json, then click Download file.
Open the downloaded file in a text editor, set the address field to the new IP address, and save it.
Go back to 10.0.4.20/?path=/ext/apps_data/usb_srv
Delete the old settings.json file.
Drag and drop the edited file into the browser window, then click Upload.
Restart your BUSY Bar by pressing and holding the  Start / Pause and Back buttons for 3 seconds.
In your browser, go to http://<new-address>. The web interface should load at the new address.
Smart home integration
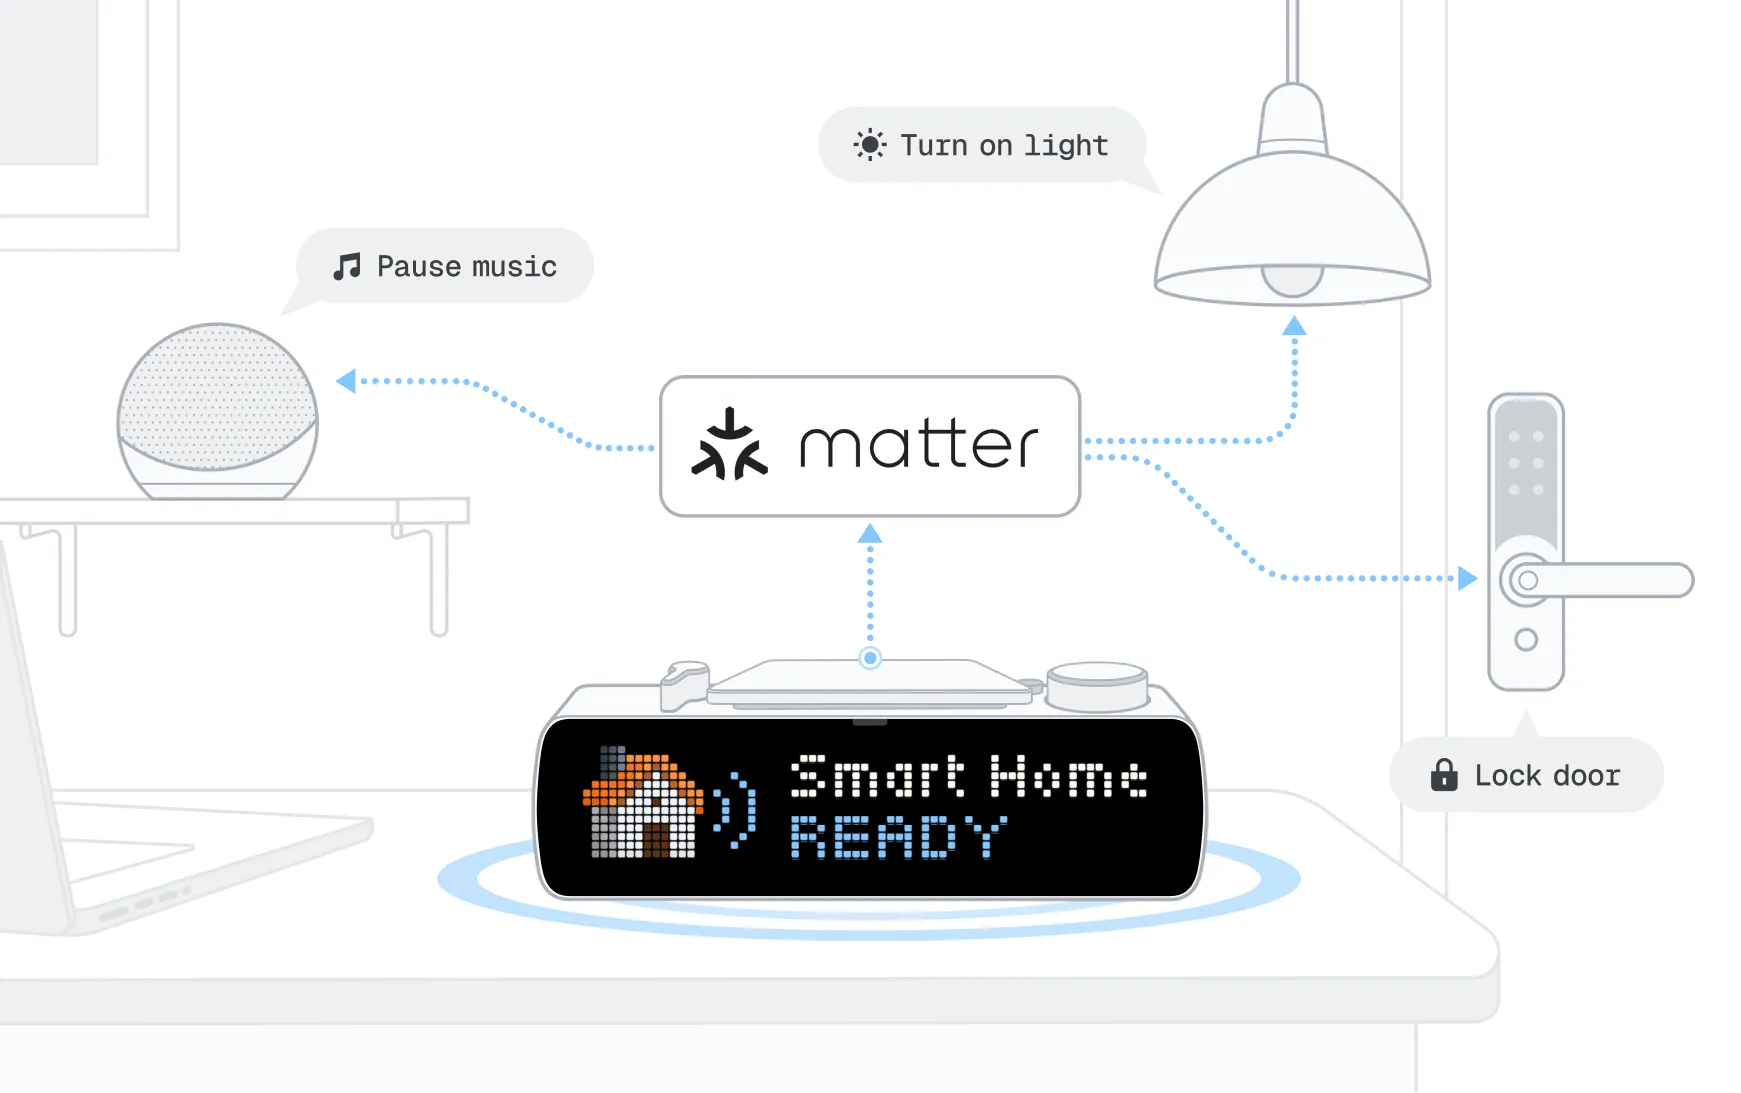
BUSY is Matter-certified and works with major smart home platforms, including Apple HomeKit, Google Home, Amazon Alexa, Samsung SmartThings, and Home Assistant.
Learn more: Compatible Matter Hub%page%Compatible Matter Hub%page%
Yes. Learn more: Connect to smart home%page%
You can do it right via your smart home app. General steps for most smart home systems:
Open your smart home app (the one you used to set up the device).
Go to Devices or Home.
Select the BUSY Bar you want to remove.
Look for Settings (⚙️) or Device Info.
Tap Remove device / Delete / Unpair.
Confirm removal.
You cannot disconnect the BUSY Bar from a single smart home system directly on the device itself. You can only remove all existing pairings at once.
Learn more: Connect to smart home%page%
Wall mount
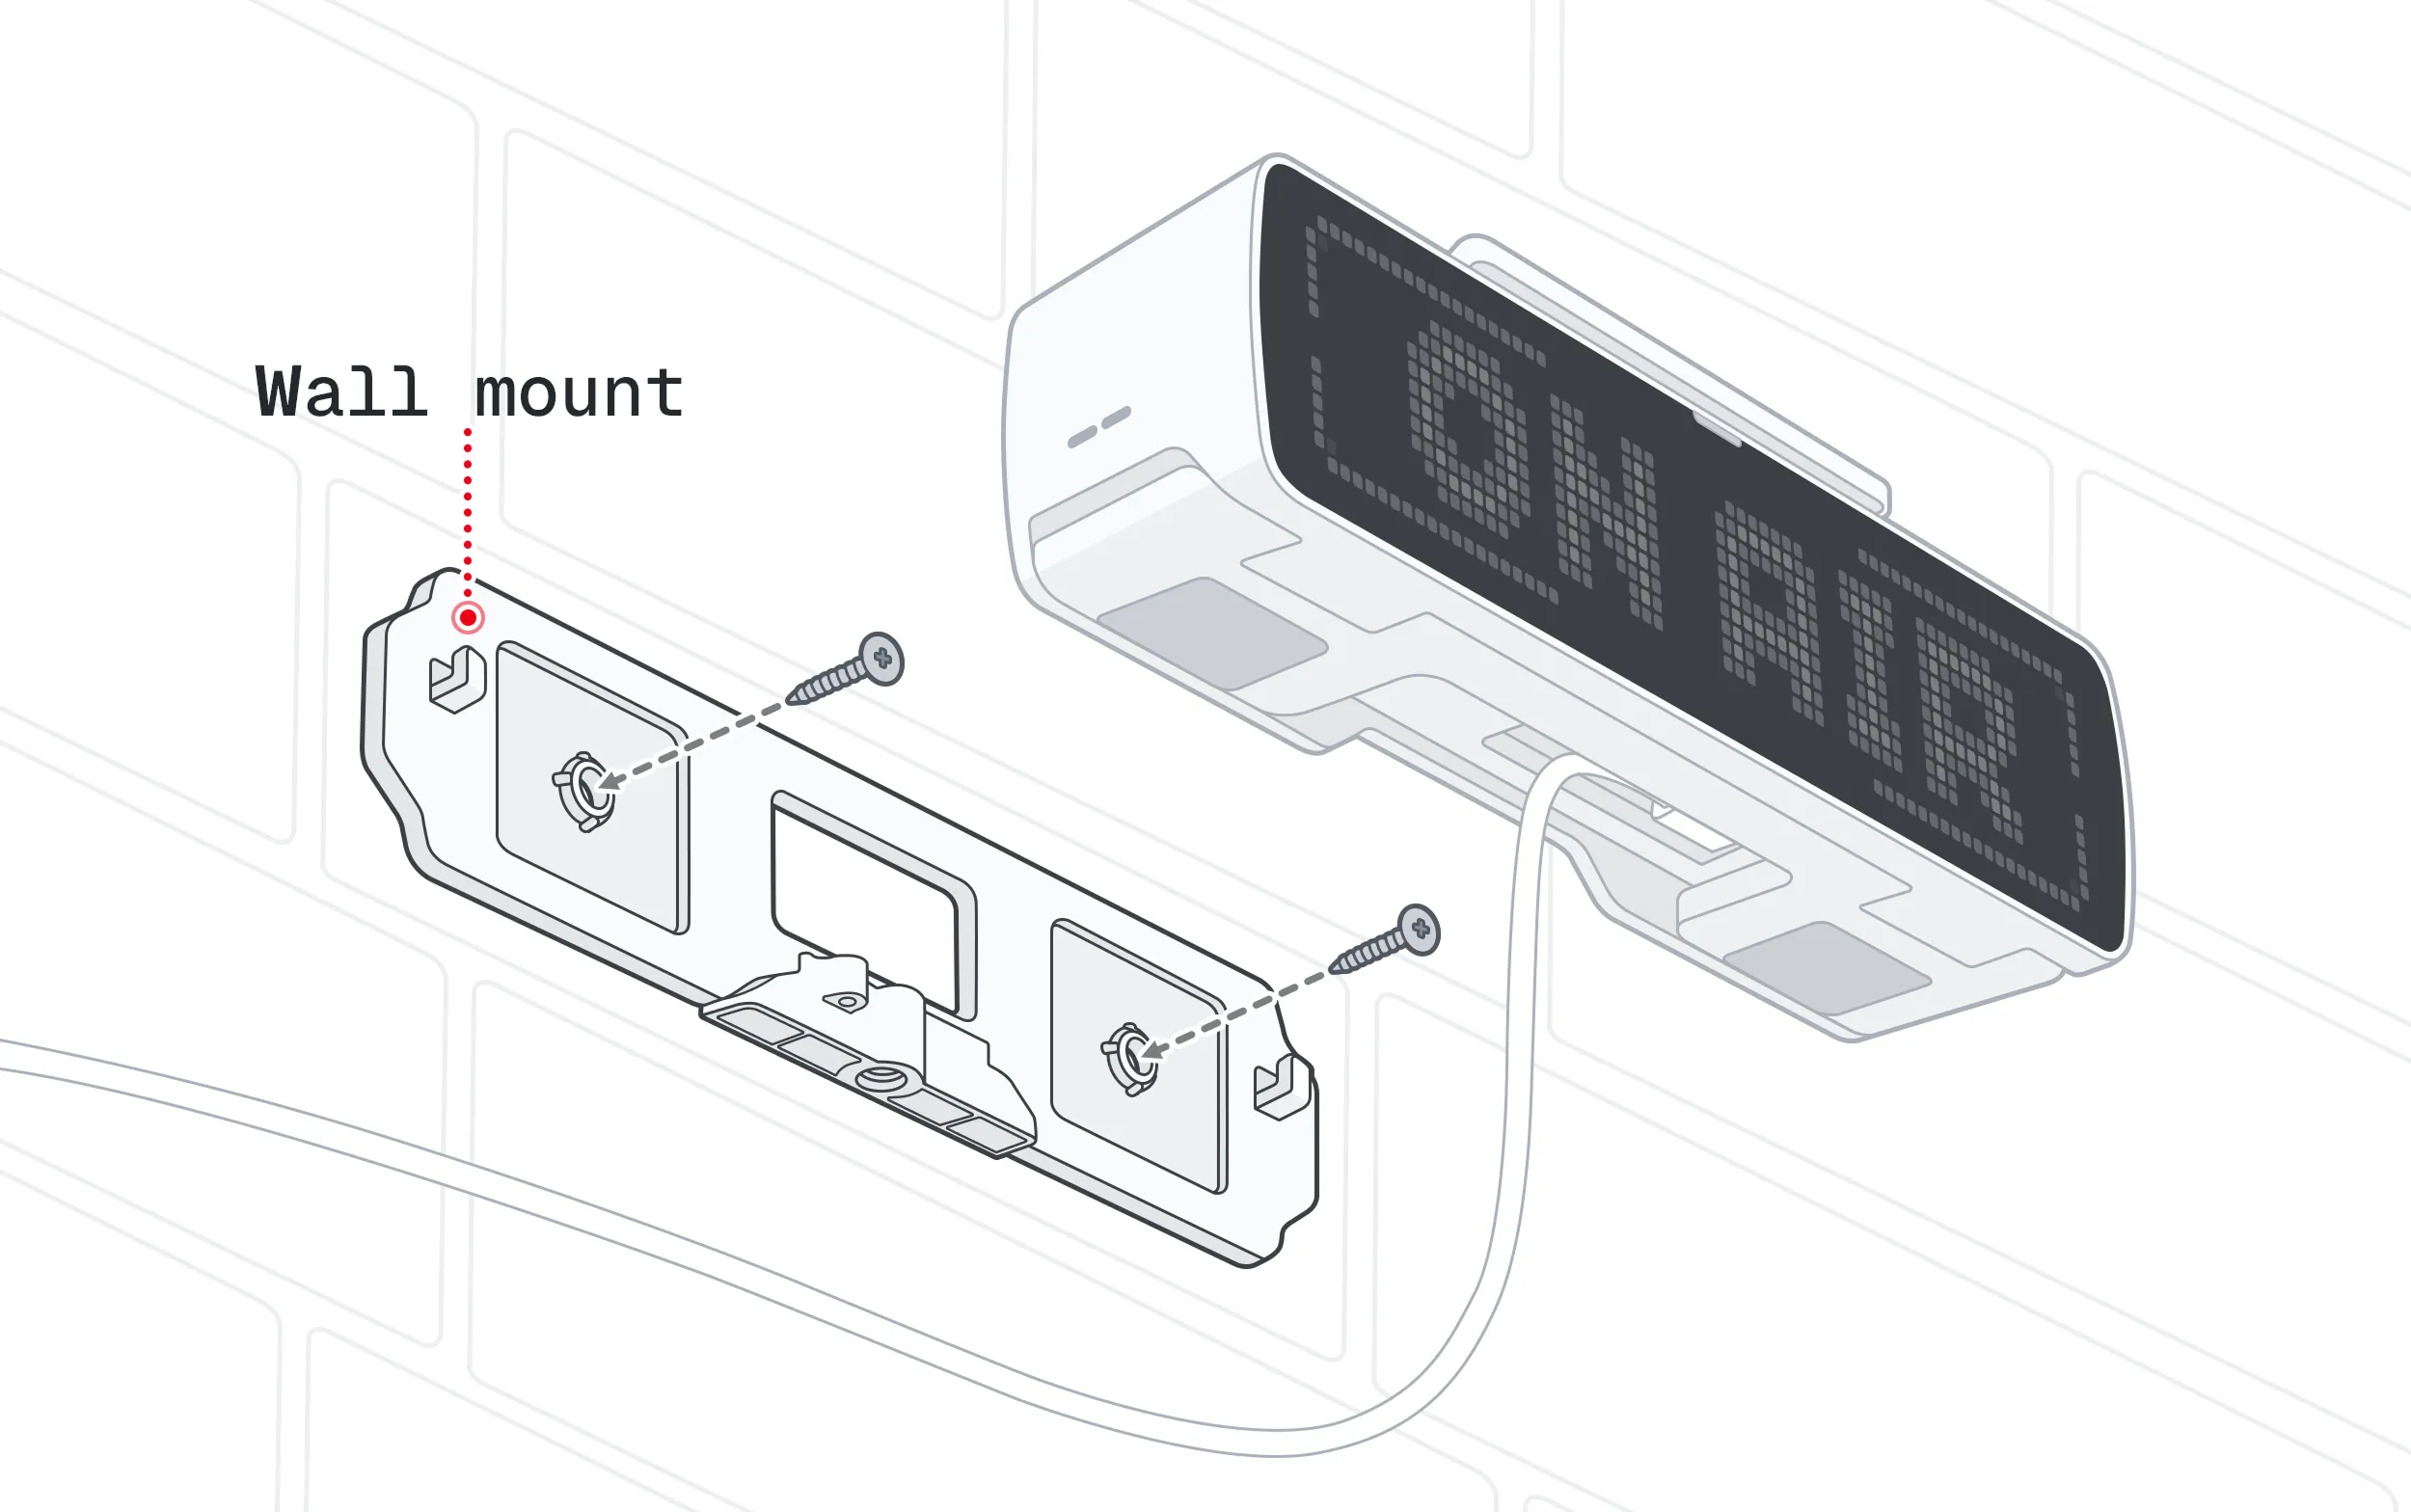
You‘ll need:
 For wooden wall:
- 2× wall screws: 3×18–35 mm self-tapping, with a pan head
- 1× locking screw: ST1.7 × 8 mm self-tapping, with a pan head
 For brick or concrete wall:
- 2× wall screws: 3×18 mm self-tapping, with a pan head
- 2× wall plugs: 4×20 mm, plastic
- 1× locking screw: ST1.7 × 8 mm self-tapping, with a pan head
Yes. You can replace the double-sided tape.
Get a double-sided tape.
We recommend Premium Crown 513 Double-Sided Tape or similar.
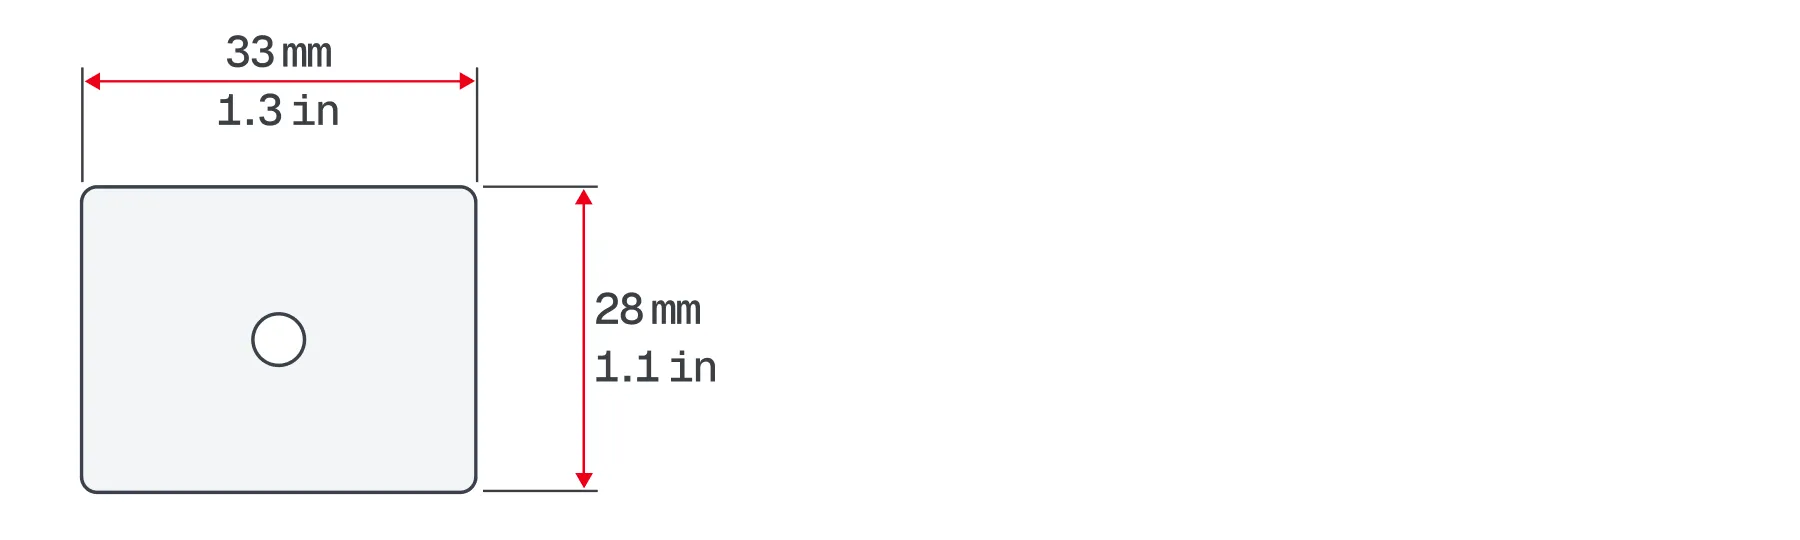
Cut out two pads, each 28×33 mm (1.10×1.30 in).
Clean the back of the wall mount with rubbing alcohol, then let it dry.
Peel off the backing paper from one side of each double-sided tape pad.
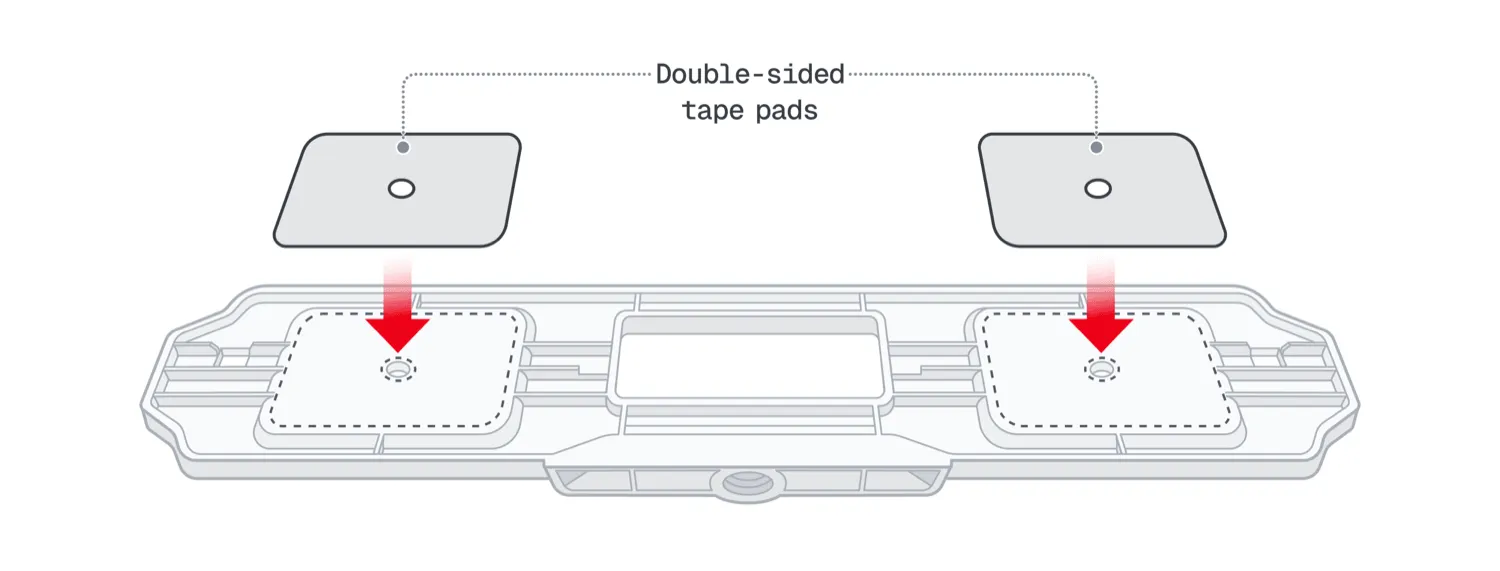
Apply the double-sided tape pads to the back of the wall mount as shown below, then press them firmly.
Development
You can create your own BUSY Bar widgets using our open HTTP API, turning the device into a programmable display showing real-time data. The BUSY SDK and support for executable apps are coming soon.
Visit the Development section to explore the API documentation, libraries, and developer guides. We hope you have fun building with BUSY Bar.
We‘re continuously expanding the platform with new capabilities. Support for executable apps is coming soon. Stay tuned!
The BUSY SDK will allow developers to build JavaScript applications that run directly on BUSY Bar.
We plan to release it later this year. Stay tuned!
Recycling
Local regulations may require you to remove the battery before disposing of electronic devices. Follow the steps below to safely remove the battery from your BUSY Bar.
Step 1. Remove the back cover
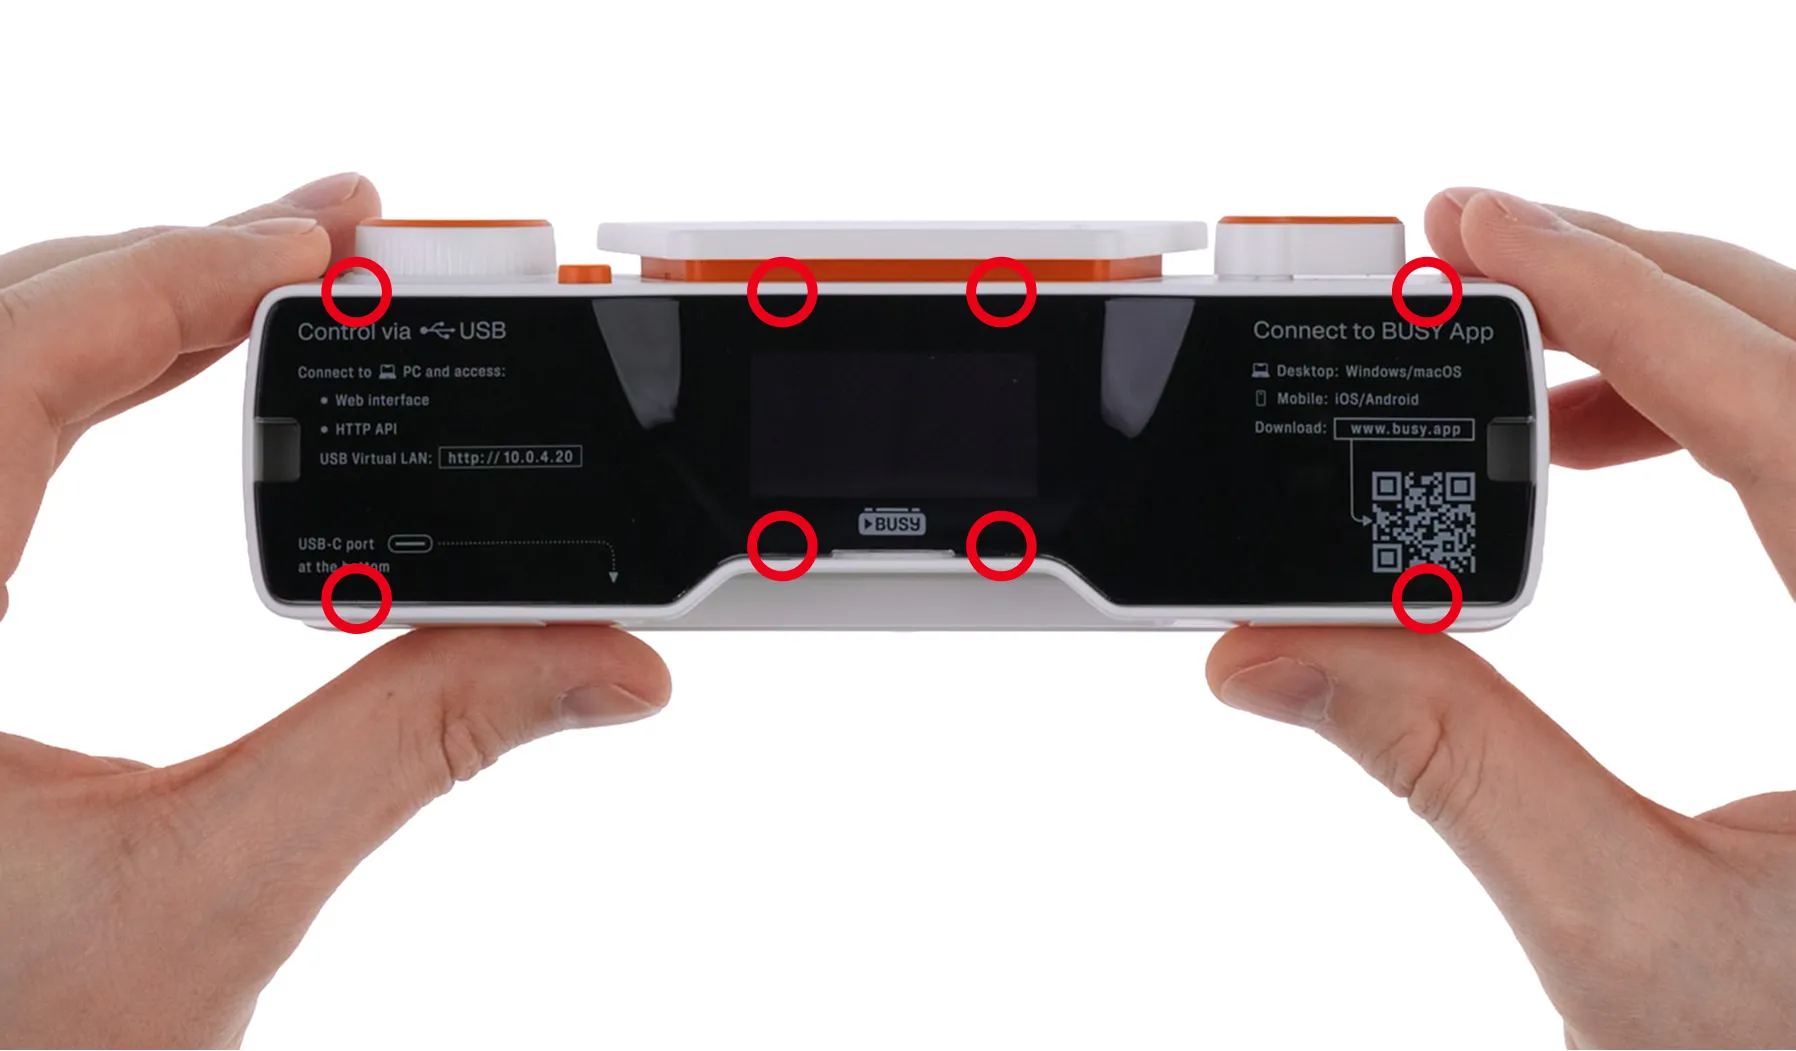
Start disassembly by removing the glossy black cover from the back of the device, which covers the back display:
Use a plastic card to release one of the clips near the center at the bottom of the back cover.
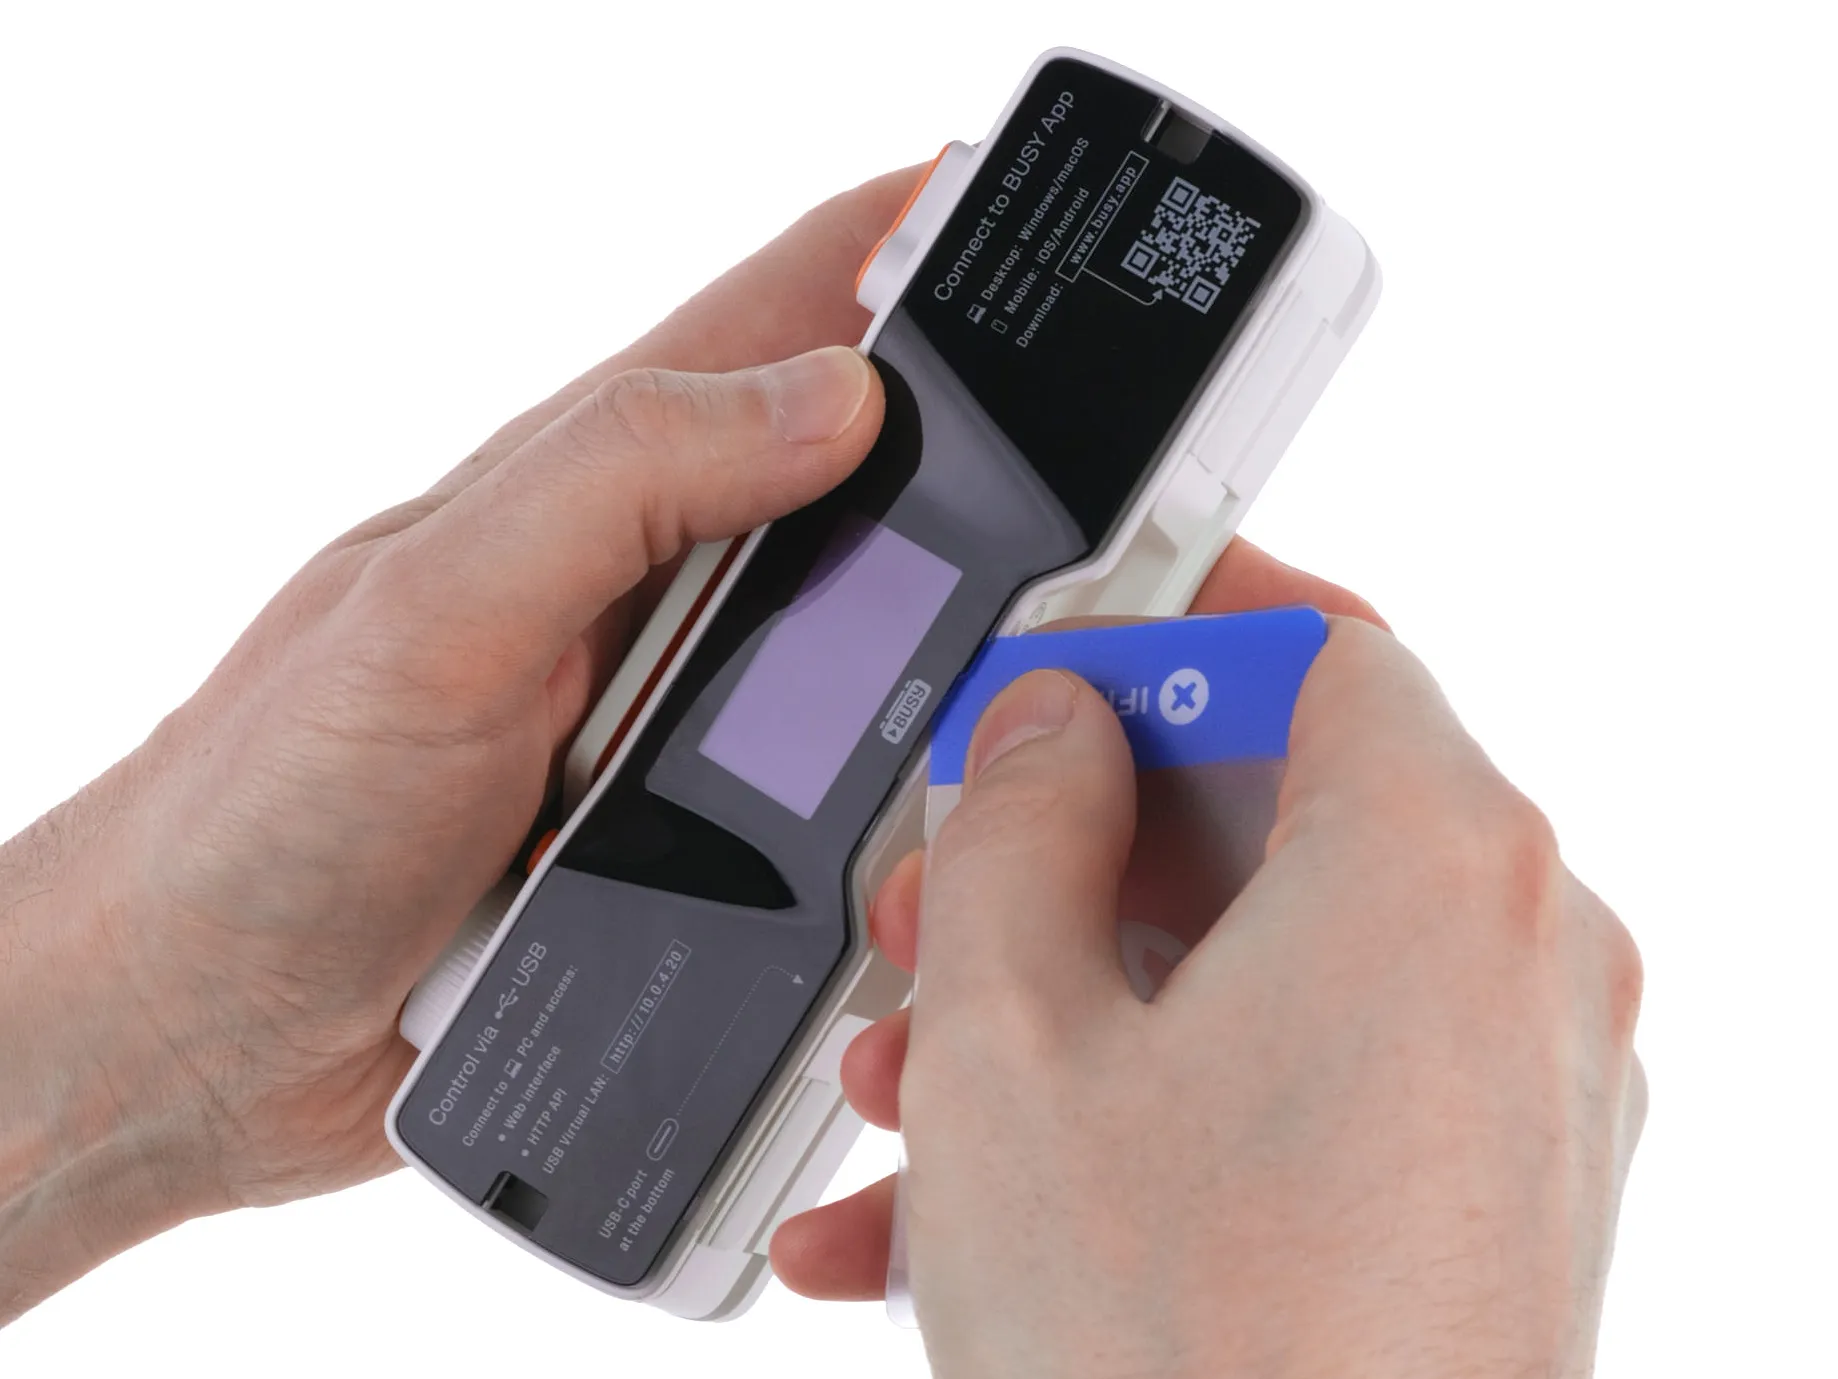
Gently release the remaining clips until the back cover comes off completely. The back cover is held in place by 8 clips.
Step 2. Remove the screws
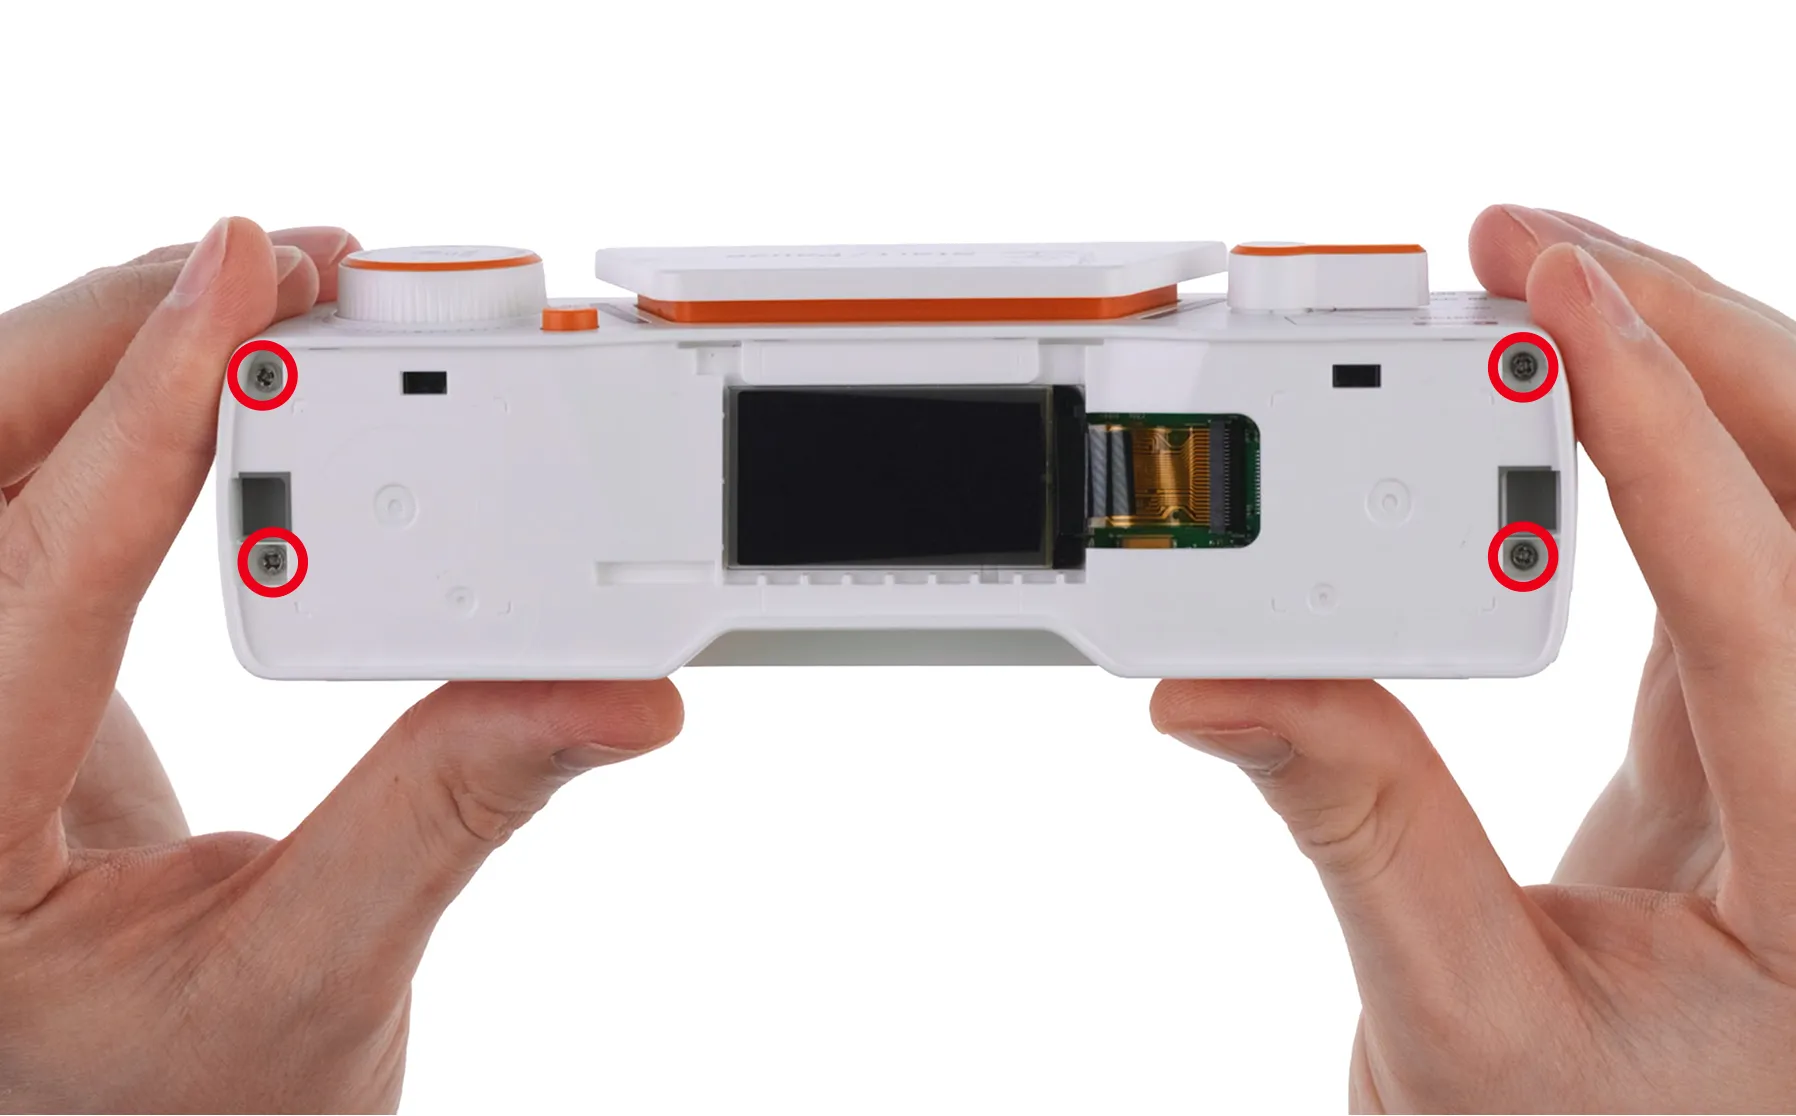
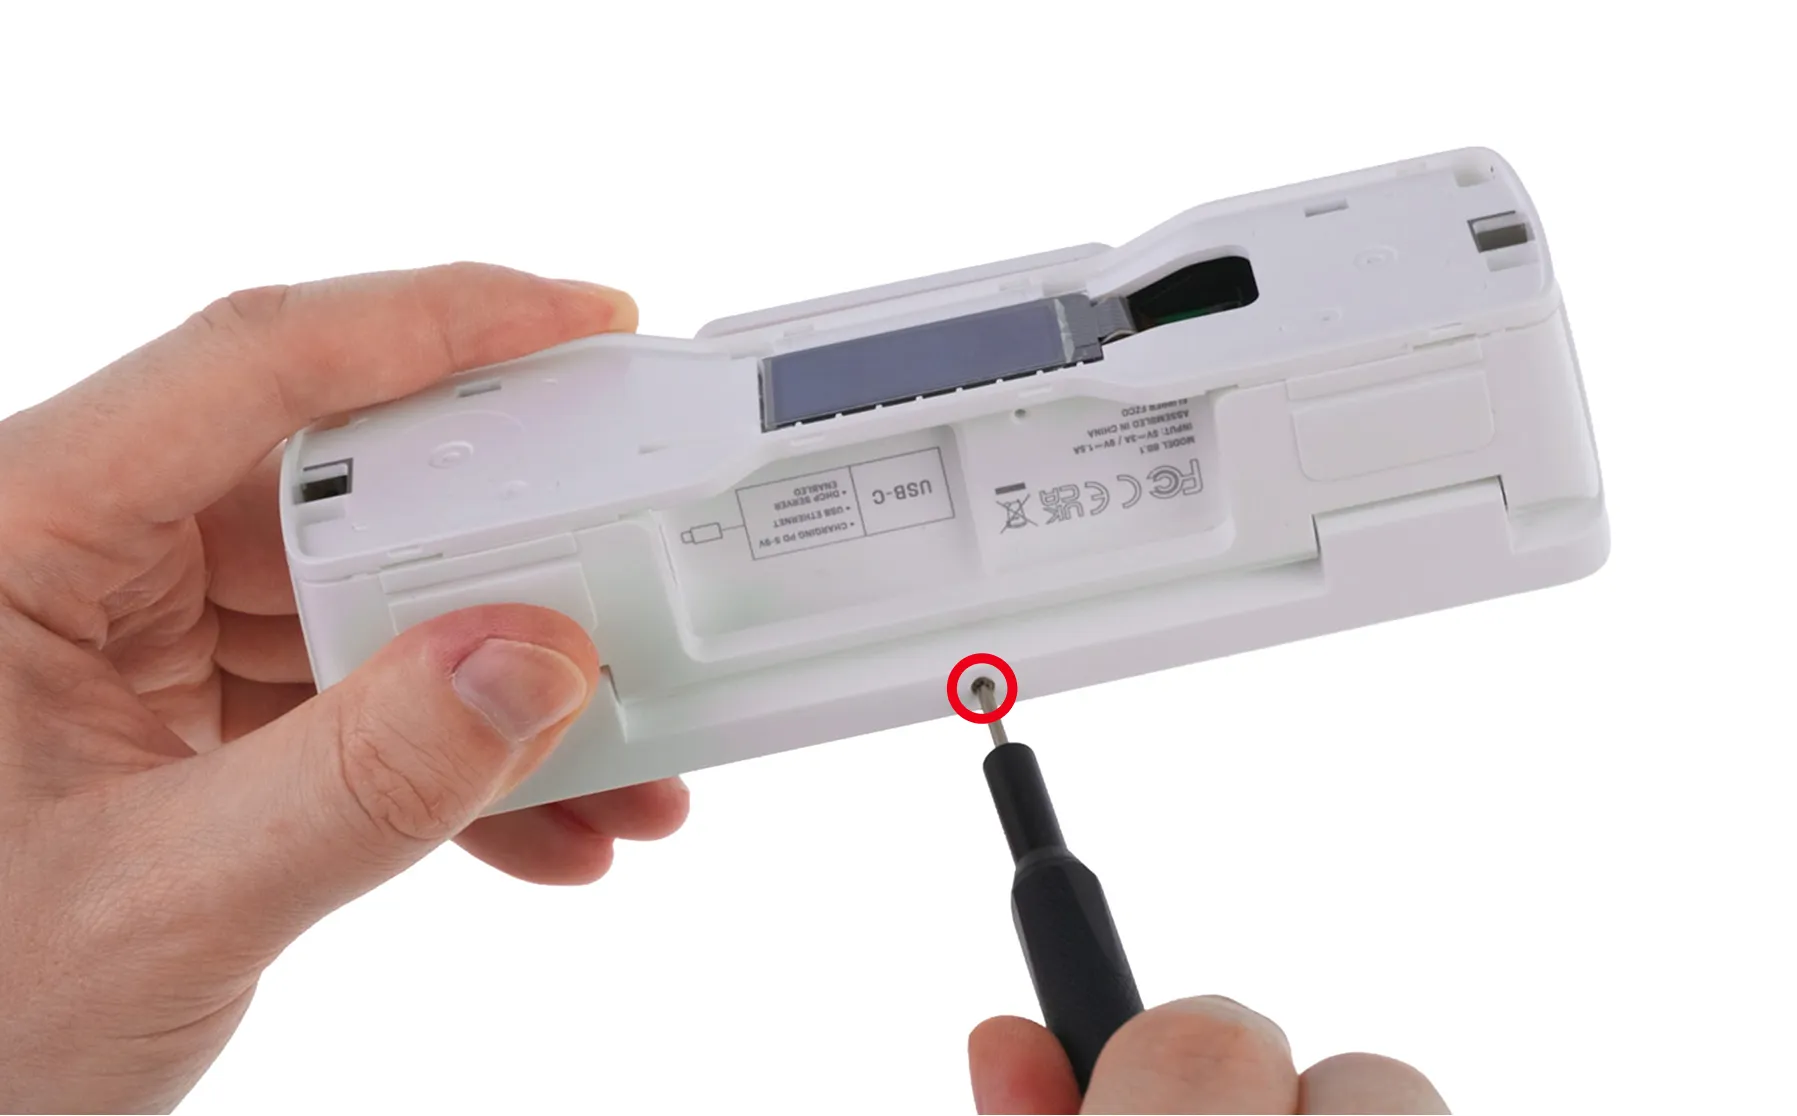
Use a PH1 screwdriver to remove the 5 screws:
4 screws on the back of the device.
1 screw on the bottom of the device.
Step 3. Remove the front display unit
Important
Do not pull the display unit too far out of the housing, as this may damage the display cable or connectors.
Do not disconnect the display cable. The battery must be disconnected first.
Use a plastic card to release the 2 latches on top of the front display.
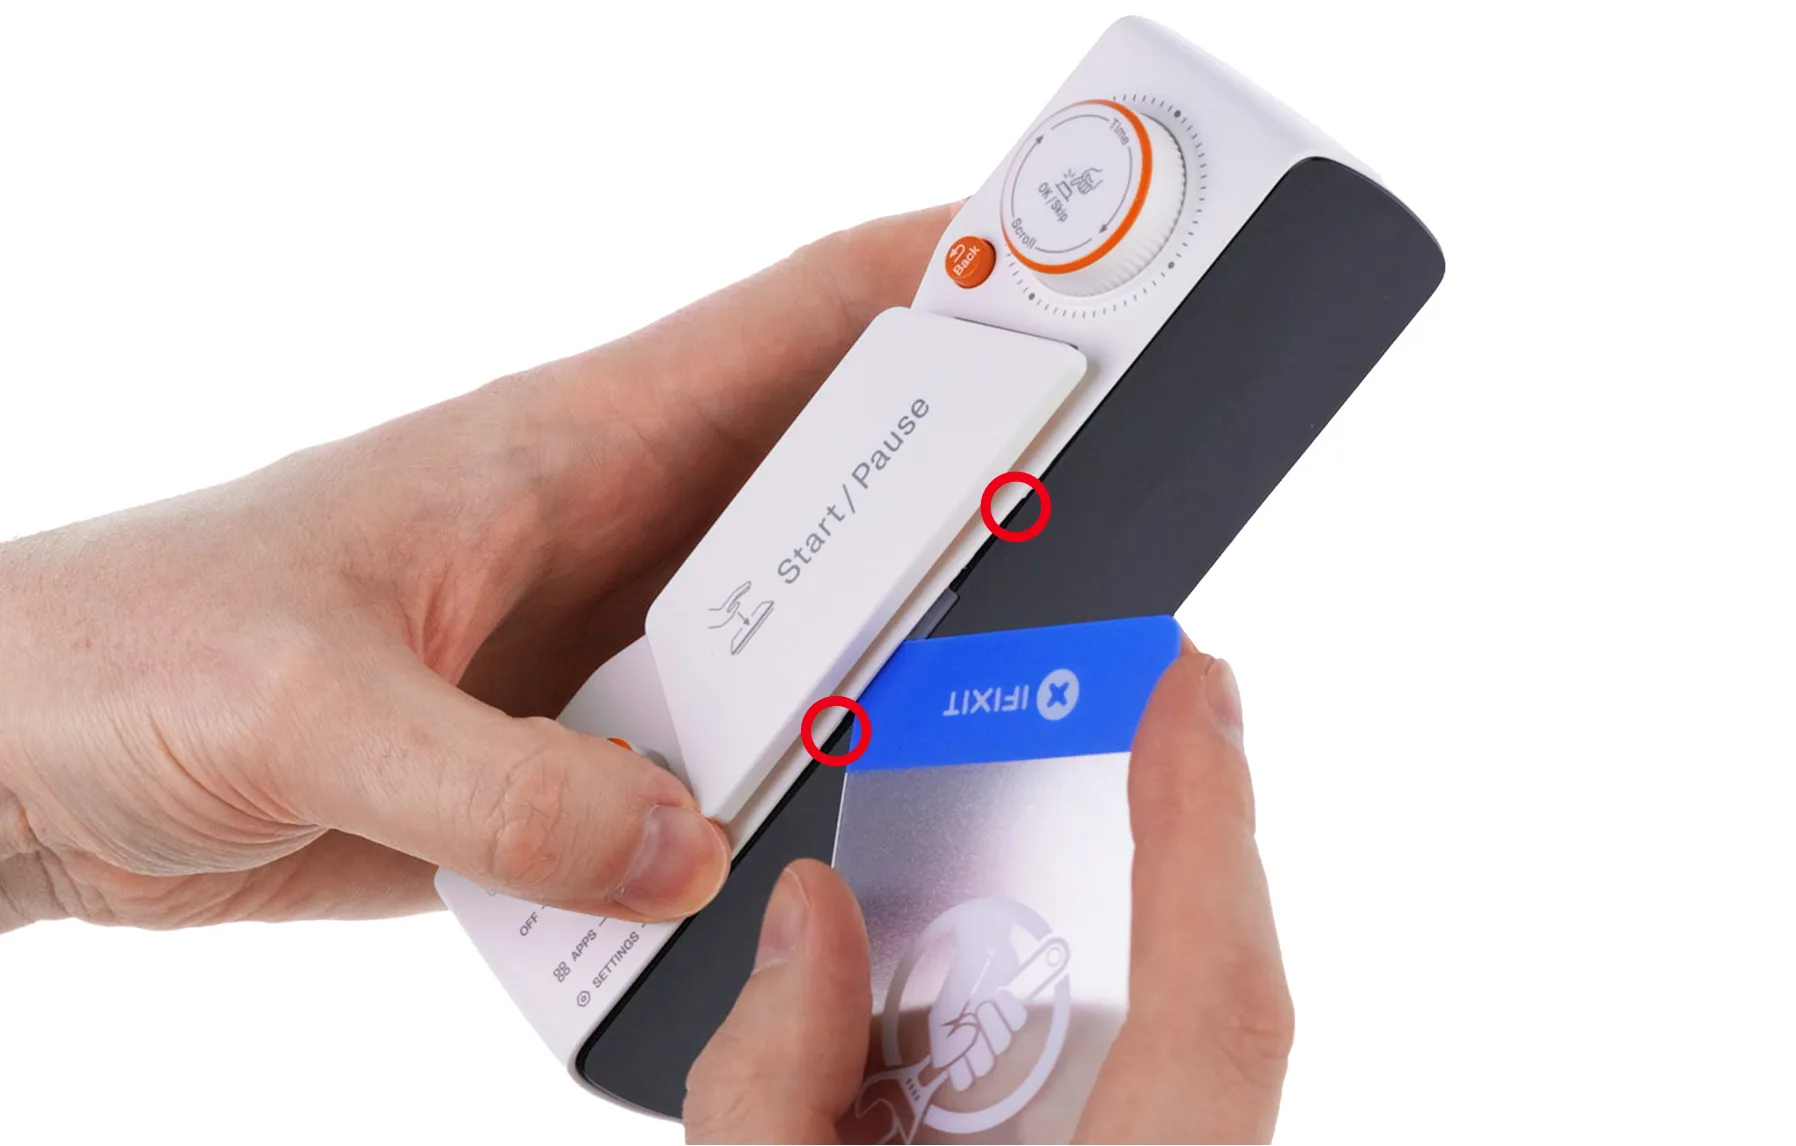
Gently pull the front display unit out toward the right.
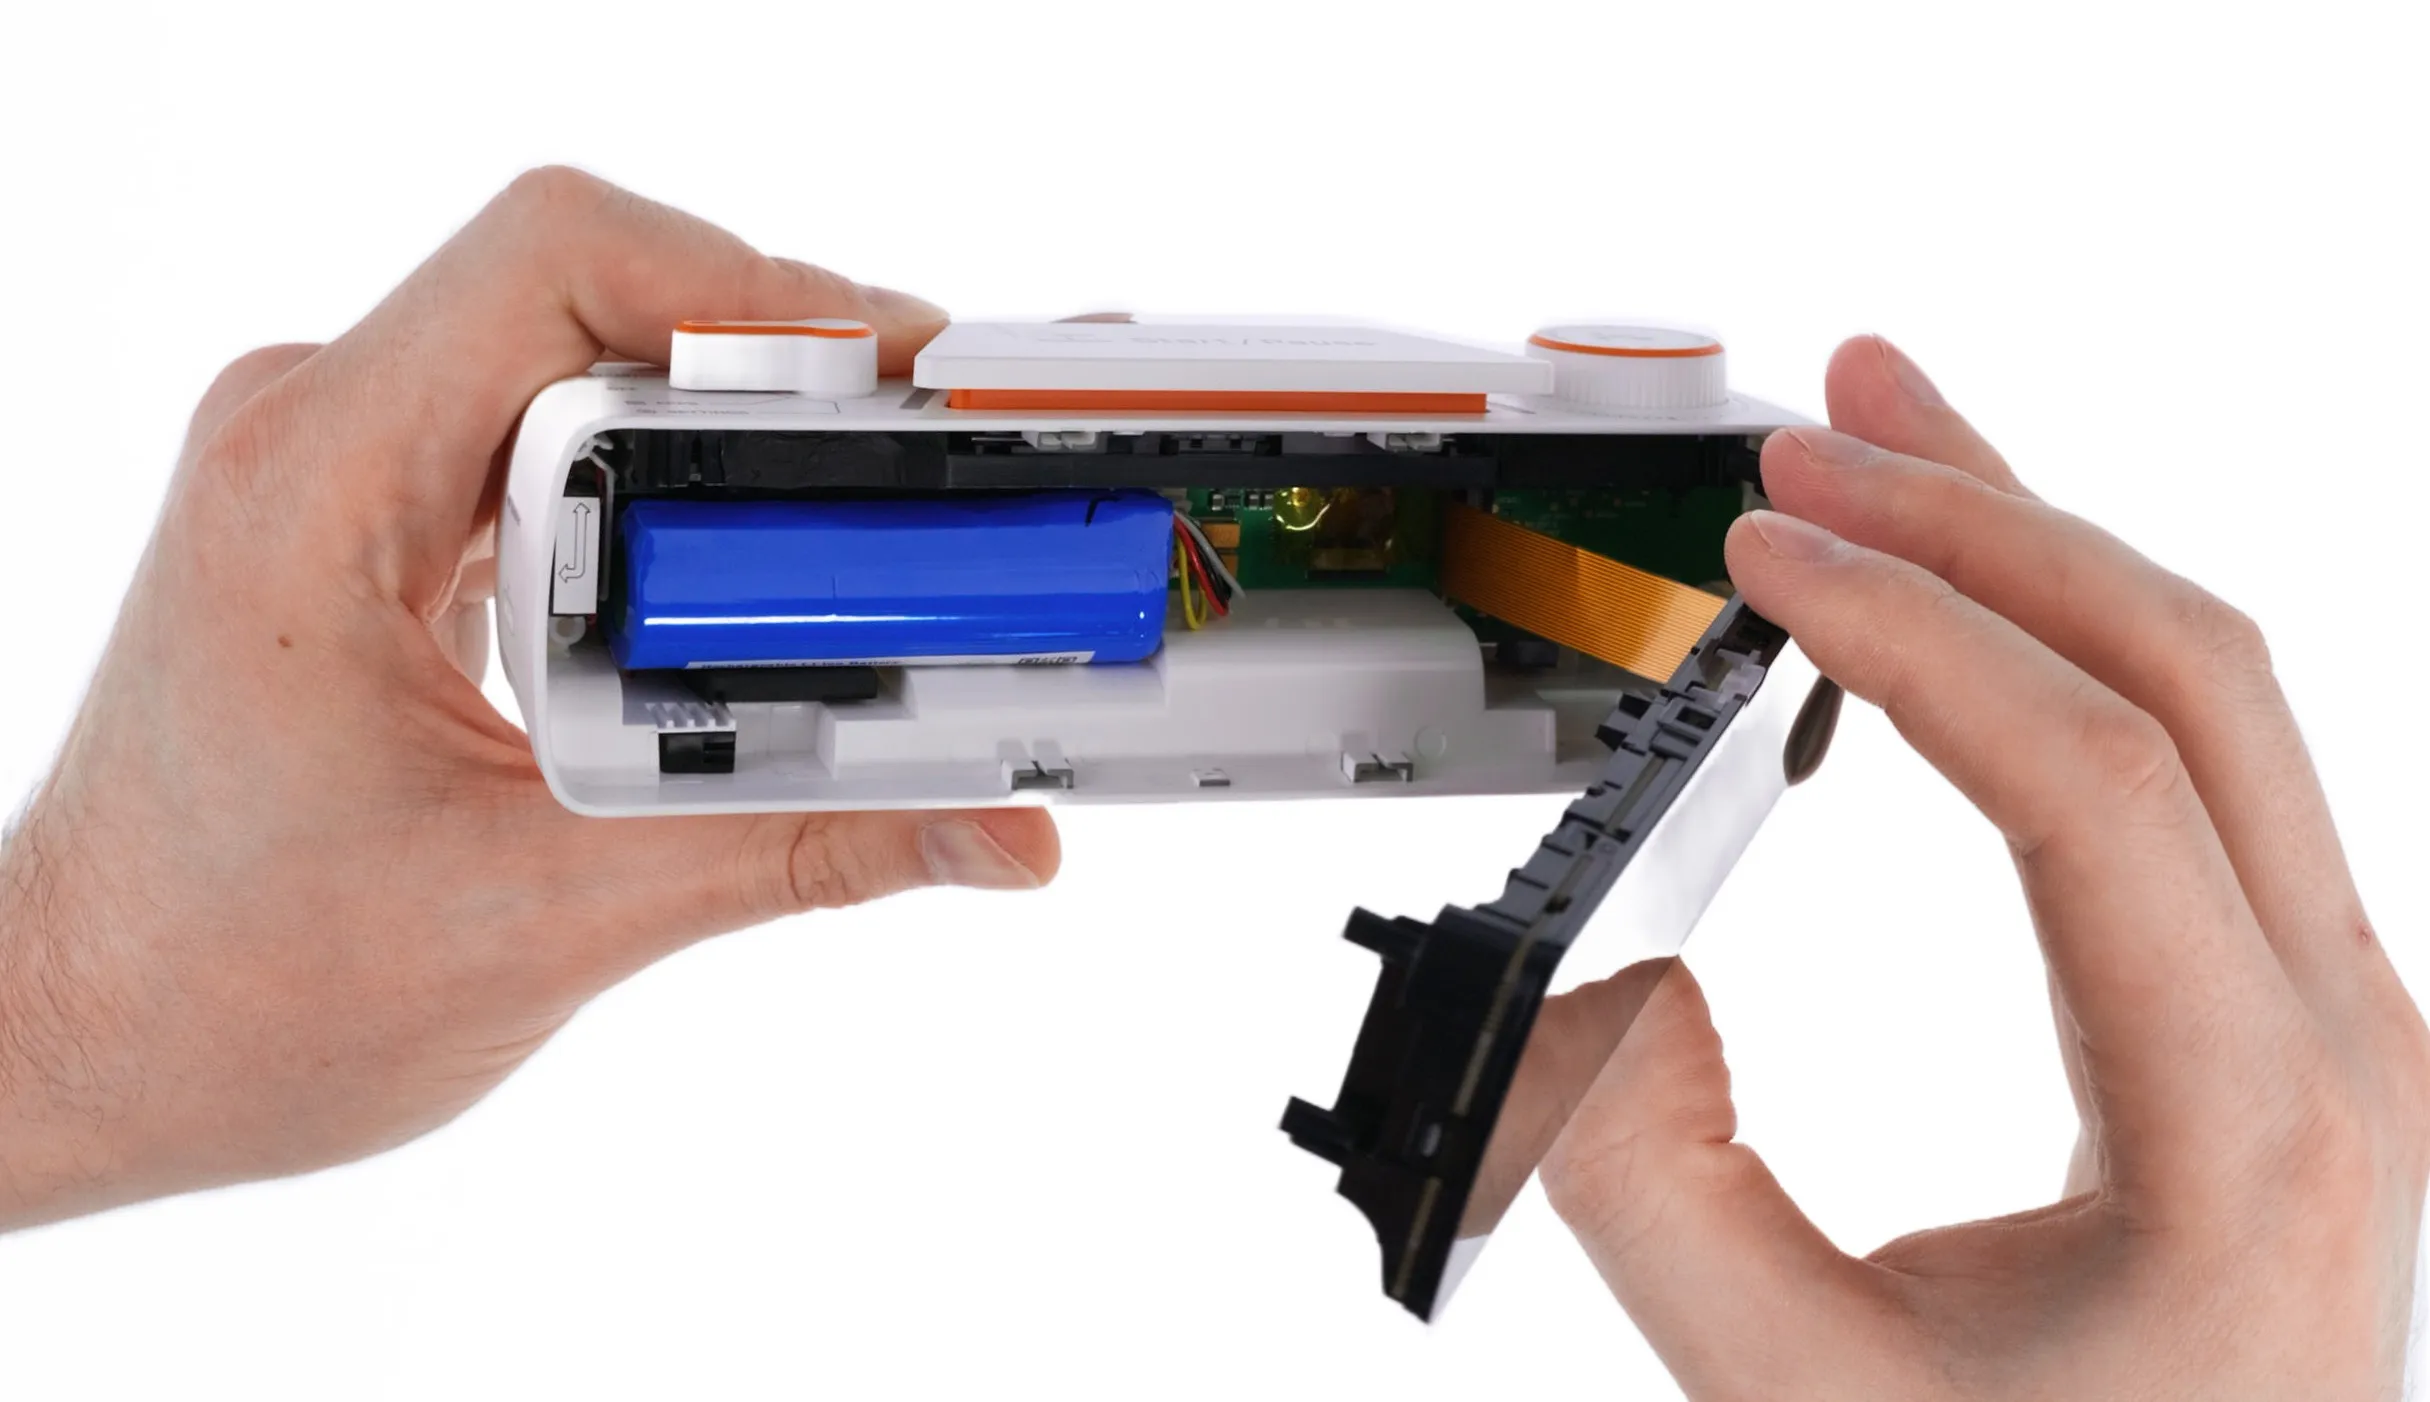
Step 4. Remove the battery
Gently move the battery to the left so you can access the connector.
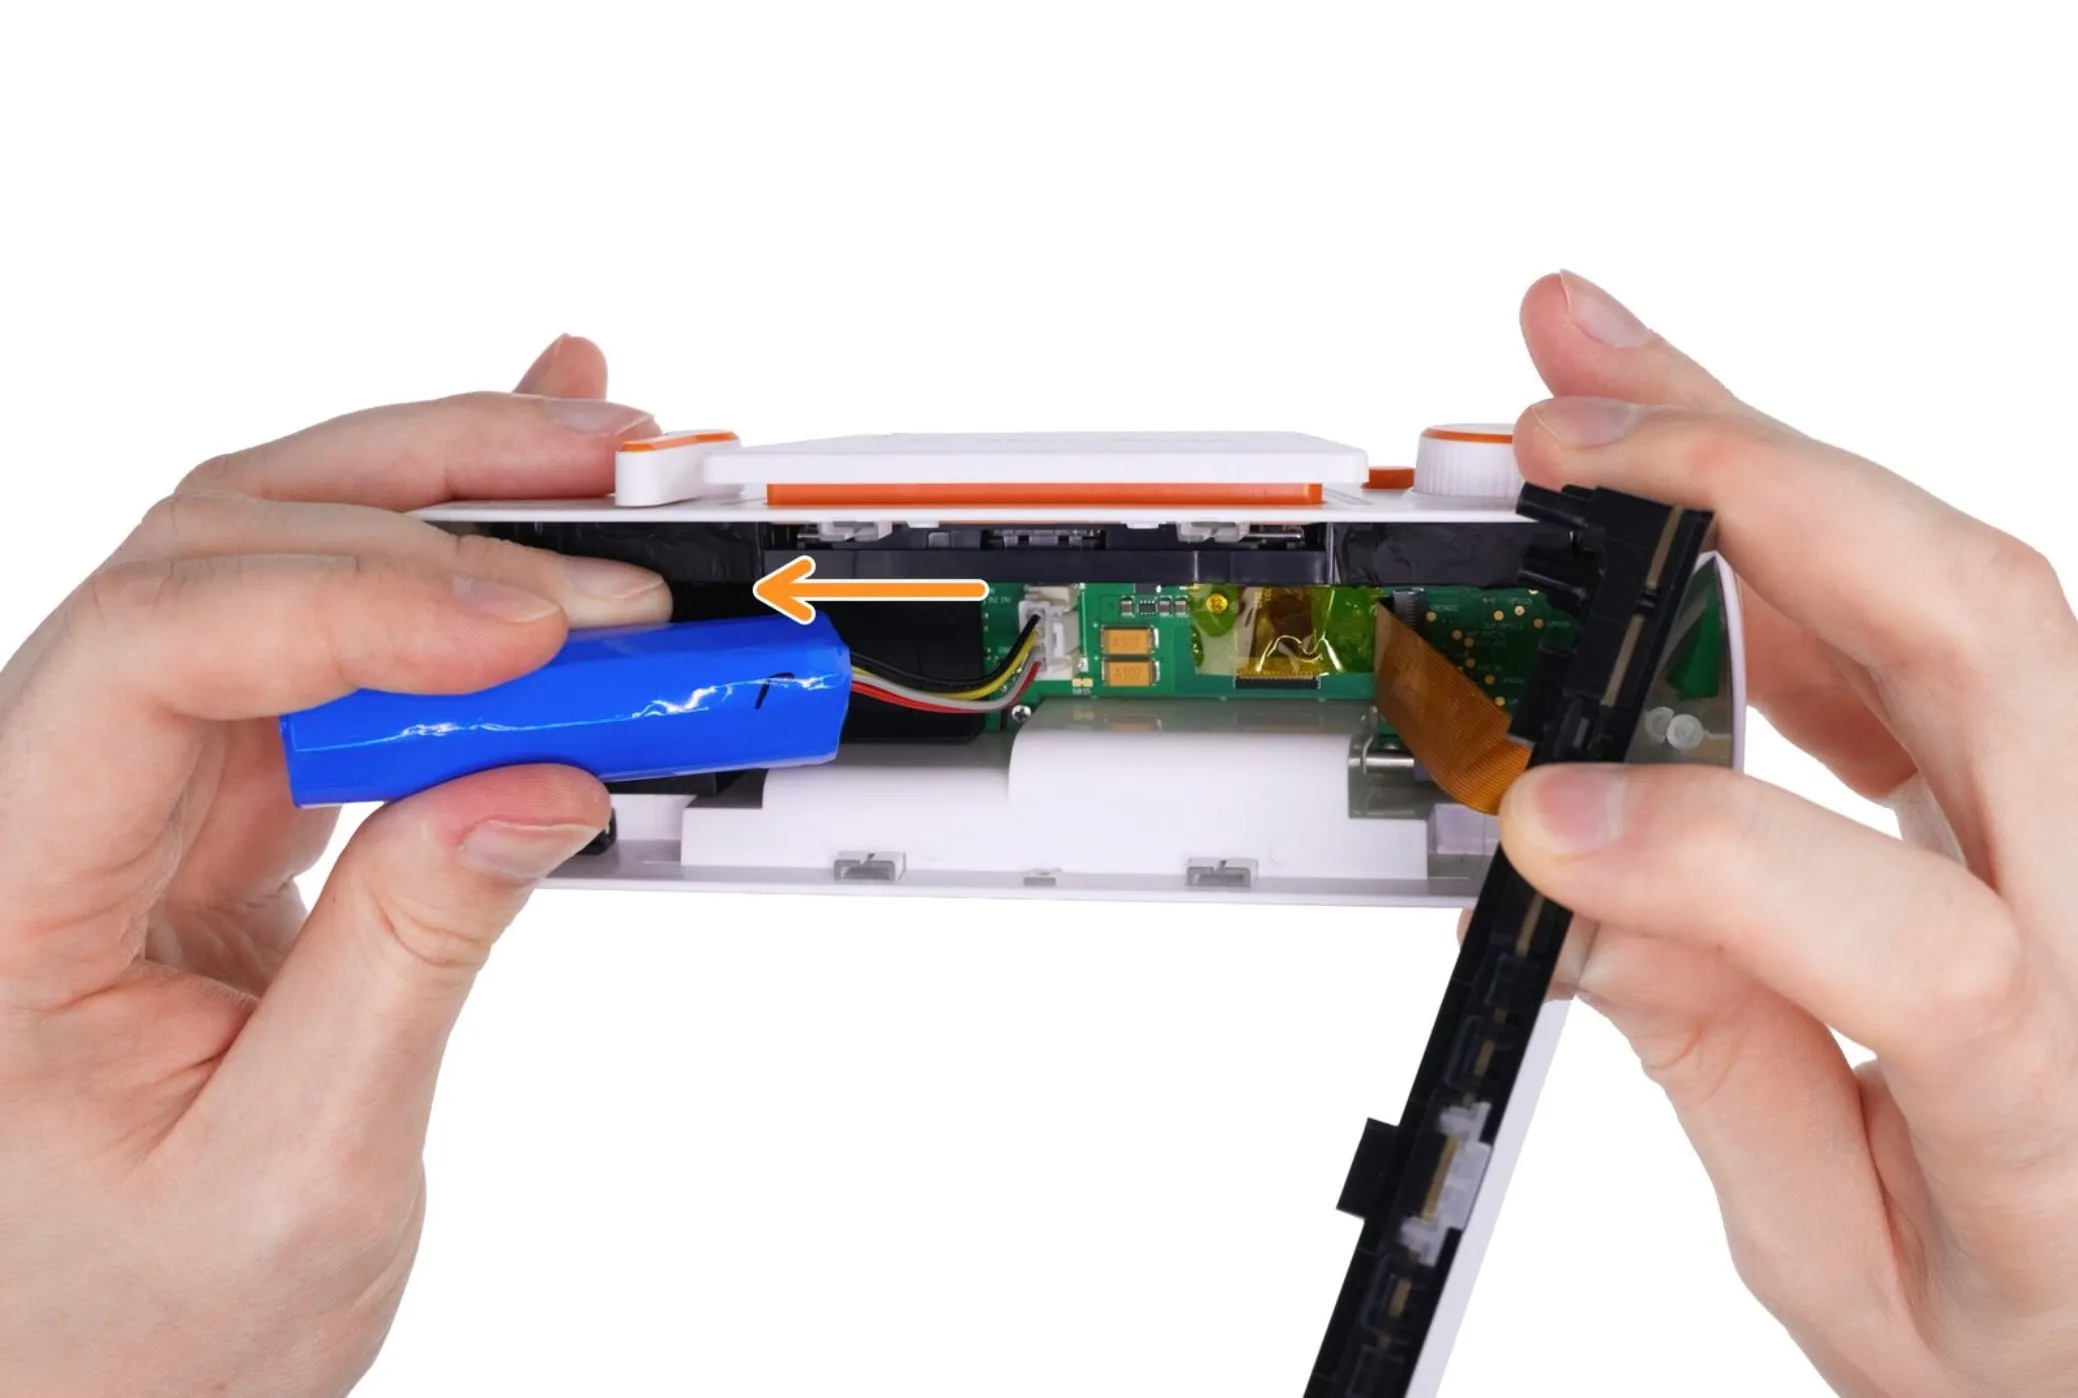
Use tweezers or your fingertip to press the connector latch.
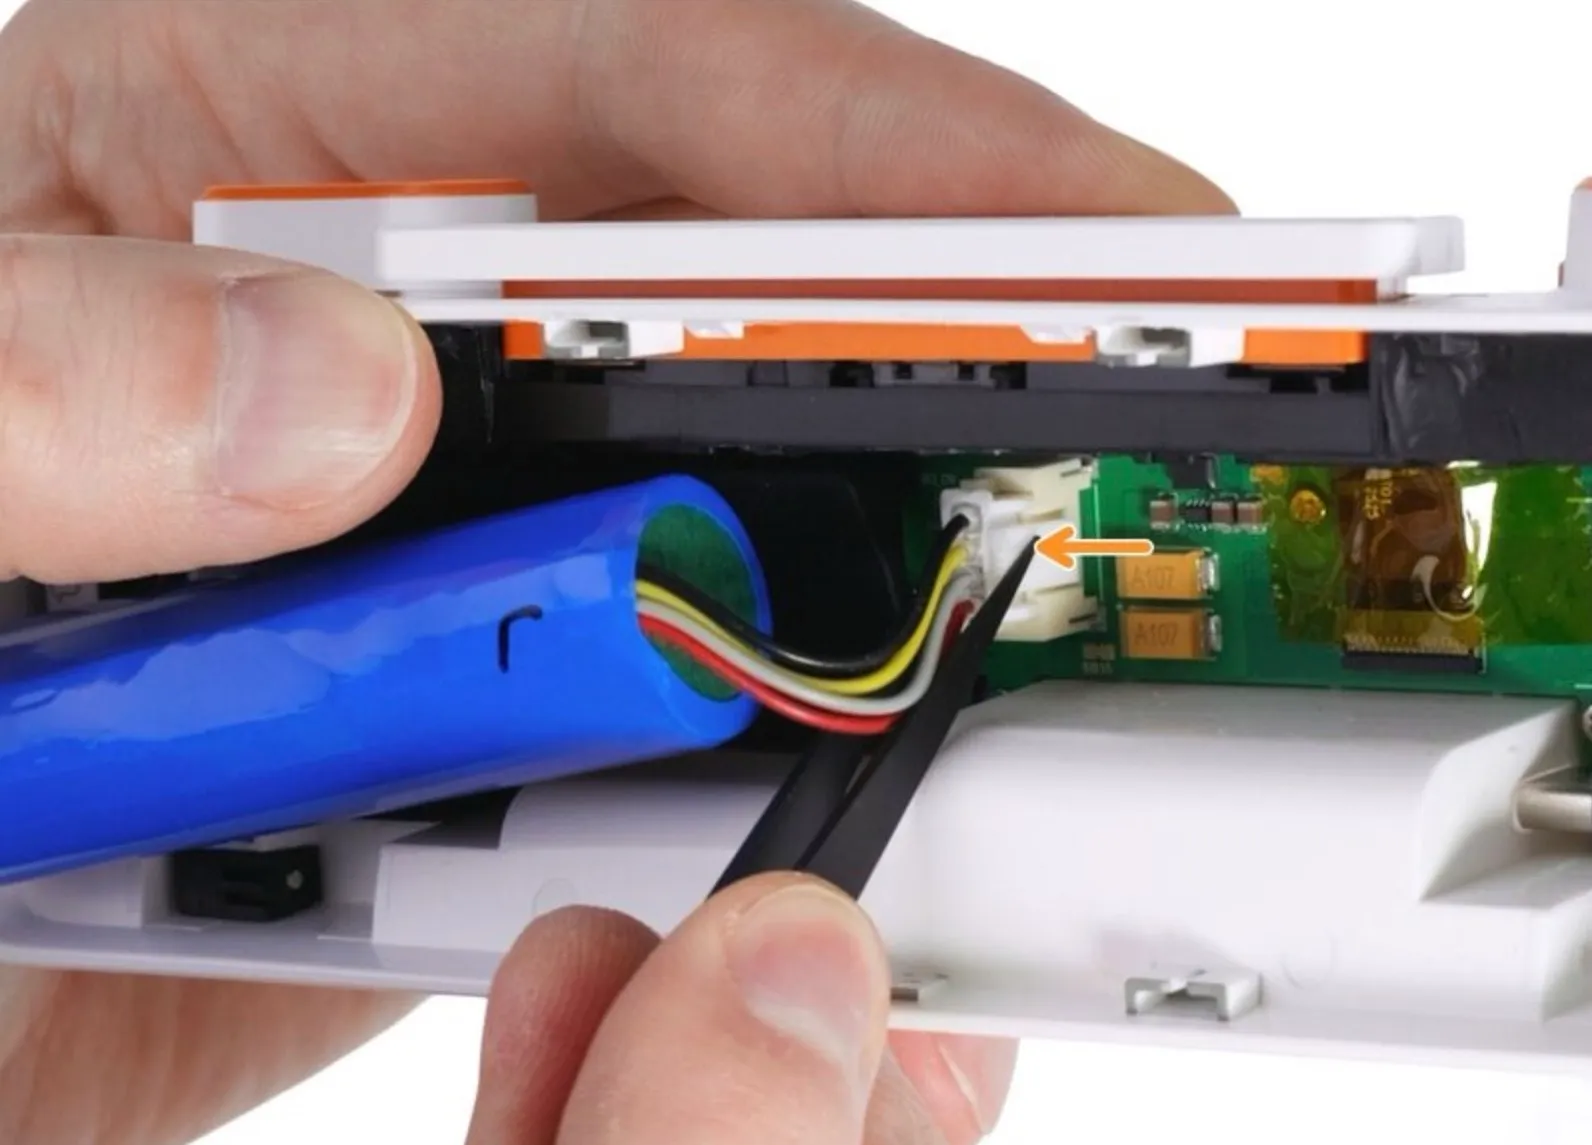
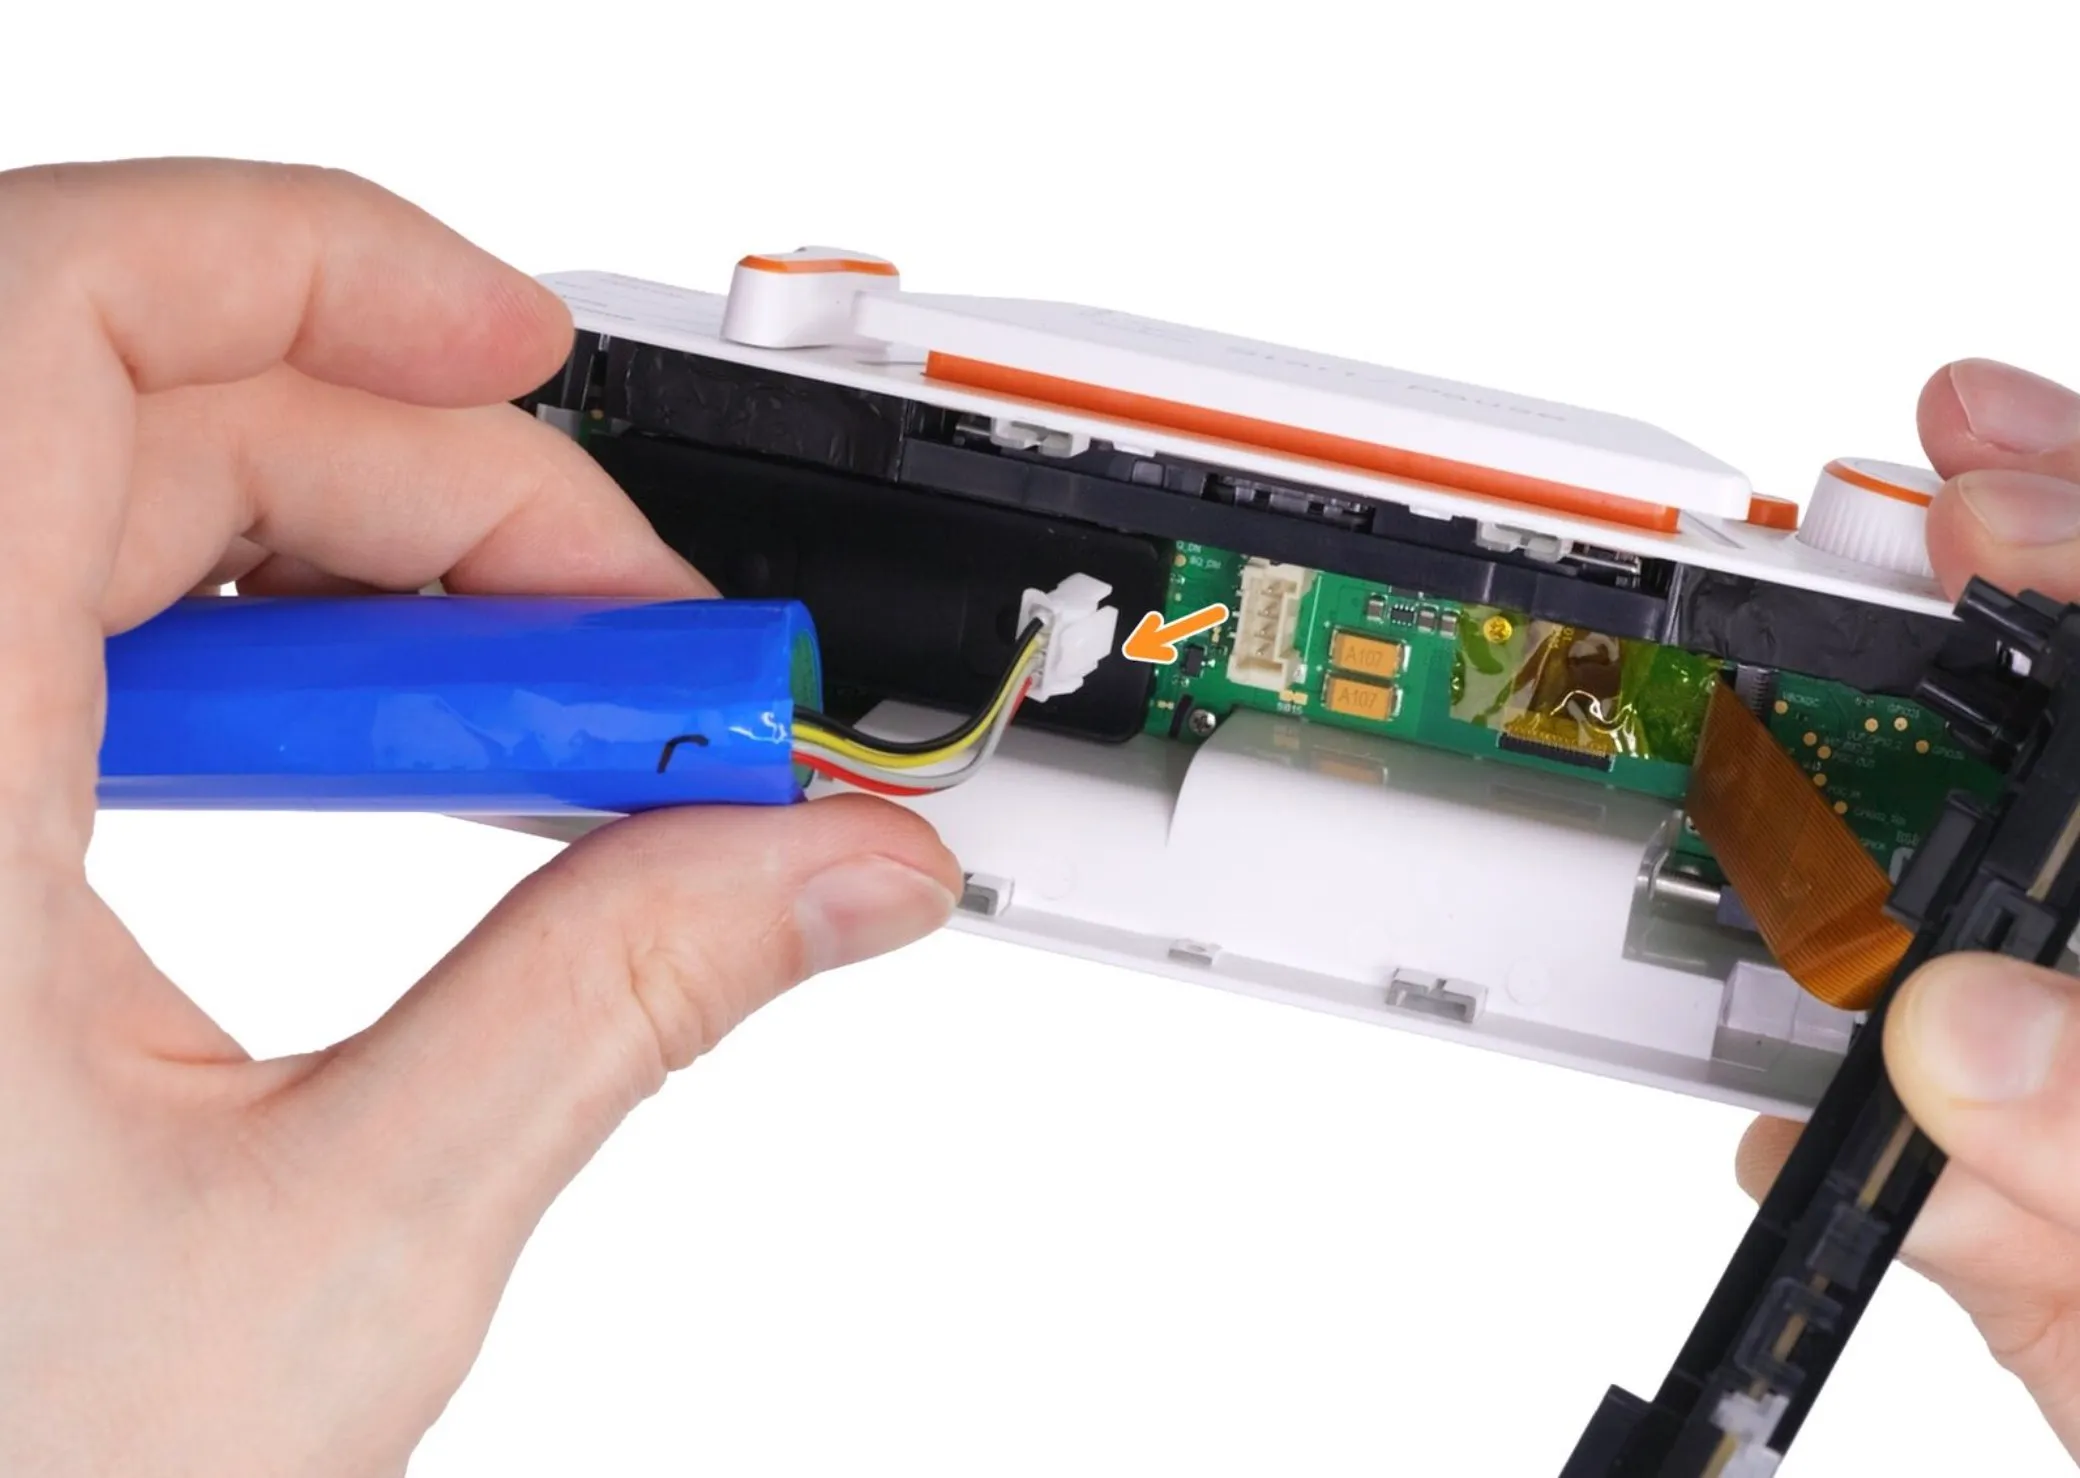
Pull the battery connector to disconnect it from the PCB.